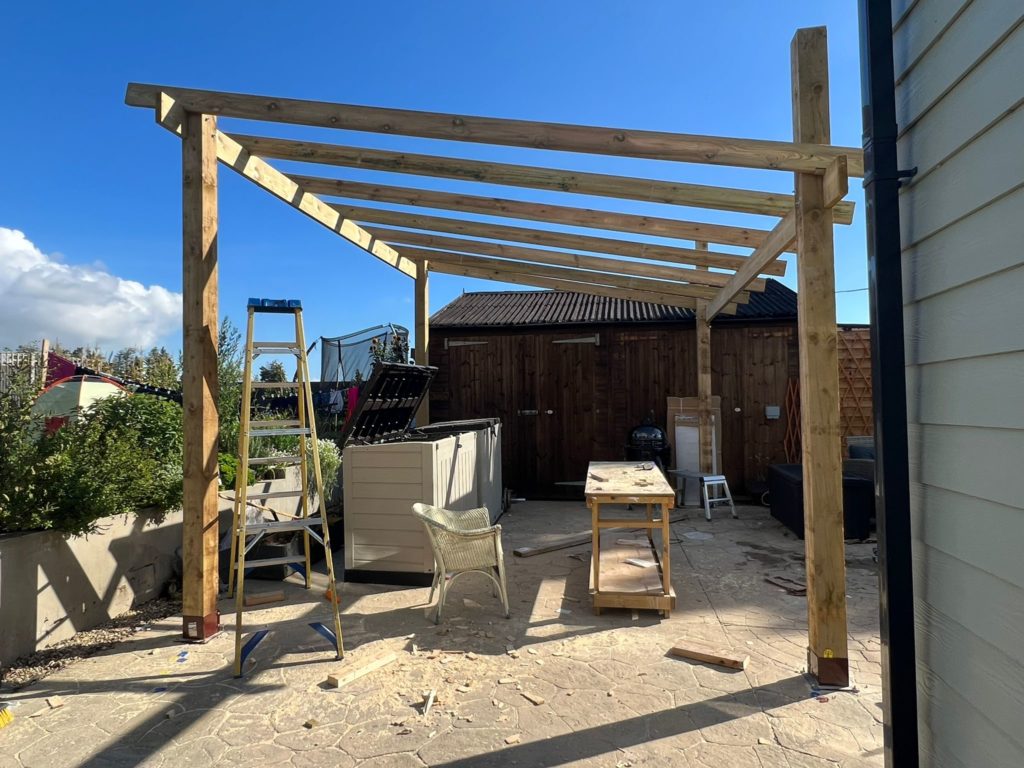
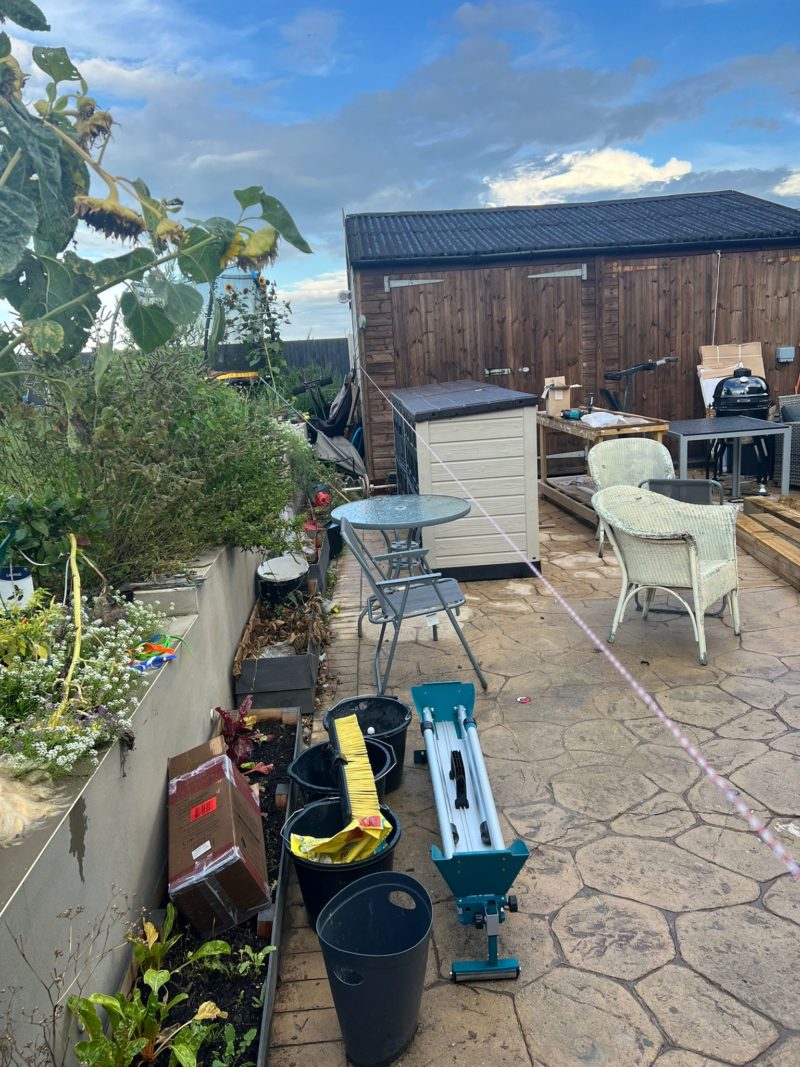
This weekend I started thinking about ways to install a solar panel system. Making a pergola South facing is pretty much the ideal solution. In my case I am making the pergola extra large and heavy duty to accommodate the solar panels and hopefully park and charge an electric vehicle underneath. This ruled out pergola kits that are fine for your everyday garden (you may find some use from these so I’ve linked them) – but I need much more heavy duty – almost structural to take the weight of solar panels which are 20kg each and the carports are either too flimsy or cost a fortune – the wood I used cost £500 so a bargain by today’s standards – more on the timber in the what you need to make a heavy duty pergola section. Here’s a look at the finished product to get you enthusiastic 🙂
You can see on the featured image how my pergola came out. There was a fair bit to plan and consider when making a pergola from scratch (especially when it’s load bearing) so the best place to start is the thought process but here is a complete rundown of what you want to do for a successful install:
Planning your wooden pergola
What you need to make a heavy duty pergola from scratch
Measure out your site with a string line
Install your fence post shoes or dig out for your posts
Get a level on your posts
Notch out your posts for your main support beams
Install your posts
Install your beams
Install your rafters
Planning your wooden pergola
So with a concrete base to work with I had two choices to make. Cut through the concrete and drop the posts into the ground, or use fence post shoes. If you’re wondering what a fence post shoe is, here’s a picture from my install – it’s pretty obvious how this works now that you can see the finished setup:
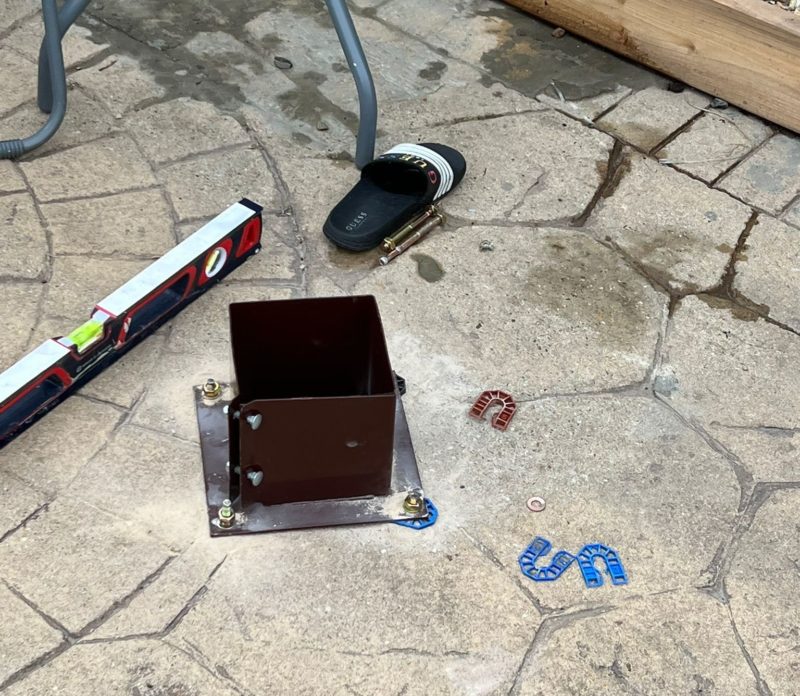
Without question digging your posts into the ground is stronger. Much stronger in fact, and arguably would have been the better job for me so I would advise you to do so if you don’t plan to have any support for your pergola. If however like me you don’t fancy drilling through 200mm concrete (yes mine was insanely thick when I cut sections out before – then you will need braces. This can be at the base and/or run at angles (much like roof trusses). This will be a necessity if using fence post shoes.
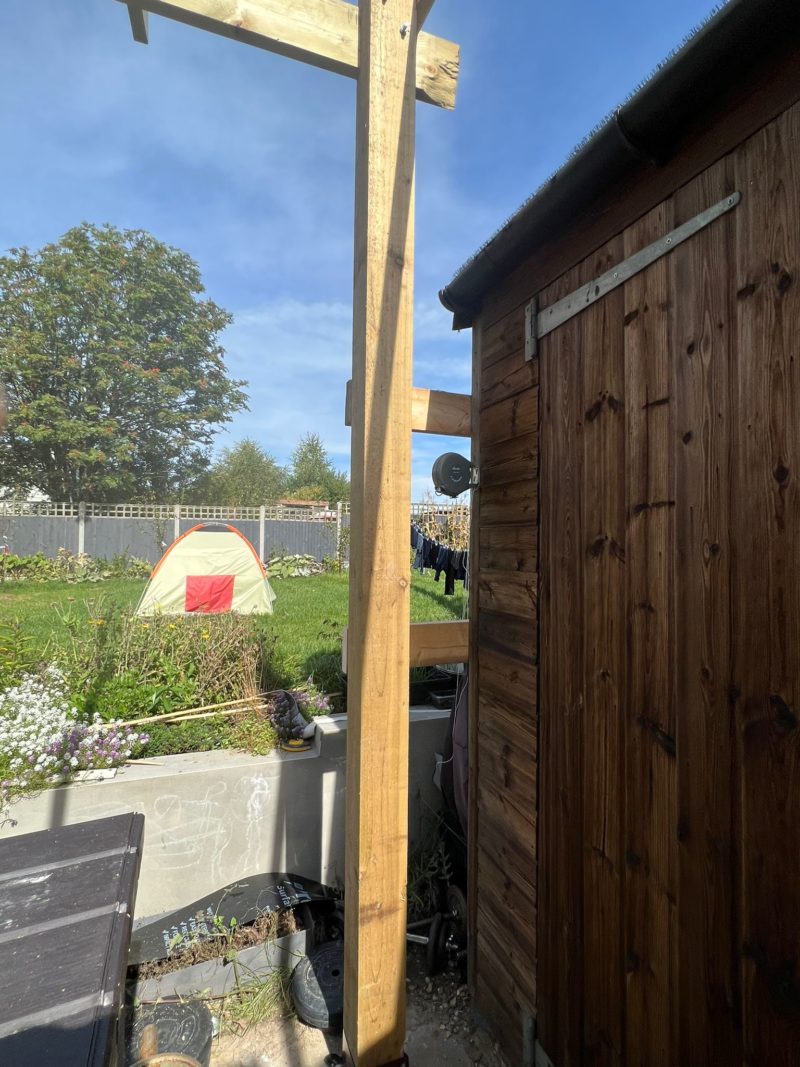
But I have the shed right next to this pergola and I planned to brace the pergola from the shed – it is possible in time I will put a roof on this pergola and extend my workshop but for now I will just place a couple of solid 6 by 2 braces off the main workshop – aesthetically this is far from perfect but in time I will build them together I expect. As I’ve now built this pergola let’s fast forward to that picture so you can benefit and understand the temporary bracing:
The point of the explanation is really you need to sure up your pergola if it’s big like the one I am building and not ground concreted in posts – so let’s talk size to add perspective to the advice here:
Size/height/roof angle of your pergola – what size timbers?
What size pergola you want will largely dictate what size timbers to use – as I already mentioned pergola kits are fine for the standard smaller stuff and being 4 by 2 over 2.4m or so you could fit 4 solar panels without worry – I’m fitting 9 or 12 (yet undecided) so need much more heavy duty. So I will run through my install which will give you a good feel. My pergola has a 15 degree pitch. The reason for this is I want to harvest the solar rays when I add my solar panels later this week – my portable solar panel tests showed me this angle is pretty much the ideal minimum – there’s a load of junk online stating up to 30 degrees and probably theres an edge in efficiency – but that’s my personal tested proven minimum angle 🙂
You may want your pergola to be flat then add kits to hold your panels at angle – this is just as easy but requires a bit more material overall. That’s absolutely fine and following this guide minus cutting the posts level is about the only difference – you can always email me for a few short pointers.
My pergola is 5.5m by 4.5m. I decided on 150mm square posts. I decided the main tie beams would be 8 by 2 and the rafters 6 by 2. My solar panels weigh about 10kg per m2. If you look at timber span tables you’ll quickly see I am well within the bounds of safety in terms of weight load. Armed with this timber weight span table you can make a fool proof calculation based on your personal size too now. So with the timber sizes worked out let’s take a look at everything you need:
What you need to make a heavy duty pergola from scratch
With regards to materials and tools I will break them down into their own sections to make the article easier to follow – obviously you’ll be able to adapt this list to your own needs but it’s a great starting point and everything in here is designed to make life as easy as possible. So, depending on how you go about the install and the size of your pergola this may vary but here is what I used:
Materials I used:
- 150mm posts – you may want 100mm posts if it’s a smaller pergola
- 200mm by 50mm for the main beams
- 150mm by 50mm for the roof rafters – these also acted as ties
- 200mm Spectre screws
- 150mm fence post shoes
- M10 anchor bolts for the fence post shoes – like the ones I used when I added a fence on top of a wall
- 200mm M12 coach bolts – to secure the main beams to the fence posts
Tools I used:
- Circular saw
- Cordless Jigsaw
- Handsaw
- Socket set
- Laser level – I use the DeWalt DW088CG-XJ Laser Level
- String line
- Impact driver
- Cordless drill
- SDS drill – you may need a concrete breaker
- Cordless planer
- Set square
- Bevel
- Adjustable spanner
- Step ladders
- Hop up
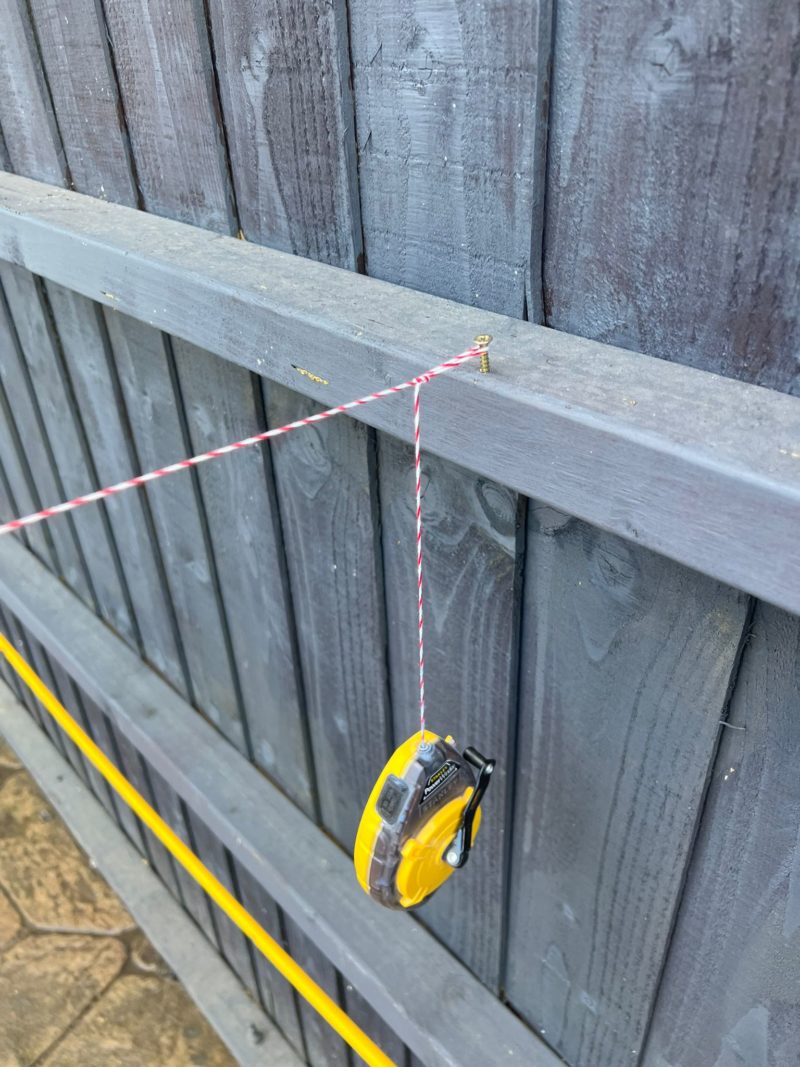
Measure out your site with a string line
Arguably the hardest part of your pergola is setting out your site. In my case I anticipate I’ll extend my workshop so I’m running my string line off the edge of the workshop and then setting the posts back 25mm in case I ever add shiplap to the pergola and enclose it. A string line makes all this easy. If you don’t have an object to hang your line from then knock in some stakes to the ground. Here’s a look at running a string line:
Attaching your string line taunt is easy – just set yourself up with some screws and tie loops pulling your string tight – place them on and you’ve got your lines:
Install your fence post shoes or dig out for your posts
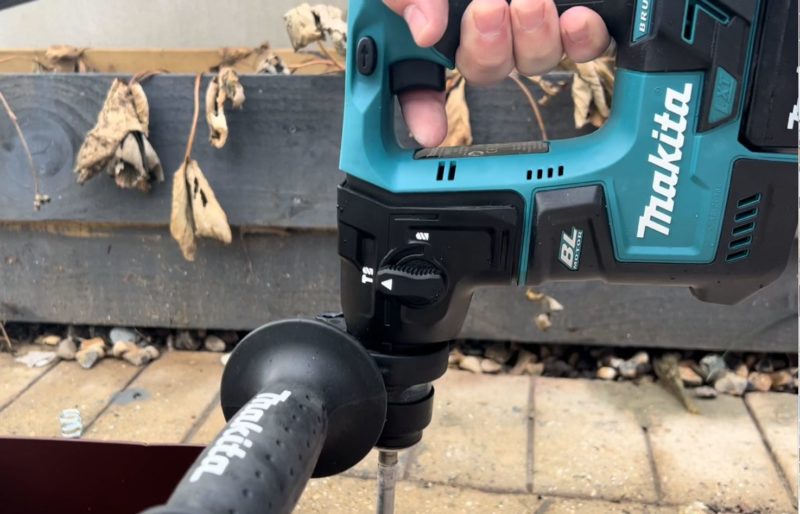
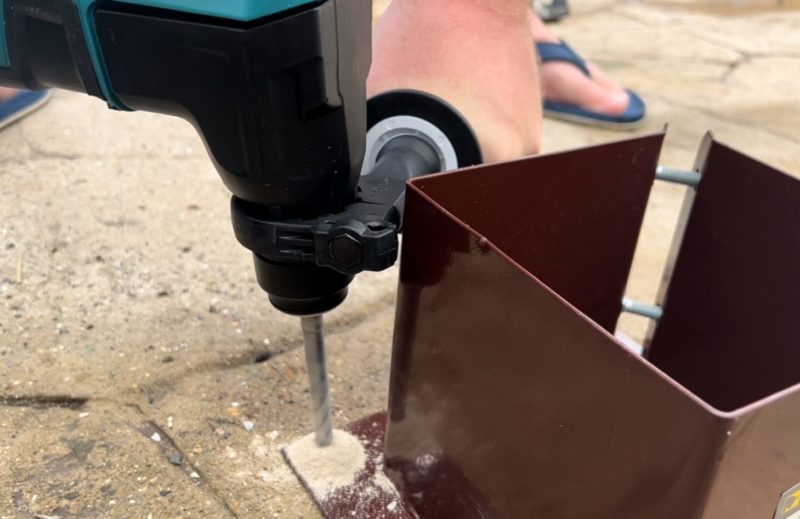
If you’re installing into concrete you need an SDS drill – a proper one. If it’s sand cement without stone you’ll probably be able to use a cordless drill with a hammer function like my trusty Makita 485- DHPZ COMBI DRILL. In my case I am going through concrete that I know to be extremely thick (up to 200mm in some places) but also it’s an extremely strong mix of concrete too. I know this from concrete testing and years of experience 🙂
So, I am installing my fence post shoes with with M10 anchor bolts. You can find the comprehensive list of what materials I used and what for in the section linked. The reason I picked M10 (which basically means 10mm wide thread) is because that is the widest I could get through the shoe without drilling them – I would have probably gone for M12 if my shoe could take them. Here’s a look at my SDS drill – of course it’s Makita and it was an absolute bargain:
Firstly I drill through the feet carefully not to disturb the positions we made from the previous string line set out. If it moves a couple of mm I am not losing sleep. 5mm tolerance or so over 5.4m by 4.4m is absolutely fine to me. Especially on my own home 🙂 So carefully as you can drill your post shoes in situ. Here’s a look at that:
With the holes drilled you want to install your anchors. You’ll need a socket set to tighten these up. At this point in time I highly recommend trying to level your post shoes. I use high quality packers designed to take incredible weight, you could put a house on these packers. Here’s a look at the packers assisting me level the post shoes:
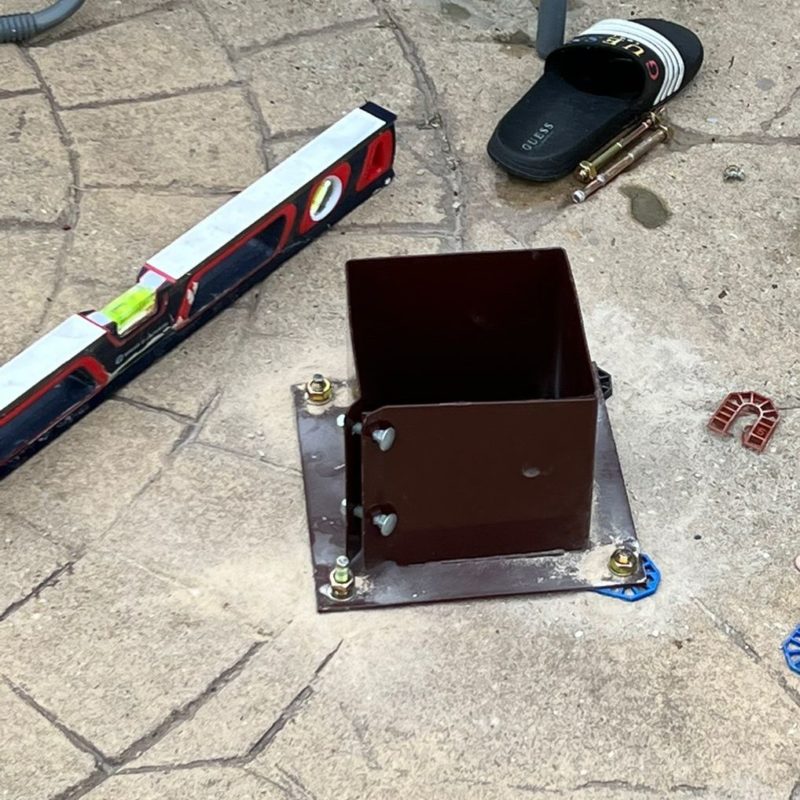
Sometimes the anchor thread comes a little further out than you’d like. As you tighten up, the flange digs into the concrete making it impossible to pull out. Sometimes the flange struggles to get a bite. So you may find a socket not long enough and you’ll then need to resort to an adjustable spanner – or in the case of these M10 anchors – a 17mm spanner works too 🙂
If you are installing the posts into the ground. It’s all very easy. You simply dig out as if you were installing a fence post. I won’t go any further than that as there is little point me explaining the same process. In fact I even did a how to fit a wooden fence post – either resource shows you exactly what to do 🙂 The only thing I would add to this is I would have dug out quite wide and thrown at least 3 bags of postcrete into each post hole for extra durability and strength.
Get a level on your posts
Temporarily drop your posts in to have a look at the heights. You want to do this not in terms of left to right, but in fact up to down. If your ground is not level (as mine isn’t – it slopes away) then you still want to make sure that your roof is level. You do this with a laser level easiest. Now for once I actually prefer Dewalt over Makita – I like the DeWalt DW088CG-XJ Laser Level.
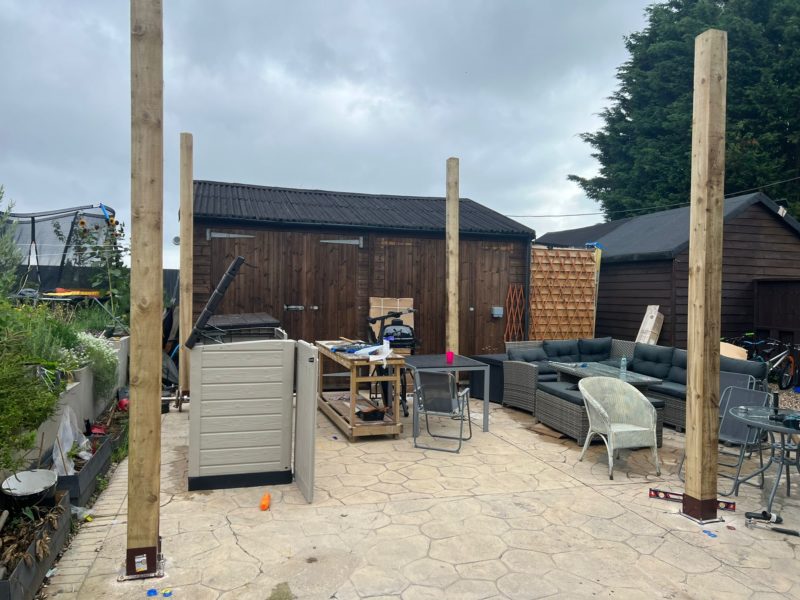
Pick your highest post, take a note of the position and then mark this level all over all the posts. From here you can calculate easily what is going to make your roof level. So if you look at my posts you can see the ground runs away – this is obviously fast forwarding but shows what I mean clearly:
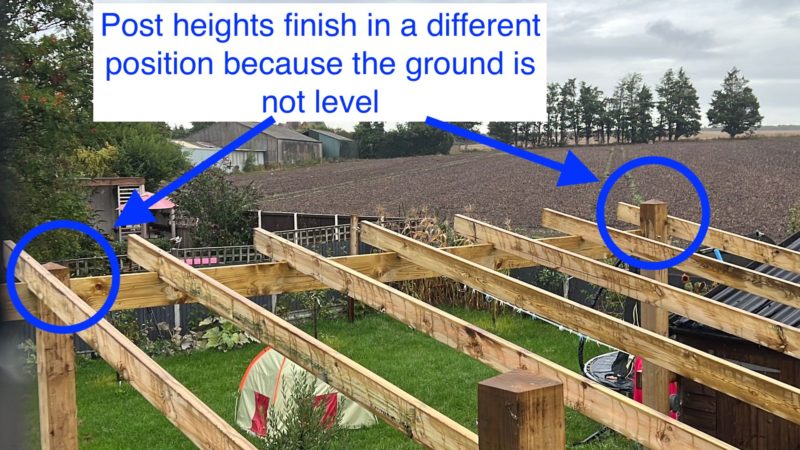
The result of this is the roof is level – which of course is important to me as I am installing solar and want it to look nice and flush. Once you have your levels you can then take out your posts, then measure to start notching out your main beam.
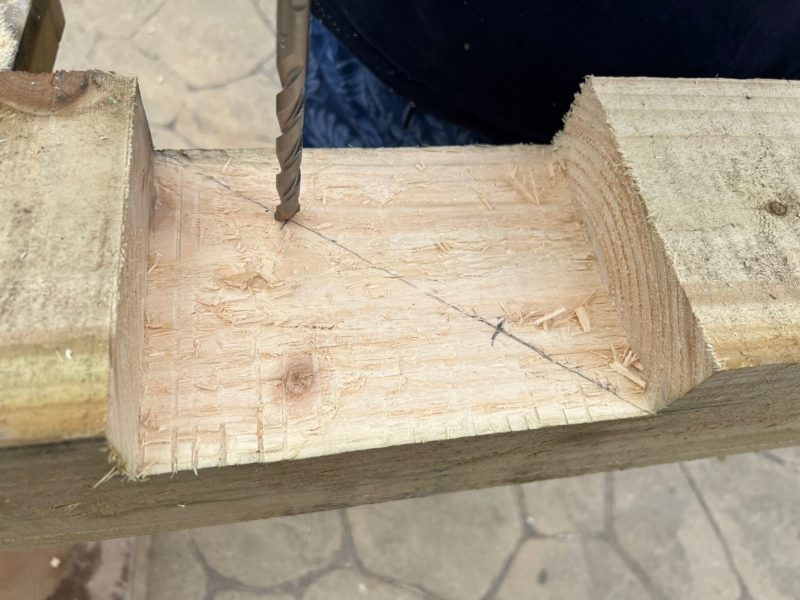
Notch out your posts for your main support beams
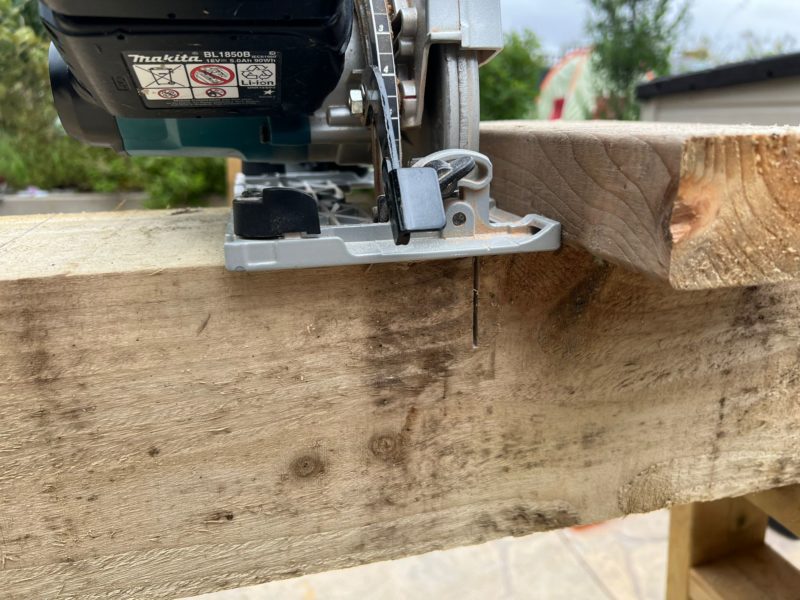
Once you’ve got your levels you can now mark out for your beams. Notching like this is much much stronger than simply cross bolting your post and beam – remembering I plan for this install to last 20 years means it needs doing right. Here’s a look at the beams marked out:
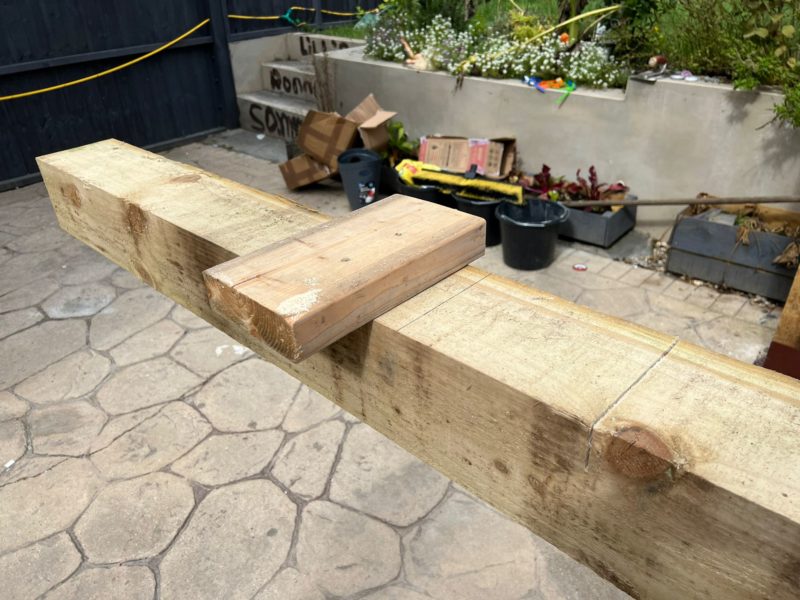
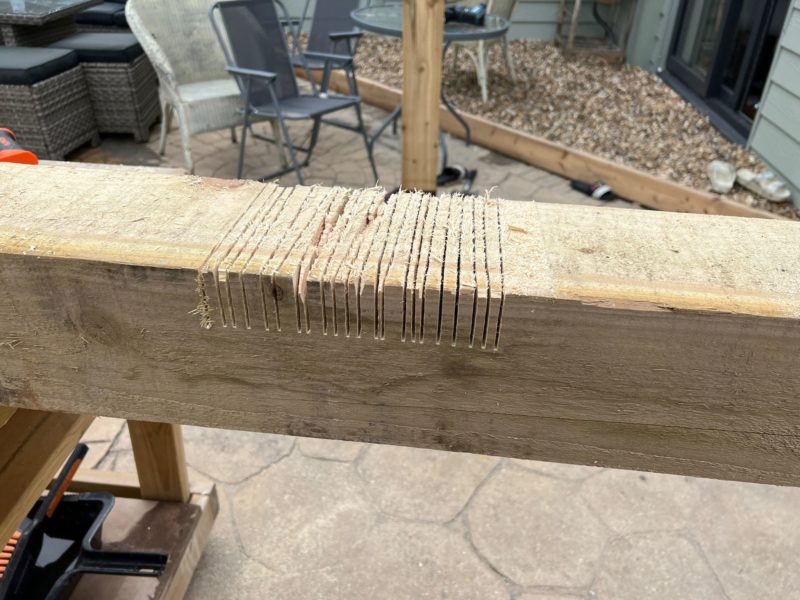
You’ll notice I have screw on a piece of wood – this is my guide. The best way to notch out a post neatly is with a circular saw. Making a series of cuts makes chiselling out the remaining wood neatly a great deal easier:
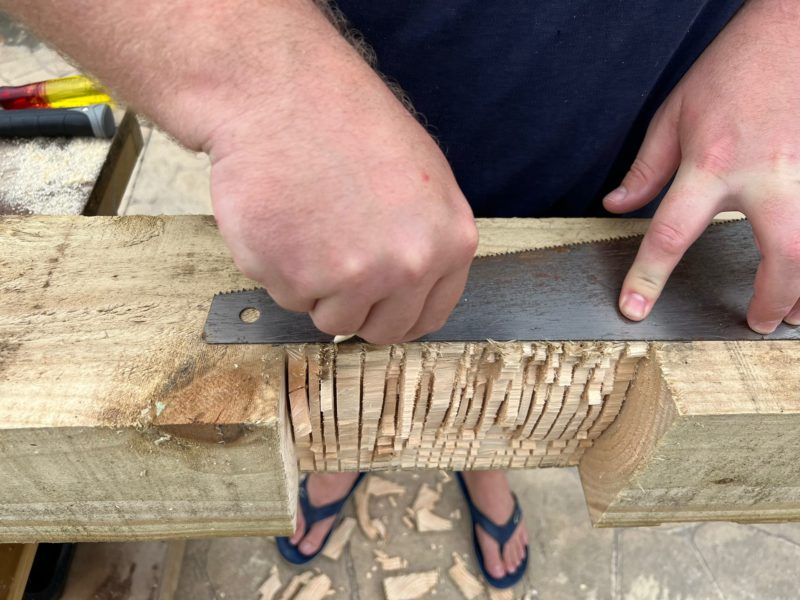
With the outside cuts made you can now free hand run back and forth removing as much timber as you like. You can also use a cross cut but I didn’t fancy setting up for it – remember these posts weigh a good 40-50kg this size and lugging them about isn’t exactly easy, much less moving it for each cross cut! So here’s a look at the timber cut out ready for a hammer and chisel to tidy up – you can do this comfortably on a workbench or hop up:
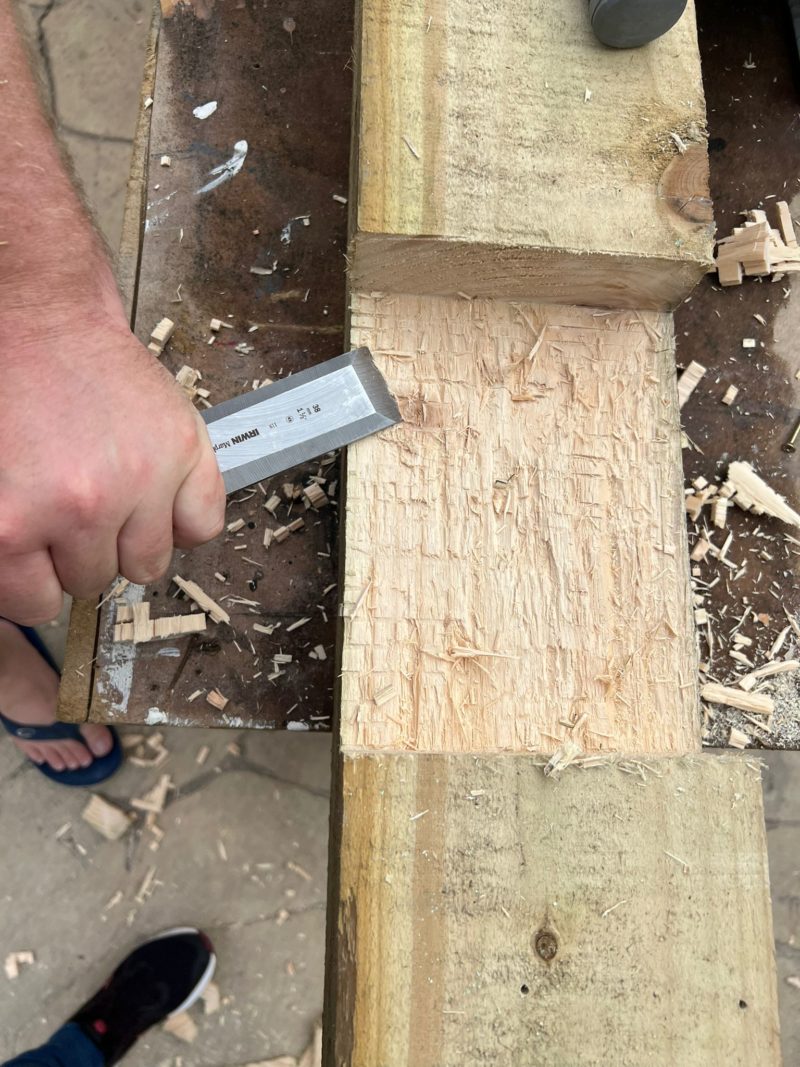
With the cuts made take your chisel and carefully remove the section. If you look above using a circular saw set specifically to the right depth means you can follow that neat line. Here’s a look at me removing the main section first:
From here I slowly and carefully pair back the timber nice and flush – neat and tidy. Take your time as this is one of the most important jobs to ensure the structural integrity of your pergola. Here’s a look at me steadily pairing out and neatening up my cut out section:
The last thing I do is pre-drill for the coach bolts. This saves doing it up in the air – you’ll still have to drill your beam but getting through 150mm of wood with a 12mm bit is much better done on the ground – if not you’ll be doing it up your step ladders. Here’s a look at me drilling those coach bolt holes:
With your holes drilled it’s time to get the posts in.
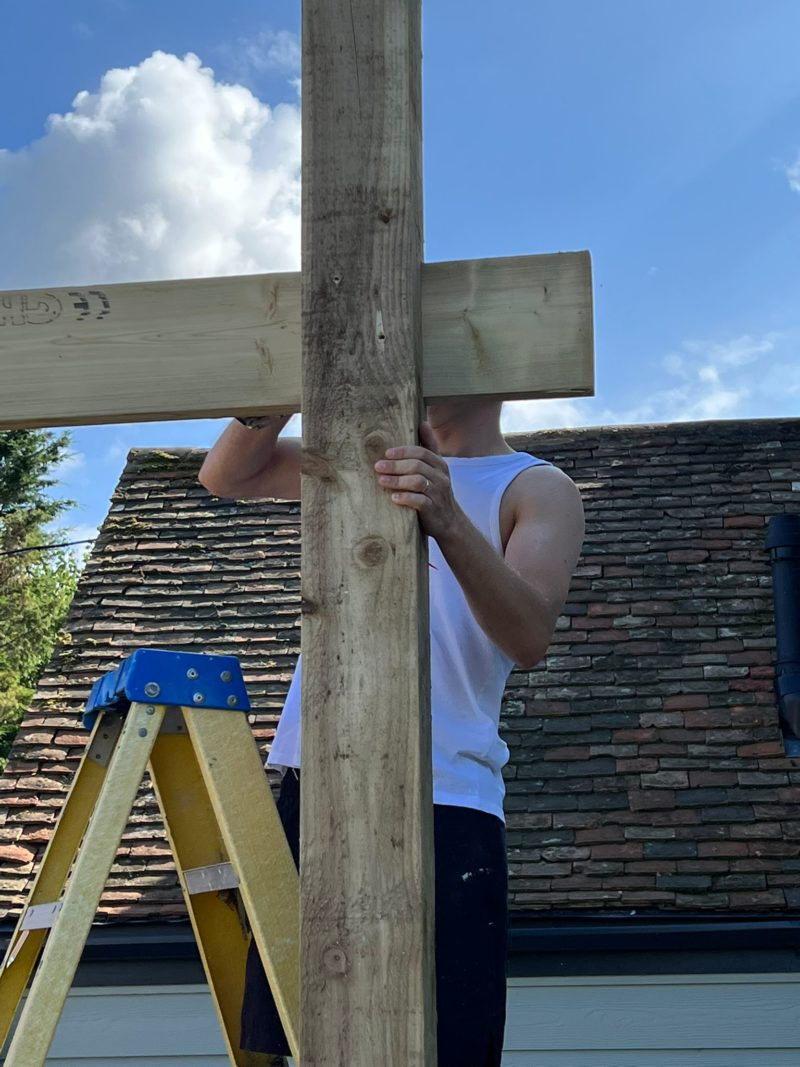
Install your posts
Now that you’ve notched out your posts, get them lifted back in, level them off, and tighten them in the shoe. This is all very easy at this point as you’ve already offered in your beams and are no longer worried about levels. If you’re dropping your beams in the ground you will now have much to do still in terms of levelling. But for those of us using post shoes it’s all good 🙂 I prefer to have my beam on the outside of the pergola. So I fit the notches to the outside. Here’s a look at that:

Now it’s time to install your cross beams.
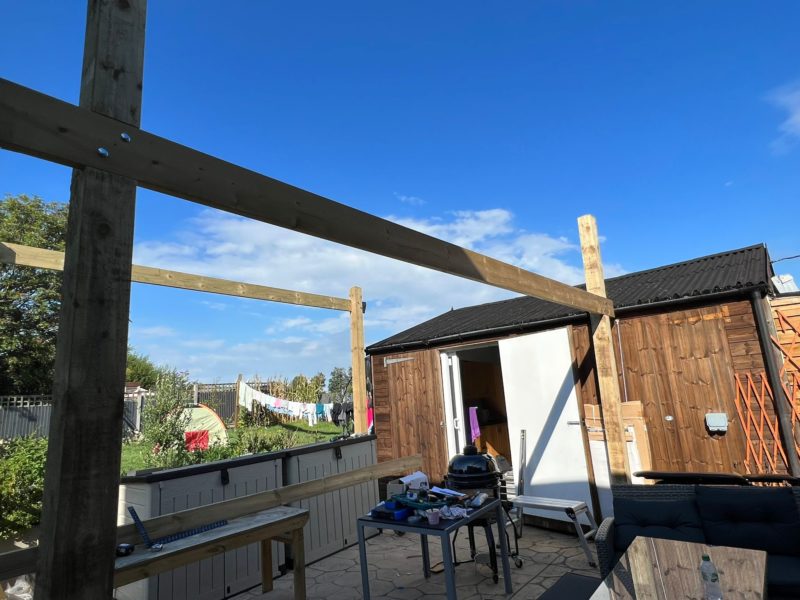
Install your cross beams
Lifting up your beams may be a little weighty – this is why a neat notched out section helps – normally they will stay put with a single screw each side just to hold them whilst you get your beams fitted with coach bolts.
Use a socket set to tighten them up – if you get it right they look neat and tidy. Here’s a look with the coach bolts tightened up:

I could go into further detail about how I drilled the beam through the pre drilled holes of the post ( I guess I just did 😀 ) but the truth is if you’ve reached this point in the tutorial I’d be insulting your intelligence. Here’s a look at the beams and posts ready to take the rafters:
Install your rafters
Because I have run the roof at an angle I need to climb up and put a tape over both beams to workout for where I notch the rafters. Obviously I square up the posts first to get a perfect reading. A great tip is to put out all the notches in one go – this means you’ll get them in exactly the same place too! I use a circular saw to make these cuts then finish off with a chisel. Here’s a look at that:
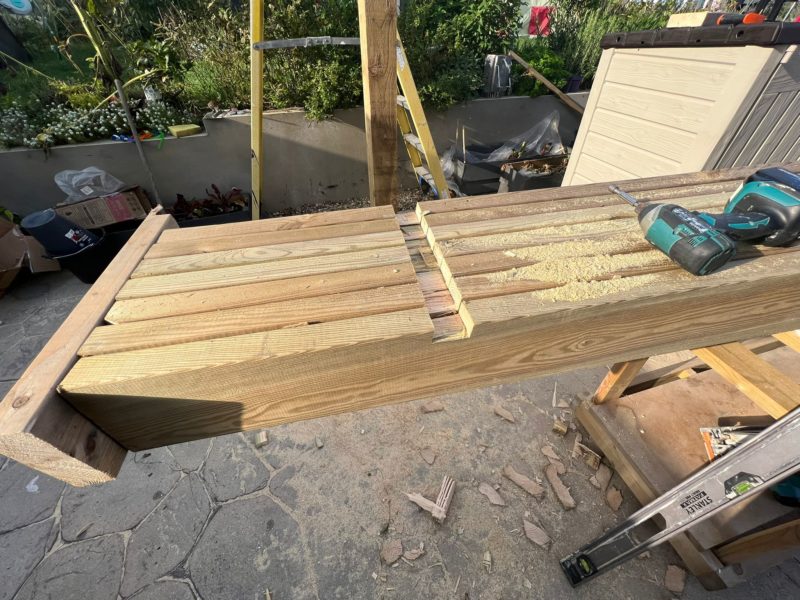
Now calculate your spacings equally and then install with Spectre screws. I just use one straight in the top. This make life easy and keeps everything string – they are a bit pricey but worth it. Here’s a look at us installing the rafters:
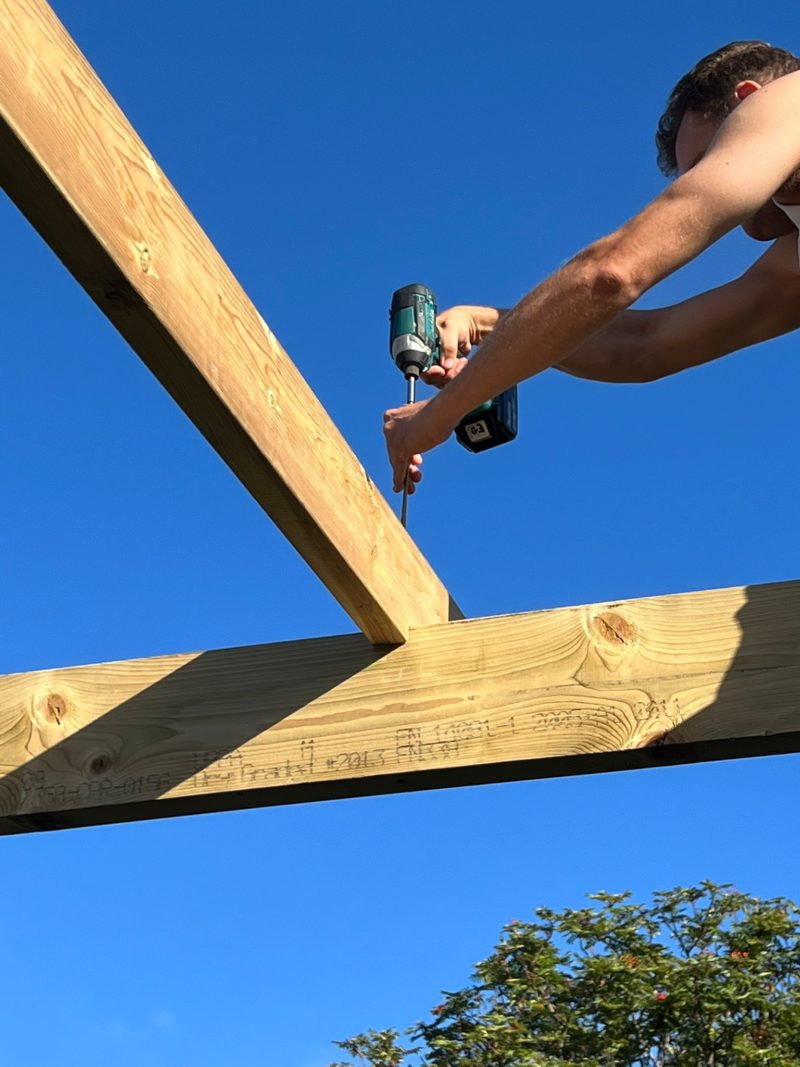
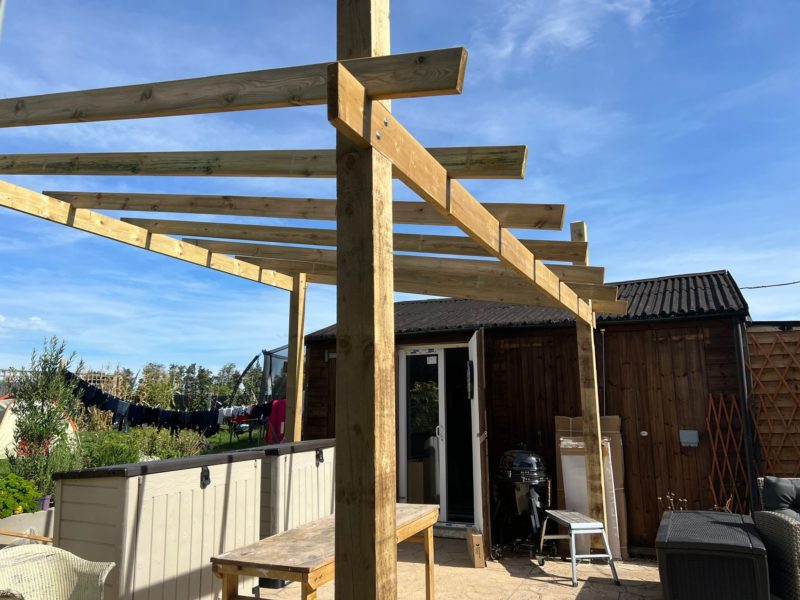
You’ll notice the notch is a nice tight fit. This helps when leaning and working on the roof as provides extra stability. Then it’s time to sit back and admire your completed pergola. In my case I will be installing solar shortly and I’ll probably make a write up of that too:
If you decide to paint your pergola, as it’s rough wood and like a fence I would recommend fence paint – be sure to use a fence sprayer for an even finish and to get the job done quick time. Any question – pop me an email cheers.
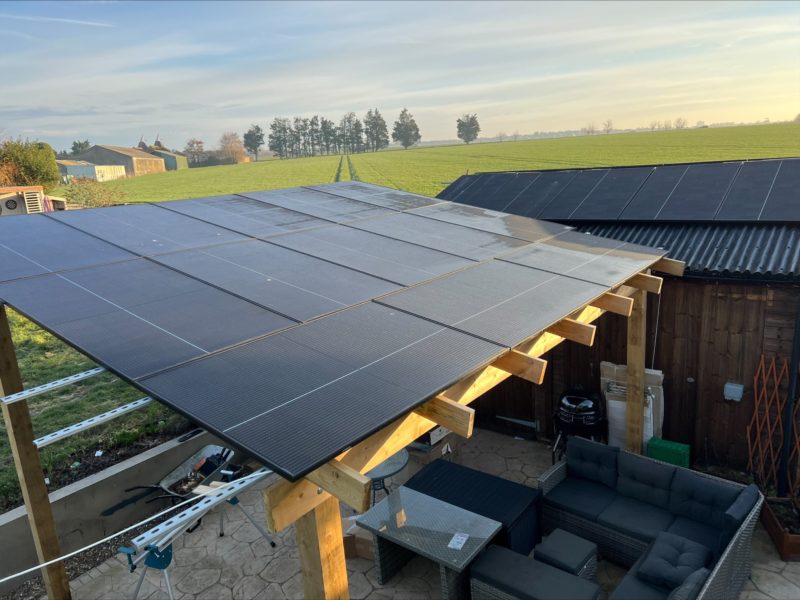
Update with solar included
Here’s some pictures of the solar on the pergola – I used simple track from an electrical wholesaler rather than PV track which is triple the price:
With the dimensions I went for, I could fit 11 400Watt panels, so nearly a whopping 5kW system!
As you can see in the background I fitted the remaining panels on the shed – 5 panels either side and that makes this nearly 10kW system (I’ve got a couple of panels elsewhere topping this up to 10 🙂 ).
Terry, interesting article on the solar pergola & timely as I’m thinking along these lines myself. Did you get around to fitting the PV panels? I can’t find a follow-up article.
What type of wood did you use? I was pondering oak for strength (I’m thinking of 16 panels) & weather resistance.
Hi Mike,
Yes I installed 10 kW and I have to say it’s going to be great not paying for fuel this year. I’ve added pictures in the update solar section.
No need for Oak on the sizes I made – this is treated Pine and the big thing is the column width – 150mm rather than slim 100mm. From memory the timber was about £500-£600.
I’d recommend finding out the size of your panels before deciding on the size of pergola.
Regards
Terry
Terry, terrific article thanks, but please could you say what rail (Din rail?) you used and how you attached the panels to them? Don
Hi Terry
Interesting article. I’ve installed the oak pillars for a lean to pergola which are 100mm x 100mm.
The wall mounting and rafters will be 150mm x 50mm.
The size is 3.7m from wall to posts, and around 5m wide. There are three 100mm x 100mm posts.
Just today I’ve been thinking of installing solar panels on top of this in future, but I have two quetsions:
1. are you able to comment on whether this will structure will be strong enough? Will this be able to bear the weight of solar panels?
2. Do you know how I’d be able to make the panels so that the area beneath the pergola is waterproof? i.e. so we can sit under it in the rain without getting wet?
Hi Terry
Great article, thanks – pretty much what I’m planning. One question though about the rails – you have a mix of portrait & landscape panels. How are the rails oriented and fixed to the rafters? Any chance of posting (or emailing me) a photo from underneath?
David