Written by Terry Smith
Our site is reader supported so when you click a link to Amazon we may earn an affiliate commission.
UK’s best polytunnels are heavy duty and wind resistant for allotments
This article was last updated on May 26th, 2022 at 7:42 am
Today, we are entering the magical world of the polytunnel; a tunnel which, once you go down you will never turn back 😀 Sorry, I couldn’t help myself. If you have found your way to this blog, it is highly likely that you are an avid gardener. Am I right? Even if my assumption somewhat misses the mark, I bet you at least dabble with gardening – after all, reports have shown that over 27 million people in the UK enjoy a spot of gardening, so we are a bit of a green-thumbed nation. However, with a painfully unpredictable weather system (which can now somewhat be accurately predicted with the latest weather stations), and an increasingly serious overpopulation problem leading to reduced land space, gardening isn’t exactly the walk in the park that Alan Titchmarsh may lead you to believe that it is? However, if you’re fortunate enough to have an allotment, at some point you’ll start thinking polytunnel or perhaps a similar mini greenhouse/cold frame – the cheap types with the same plastic covers – I did and I have tested loads of the best polytunnels now! And the BIRCHTREE I have bought twice now, one the larger, and I’ve tested the smaller 2.5m polytunnel too – both equally as good:
And what with the laws about glazing down the allotment now, these are in hot demand seeing as they cost much less money than a greenhouse with polycarbonate glazing.
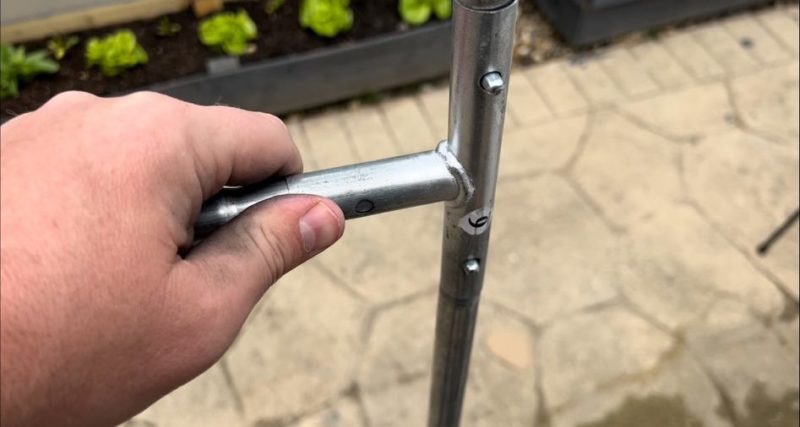
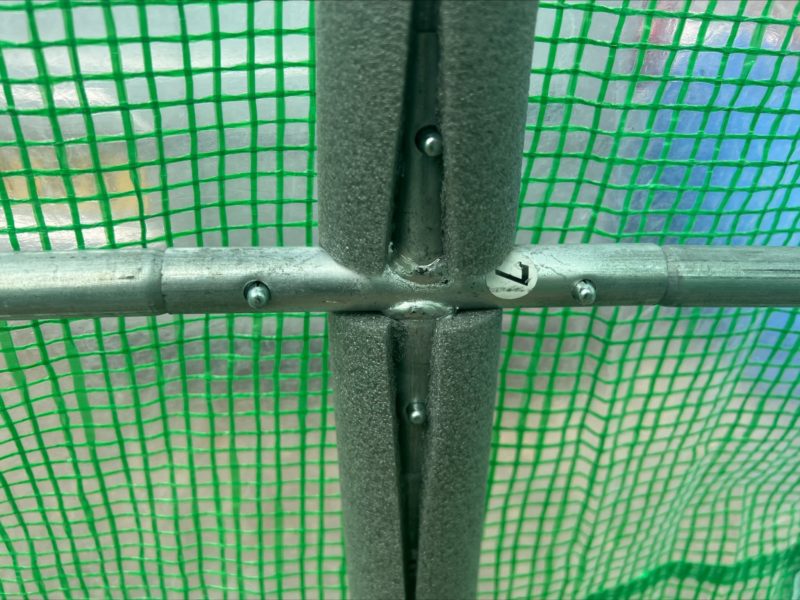
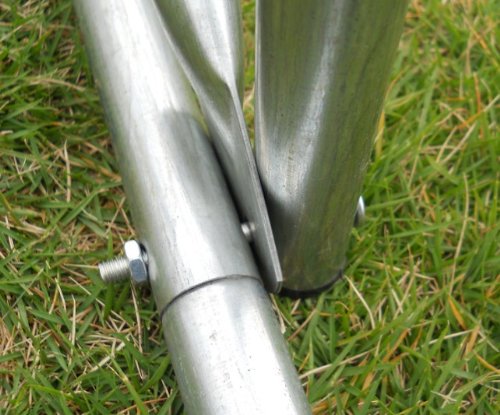
PRO TIP: After testing and using so many polytunnels, I now always pick a polytunnel that has snap together rivets rather than nuts and bolts so takes fifteen minutes to assemble! The frames are comparably strong and take a fraction of the time to install:
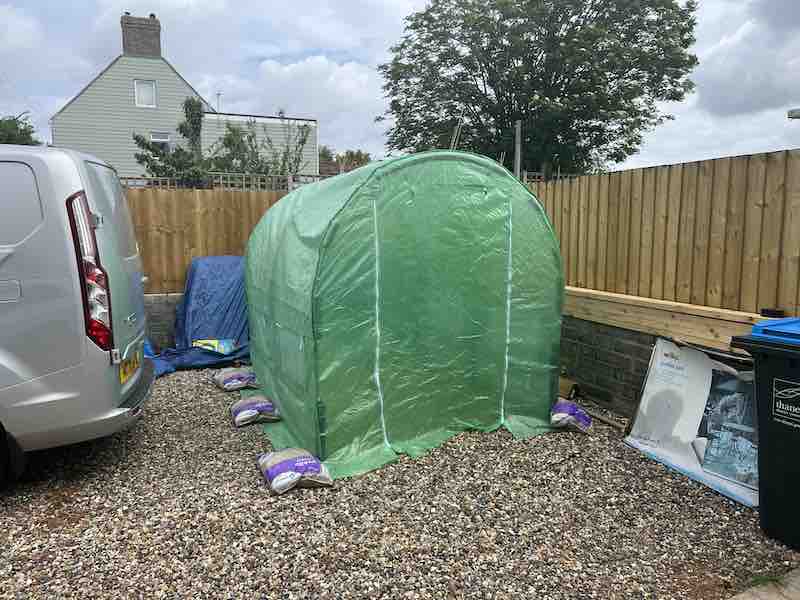
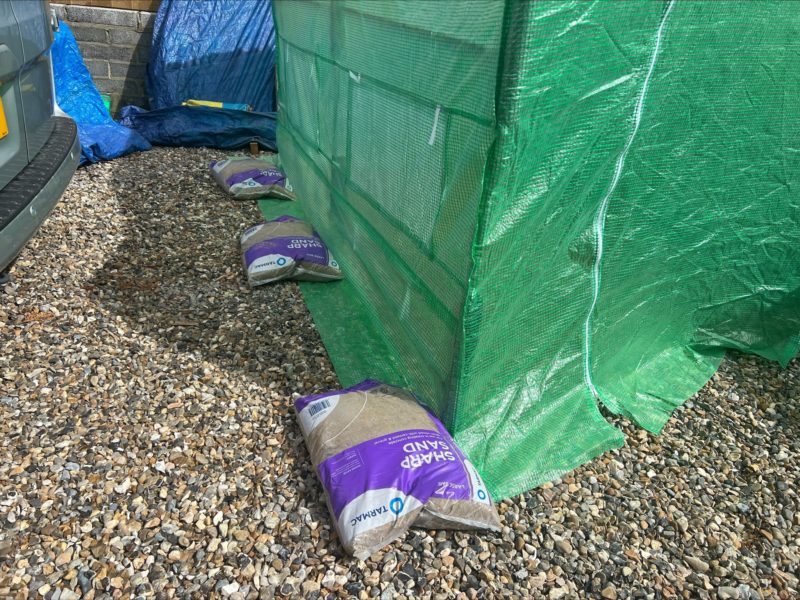
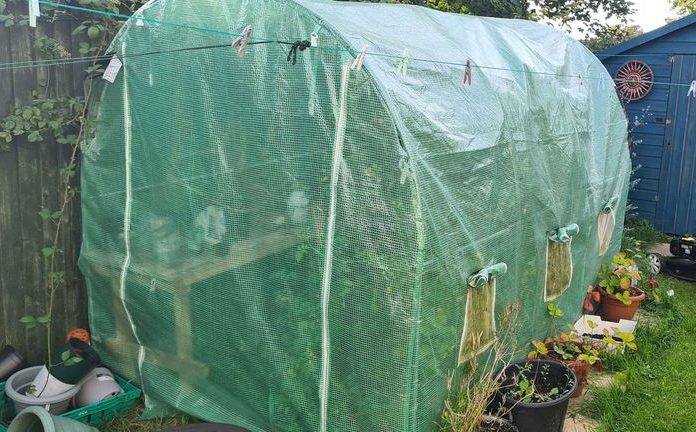
I then use sash weights duct taped to the corners to hold down my polytunnel – this method is very easy please see the picture below and I have tried and tested it a dozen times in conjunction with sand bags. This gives me the ability to easily re-site my polytunnel which is not so easy if you use earth over the polytunnel cover skirt:
Alright, with that key info in mind, let’s take a look at the best polytunnel overview:
Best polytunnels: editor picks
Best polytunnel overall: BIRCHTREE 6M(L) x 3M(W) x 2M(H) Polytunnel Greenhouse Pollytunnel
Budget pick: Garden Point Green Polytunnel or the VonHaus Polytunnel Greenhouse
What I’d use down the allotment: Garden Point Green Polytunnel or the BIRCHTREE depending on what size I need.
What I’d use at home: Outsunny Steel Frame Poly Tunnel or the CHRISTOW Grow Tunnel Greenhouse, Garden Polytunnel for non full height and the FeelGoodUK PRO if I need taller
Heavy duty pick: FeelGoodUK PRO Polytunnel Greenhouse
This article will be focussing on using your polytunnel for crop growth, so if that sounds like your kind of thing, then stay tuned. Before jumping straight into the range of polytunnels available to the buyer on the UK market, it is first important to know exactly what you should be looking for in your search for a brand new polytunnel.
What you need to known when buying a polytunnel
There’s so many important considerations with regards to a polytunnel. From the size and quality with which the materials play a large role (can they handle wind – are they heavy duty), all the way through to once you’ve taken the plunge and purchased, how easy the frame and cover are to assemble and fix in position. Is it suited (cheap enough) for an allotment but at the same time strong enough – are they stand alone or do they need extra support? And then what about what direction to site your polytunnel? There’s a load of really important factors so let’s dive in?
Wind resistant
One key factor in all this is how well your chosen polytunnel will stand up to a weather beating. You can’t site a polytunnel out in the open down the allotment and have it take off into the neighbouring plots – wow, how that would go down like a lead ballon and it’s not like we don’t know each other is it! It’s what’s not being said behind your back that hurts – so let’s avoid that one shall we – and this is without interfering with anyone else:
The video should serve as a prudent reminder buying is half the job or less, the other half is having this thing really deep rooted into the ground so here’s some tips to make sure yours doesn’t blow away:
Anchor your polytunnel properly
There area few key factors in ensuring your polytunnel stays still, even in a serious gale there shouldn’t be much reason to fear, though if you’ve already got one you do question at home, I hope the polytunnel is holding up 😀 – still, let’s look at how to fix one in properly and make sure it never blows away – and if it does, your neighbouring polytunnels went long before yours! So here’s some tips to hold polytunnel down here:
Soil and loads of it, bury the entire edge of your cover- they are in fact in most cases designed with extra skirt so you can do so. In the event you have a quality pivot door like the FeelGoodUK PRO make sure you still allow enough space for it to keep swinging
Sand bags – you can use bags of sand and pile them around the edge if you prefer. This is always a better solution if you intend to move your polytunnel at some point in the future. With the Birchwood (smallest 2.5m version). I like to anchor down with sandbags from the local DIY shops. They are cheap and reasonably durable though you could swap up for a woven heavy duty rubble sack if you preferred:
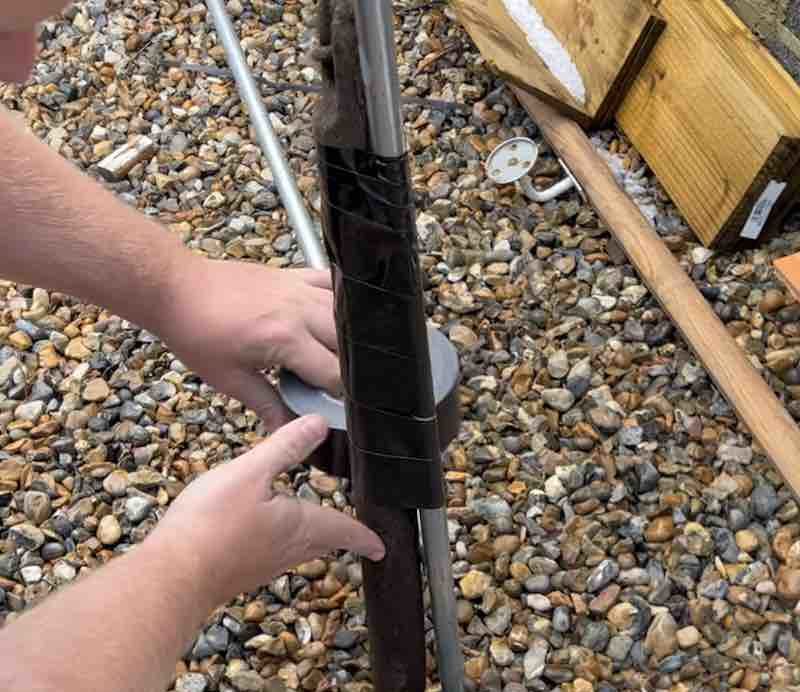
Old sash weights – If you can find a sash window company that does replacements then you can duct tape or tie them to the corner and centre uprights of your frame. This is a remarkably good and cheap way of reducing costs:
If you have a wooden base then screw it to the ground using long planks of wood around the edges. Roll the canvas in the wood, this will create loads of strength, pull the cover taunt reducing the damage on poles in combination with hot spot tape – what’s that you’re wondering? Coming next:
Hot-spot tape
Hot spot tape is going to really reduce tears like this on the corners of the frames in particular that you can see on the Garden Point – don’t panic though it’s far from over. This one is old and has lasted very very well indeed. I couldn’t recommend it to people enough at the price…
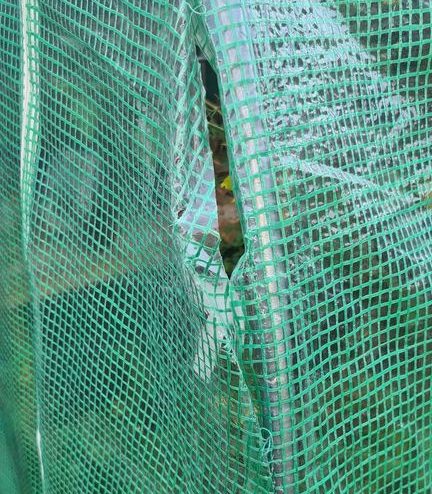
If you want you can re-stitch that, I just don’t think the aesthetics is anything to worry about at all and so duct tape is the solution. The real solution after that though is hot spot tape. What is hot spot tape? Basically it’s a foam tape that reduces the stress between the metal pole and canvas. The softer edge means when the window blows it’s much less likely to become a problem with damaged corners – and that’s where it always starts.
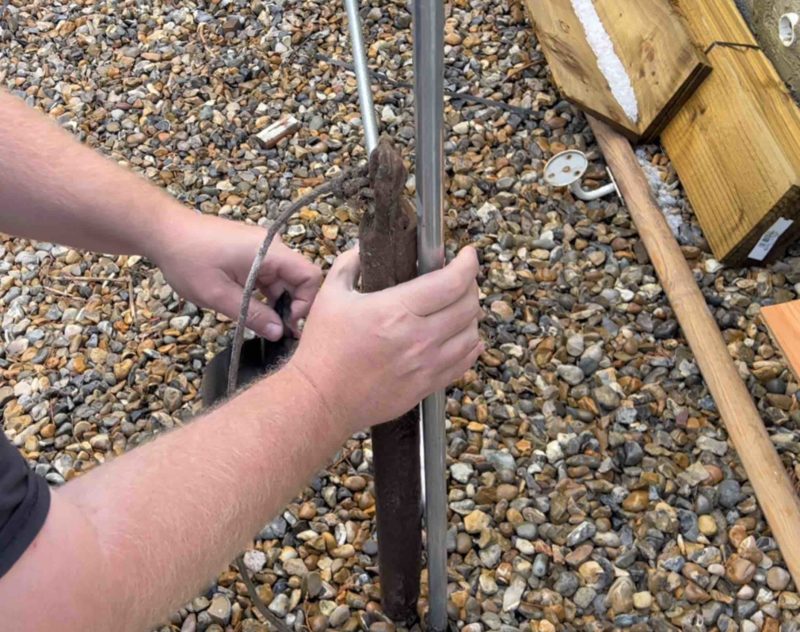
From years of experience though I prefer to use 22mm pipe cover. This can be installed after you have the cover on – a massive advantage over hot spot tape if you are doing this retrospectively:
Assembly and Ease of Use
Unfortunately, it is pretty difficult (scratch that – impossible) to have a polytunnel delivered to your house fully constructed and ready to go. This means that self-assembly is required with a polytunnel, but I know how it is – life is busy and not everyone has hours to spare to put their brand spanking new polytunnel together. Likewise, not all of us are blessed with DIY skills, so ideally your new polytunnel will be fairly easy to put together. However, if you buy the BIRCHTREE as I have tested then they all rivet together without the need for any drills at all! They just snap together:
In this review we will touch on the ease at which the tunnel is constructed, as well as the ease of use in general, in terms of transportability, added features and room for movement inside the tunnel but some main pointers that serve all polytunnels:
- These handy tips are more than enough to see you through a simply install but a further bonus is to have a cordless drill and impact driver with the correct size hexagonal bit for the nut – normally 8-12mm that I’ve seen in my experience assembling these kits.
- DO NOT do this on a windy day 😀 – sounds obvious until you try it 😀
- Make sure you don’t do the frame sides up tight, slide the canvas over the hoops first so there’s more play – this is going to almost certainly save you from damaging the cover as a result of it being too tight to pull over.
- The canvas needs two people – not only is it easier, you’re far less likely to tear anything or get them caught on bolts which can hole the cover too
- Weigh the thing down big – you’ve seen above what happens when you don’t – ensure you have a good amount of soil ready to load up the sides – or sandbags
These handy tips are more than enough to see you through a simply install but a further bonus is to have a cordless drill and impact driver with the correct size hexagonal bit for the nut – normally 8-12mm that I’ve seen in my experience assembling these kits.
Space – height not just surface area is key
Space and sizing are always important considerations in practically any new garden purchase. No two gardens are exactly the same, so a product which would be the perfect fit in one garden may be totally wrong for another. With this in mind, it is important to take a look at your outdoor space before buying a new polytunnel – perhaps take some measurements and bring these along on your search to avoid that sod’s law moment of realisation that you invested in a product which is too big, small, wide or thin for your outdoor space.
Now for the most part, the bigger the polytunnel, the better. This is simply because with a bigger size comes more space for growing – simple, right? Well, it is actually less simple than you may think. What is also essential to bear in mind is the fact that, as mentioned above, for some people, a huge polytunnel will be nothing but a hindrance for them if, for example, they have a small garden. Despite this, this review will take the stance that a bigger polytunnel means a better polytunnel, simply because our aim is to judge the best functioning polytunnel on the market.
With this in mind, another consideration to bear in mind is the influence of the polytunnel’s height and length on their overall size. This is specifically relevant to the type of crops you are looking to grow. If you need a polytunnel which will house taller plants like fruit trees, then height will be a super important factor in your search. If, however, you simply need a polytunnel to grow vegetation such as carrots, cabbages and lettuce, then height won’t be an important factor and you would be better off conserving height and increasing the length of your polytunnel. The polytunnel does, however, have to be tall enough to fit you – otherwise who will see to your precious veg?!
Materials
The materials used to make your polytunnel are also an important consideration to factor in. Firstly, it is essential that the frame of your polytunnel is sturdy, as without a frame your polytunnel will be pretty useless. This means that you should ideally be looking for a steel framework, which ideally will be galvanised or powder coated for extra protection. All in this article are at least that standard with the
After framework, the next most important consideration is the quality of the plastic cover – this is the very first thing that goes or gets ripped, always. In fact, one I had deliverd had a rip by the zip – if I am honest, overall I was happy so I didn’t return it:
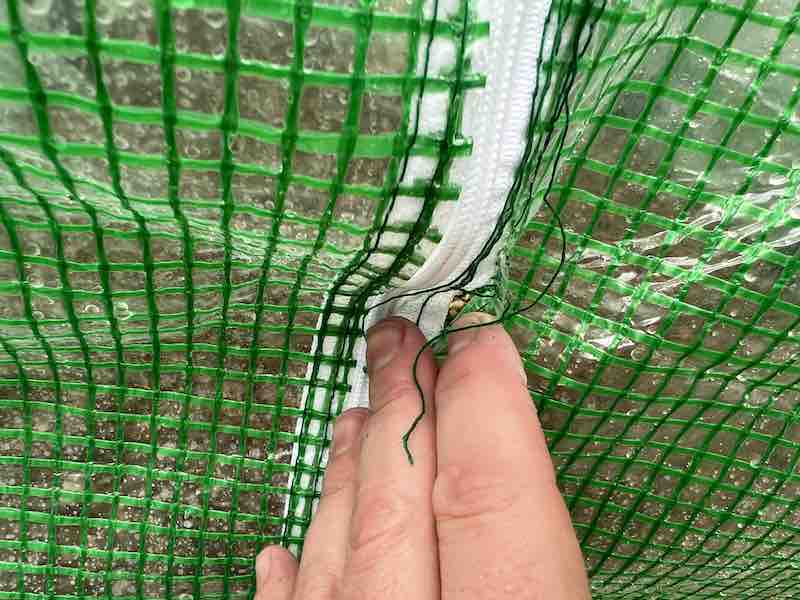
Naturally, it is this part of the polytunnel which is the most exposed to the elements, so it is essential that the plastic used is waterproof and tear proof (hard to find) – in case the weather gets a little too wild. Likewise, any windows or doors which are built into the polytunnel must be fully sealable, otherwise you might have leakage issues.
Price
Let’s be honest – money makes the world go around. I could list the best polytunnels to ever grace the gardening world, but it would all be for nothing if the products were totally unaffordable. So, don’t worry – this is a list of affordable polytunnels, which will do the job without massively breaking the bank. Prices in this article range from £40 to £300.
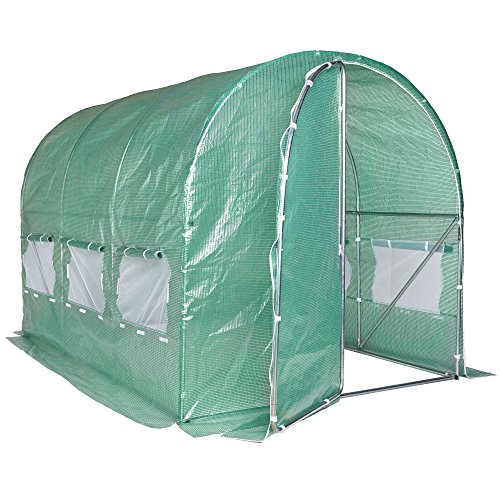
1. Garden Point Green Polytunnel


I don’t normally start my lists with the bargain pick but it deserves it. I’ve picked the 3,5M(L) x 2M(W) x 2M(H) Garden Point green polytunnel as my best budget pick for a number of reasons. Firstly I like the privacy and I don’t lose much in the way of sunlight, I like the quality, you’re not buying cheap, you’re buying mid range value, and of all the polytunnels available in the UK at the moment that are worth buying, for a 3.5m by 2m this is the cheapest and actually looks pretty alright in the garden as well as allotments:
You’ll like the cover material – it’s pretty thick and decent quality – the only time you won’t like it is trying to fit it over an erected frame. Might I recommend putting the frame work together loosely, then shuffle your canvas into position as you go along – this way it’ll save you fighting an erect tent. You’ll definitely want a hand with the canvas as you’ll need to lift high – you’ll upset yourself trying to do it alone – trust me on that 😀 The number of times I’ve wished a hand when putting a polytunnel cover on doesn’t bear thinking about -the frame is like any jigsaw though and easy to bolt screw together.
After a couple of years you’ll have a few tears but nothing you won’t forgive at this money:

Well actually as I joke about duct tape – what you really need on the corners to stop the wind pulling the joints apart is hot-spot tape. That will definitely stop tears like this happening so quickly – when you follow the hot spot tape link you’ll get redirected to another part of the page that’ll clearly show the tear.
The framework is a pretty sensible 1 inch bit of steel tubing. Yeah it’s enough, no it’s not the most solid but here we are discussing budget – not the absolute best. And no, if you bang a load of earth, or bags of dirt or sand filled over the edges this won’t go anywhere. My preference would be level ground but you can build up the sides to keep it level if necessary but not essential because this is a roll up door and you won’t catch it like some of the models that do have a pivot door – however much easier that are to use like the
You’ve got your 6 roll up vents, they are definitely needed along with opening the door on the hottest Summer days, overall this is a real bargain.
Pros:
- Cheapest quality in the UK
- Nice green mottle great for privacy
- Easy to assemble with two people
Cons:
- Eventually like all polytunnels the tarp cover tears in the wind.
2. BIRCHTREE 6M(L) x 3M(W) x 2M(H) Polytunnel Greenhouse Pollytunnel


I don’t know if you know BIRCHTREE but they’ve been around for ages now selling their polytunnels online and the BIRCHTREE 6M(L) x 3M(W) x 2M(H) polytunnel is probably the pick of the lot when balancing value, size, build quality, canvas quality, and ease of setup. I can tell you that after recently buying the 2.5m version and reviewing it. I show a bit of the setup and some handy tricks:
It’s also the best value in terms of m2 – I’d probably has given this budget as well, not for the fact I know the Garden Point can take a fair beating at really low money. Though after testing this 2.5m version I would flip a coin and probably end up buying this. But for fairness and value the listing order stays around this way. That said, I do like the PVC quality of this polytunnel.
If you go for the 6 by 3 metre unit (once you click the link you’ll see a whole myriad of options including preorder), you’ll quickly realise this is the only unit with a really wide door – a real help in terms of using all the space as well as moving tables in and out with ease. With that said though, when I tested the 2.5m walking through was easy but you would need a thin table either side – it’s more for planting than seedling tables.
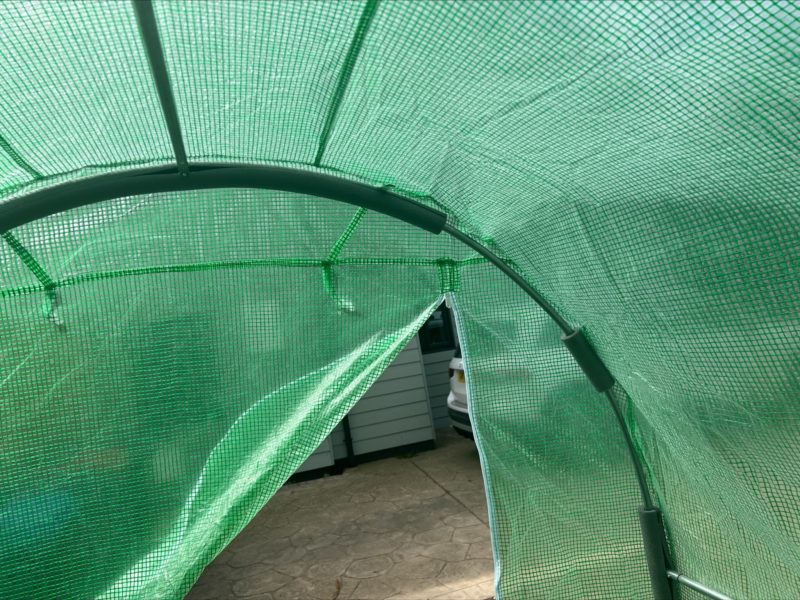
To add extra support the corners have got a lower cross brace, this is definitely needed on such a large area – the metal rungs or hoops if you prefer are broken into one metre centres and you’ve got the standard screw type bolts that will keep it all taunt no problem – this is pretty much ideal as allows 6 window slots all the way along. The 2.5m is pop riveted together which makes life all the simpler and is a no tool assembly.
In terms of assembly it’s just like any other polytunnel, loosely tighten your bolts, get a hand with the canvas – don’t do this on a windy day and if you do please send me the video for entertainment 😀 Then once the canvas reasonably in place it’s time to then tighten it all up and slide the canvas around with minor adjustments.
The only thing it’s realistically missing but I can accept at this price point is a pivot door like the FeelGoodUK PRO – that would have elevated this unit a long long way and secured top spot – with the new range next year I’ll be paying close attention but for now, this is my top spot.
Pros:
- Nice big polytunnel for very low money
- Well built shows signs of a better model for the price
- Easy enough assembly despite the size
Cons:
- Would love to see a pivot door
3. FeelGoodUK PRO Polytunnel Greenhouse
Double the price of the Garden Point Green Polytunnel is the FeelGoodUK PRO Polytunnel Greenhouse that is the similar size but is it double the strength? I’m not convinced on that, but yeah, it definitely is better quality for sure and the pivot door is a game changer. You won’t really need to bury this into the ground either as the canvas flaps so far you can easily hold this down with sand bags or soil. the pro range gives you thicker heavier duty tubing, corner supports, and that allows for a heavier pivot door.
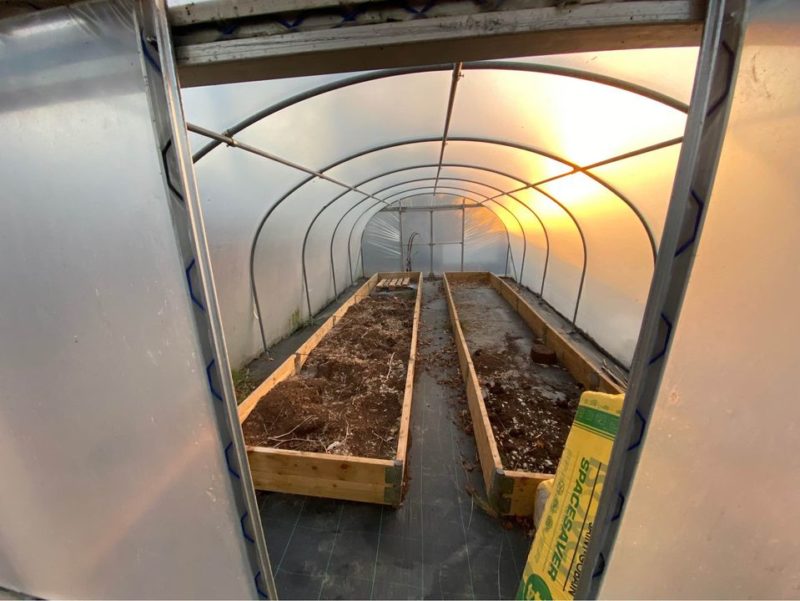
What I might be convinced to do, seeing as this is a heavy duty polytunnel that’s going to last (and even if the canvas does go, the framework will still keep on going) I would be inclined to build some type of base for it, a shed base basically. Then you can treat it like a shed come potting room as well in the Winter – a small greenhouse heater would be just the ticket and save big numbers on an actual greenhouse. and don’t forget, there’s always the good old bubble wrap trick if you’re going to make a long term gig out of this.
The canvas is nice quality – no problems there, the pivot door is a deal sealer for anyone who’s owned the cheaper zip version – and at 900mm wide you’ll have no trouble at all getting a potting bench or staging table in, and the frameworks extra strong, yeah I’m gonna go and say this isn’t bad value – I can accept the price point especially with the nice framework around the inside of the floor adding additional strength. At the moment I’d say it’s got to be the best heavy duty option but if I spot anything else I’ll be quick to update, and like wise manufacturers do some to me if you think I’ve over looked you.
Here’s a video of that being put up – it’s a bit slow but he’s a nice guy:
Pros:
- Heavy duty metal and canvas
- Nice swing door big step up from roll up.
- Long term solution
Cons:
- Price is a fair bit more than budget picks
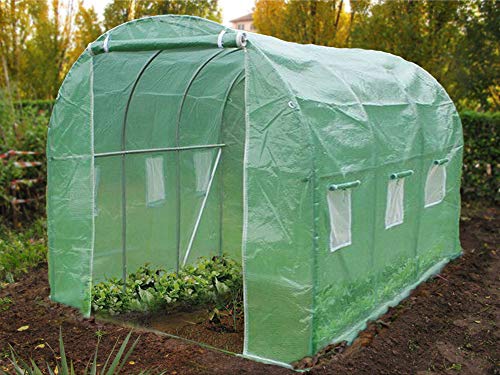
4. VonHaus Polytunnel Greenhouse - Walk-In Polytunnel Tent with Steel Frame


We’re bringing it back to the VonHaus family with this product, however where the VonHaus Compact was the baby of the family, this product is most certainly the parent. To put it simply – this polytunnel is huge.
It measures a whopping 2 metres in height, 3 metres in length and 2 metres in width, making it a monster of a garden accessory, big enough to house a jungle of plants. Whilst the polytunnel is certainly big from the outside, it is the inside space which is of a higher importance, something you certainly won’t have to worry about with the VonHaus polytunnel which has an impressive floor size of 6 metres squared. Wow.
So how is this beast constructed? Good question. The frame comes in four huge hoops with one swinging door at the front of the tunnel. The frame is made from a rust-resistant tubular steel, powder coated to enhance the frame’s overall strength and extend its lifespan. Unlike the other polytunnels we have looked at so far in this review, the VonHaus polytunnel frame is connected by screws and bolts and not plastic attachments. This feature works hard to reassure me of the sturdiness of the polytunnel, however it does of course make constructing the product that little bit harder. Despite saying this, with all of the assembly parts included, in addition to clear instructions to help the user, the assembly of this product is surprisingly easier than you would expect – plus once you’re done assembling the tent you will have a structure the size of a shed, so the assembly process is bound to be a little longer than that of VonHaus’ smaller counterpart polytunnel.
You have total freedom with this product, as it comes without any built-in shelves, making it ideal for housing a plethora of different types of plants and vegetation, whether tall or short. Furthermore, arguably my favourite feature of this product is the inclusion of not just one, not just two, but seven whole ventilation windows. This gives you total control over the climate within your polytunnel and ensures that your vegetation will never overheat and wilt – unless of course you forget to crack the ventilation windows open.
Another super clever and user-friendly feature of this product is the hot tape coverings on the metal frame. The hot tape essentially works by preventing the steel frame from heating up too much in hot and sunny weather, essentially protecting the plastic cover from melting or seriously deteriorating in hot weather. Very clever, VonHaus.
In terms of disadvantages, this product has few – but nothing is perfect. The primary issue with this product is its huge size, a factor which is concurrently its weakest and strongest feature. Of course, its size means that you have tonnes of growing space, however it also means that the polytunnel will take up tonnes of garden space, so certainly something to bear in mind if you have a small garden. The other minor disadvantage is the price, as this is the most expensive polytunnel featured on this review. Whilst this fact is far from ideal, I would argue that it is understandable given the sheer size (and of course all of the impressive added features) of this product.
5. CHRISTOW Grow Tunnel Greenhouse, Garden Polytunnel


The CHRISTOW Polytunnel is a very nice little unit for protecting your early greens and definitely has enough style to put in the back garden. Christow seem to be sourcing some really good products at the moment and I’d say this is nearly up there with the Outsunny Polytunnel in the same class. I know I gave them a bit of a grilling over the price point on their potting bench earlier this week but that wasn’t to do with the quality – it was one of the best, it was about price. Here though, when I look at what else is available in the UK, I feel like we’ve got a lovely balance of both price and quality as well as the style.
So what have we got here: Well the first thing to note is I’ve selected the 2 section, but you could pick up to four sections when you follow my links:
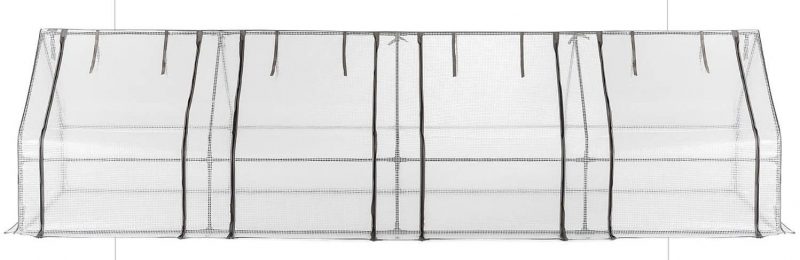
Given this is 90cm odd high you’ve got loads of options – firstly you can get in and work no problem, secondly and also very favourable is the possibility of raised planters. You can grow your veg inside these without the worry of invasion – or at least far less! The big plus is it’ll trap the moisture so you’ll end up watering less too.
In terms of construction the plastic is durable enough – I saw some whimper about blowing away turns out said person decided a few bricks would hold it down – we both know that isn’t good enough and to review the product negatively as a result is a reflection of themselves not the product. Make sure you dig this into the ground and the cover is well bedded in. Make sure your doors are well closed and it’s properly sealed – you then won’t have what is essentially a large kite 😀 Mark my words a few bricks in the worst of weather won’t work – get dirt over it!
The plastic cover is durable – you know the woven mesh bags you can buy that are real heavy duty? Like seriously strong and can carry bricks? This is not that 😀 – but to be fair it’s a very solid cover and will hold up in a decent gale force blow. Setup isn’t bad either – you’re only 900mm up so one person can just about get this done but as with every tunnel two people makes light work.
I like the zips and ties to hold your doors. It’s a pretty hard ask – to get much more for your money, this things less than a decent lunch and a bottle of wine.
But if you want to me to pick wings of flies here goes: I’ve spotted a few broken zips and blow aways, whilst I blame them, CHRISTOW shouldn’t supply those pegs and lead you into a false sense that’ll be alright, anchor it better than that and you have a bargain!
Pros:
- Lovely design looks nice even in a garden setup
- Perfect if you fancy raised beds due to the extra height
- Retains moisture
Cons:
- Will fly away if you use only their pegs supplied. Refer to my anchor your polytunnel properly to hold this thing down.
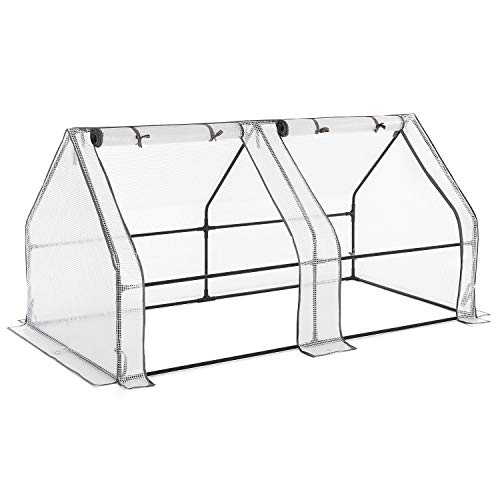
6. Outsunny-Steel Frame Poly Tunnel Steeple Greenhouse
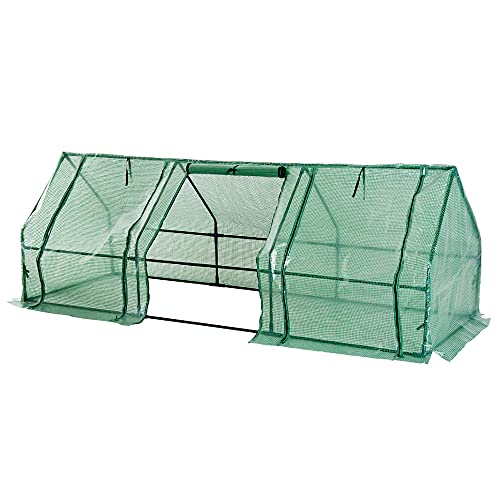


To start our review off, we will take a look at the Outsunny polytunnel, the smallest and consequently cheapest product on our list. Unlike the products which we will later go on to look at, the Outsunny polytunnel boasts a wide and low design – so low that you can’t actually get inside the tunnel, which is exactly why it ranks at the bottom of our list. However, don’t be discouraged – this does not have to be a dealbreaker, it is simply a unique design feature of the product which will put some users off, but will likewise draw others in.
The Outsunny polytunnel is constructed with a strong steel frame, which is powder coated to increase strength and elongate the product’s lifespan. The frame also has five crossbars, joined together by high quality plastic connectors, making for a sturdy frame which shouldn’t buckle in bad weather, but with plastic connectors you can never truly be sure.
The plastic mesh cover features three roll-up doors, allowing you to access the crops within the tunnel, whilst also allowing you to zip them down and secure them closed when you are not tending to your crops, meaning maximum protection for your plants and vegetation.
The simple and small nature of this product lends itself to a super easy assembly process, saving you time and effort and increasing the portability of the product, as you can put it up and take it down in a matter of minutes. Big tick.
Of course, the downside to having such a low polytunnel (only 90cm in height) is the way in which this dimension limits the user’s range of movement within the polytunnel. In order to access the plants within, the user is required to bend down and tend to their crops. However, for some people, this would be the desired type of polytunnel, as it takes up very little space and is perfect for smaller crops which do not require vertical space to grow upwards. We already know that the tunnel measures 90cm in height, but with a 90cm width and 270cm length, it is the perfect size for a smaller outdoor space. However, for those looking to use their polytunnel to house multiple different types of vegetation, this product will likely be too small.
It is a great starting place for new gardeners, ideal for tight budgets and perfect for those with small gardens, but pales in size when compared with other polytunnels.
7. VOUNOT Polytunnel Greenhouse Walk In


Our final product is the VOUNOT polytunnel greenhouse, another absolute beast of a polytunnel which is incredibly similar to the huge VonHaus polytunnel described above.
Like the VonHaus polytunnel, the frame is constructed from four galvanised steel hoops, which support a strong, reinforced plastic cover. One key difference between the VonHaus polytunnel and the VOUNOT polytunnel is the door. Where VonHaus have included a swinging door, fit with a metal frame, VOUNOT keep it simple with a roll-up door which is secured shut with a zip. I do think that the VonHaus swinging door is a nice feature, however it is somewhat pointless, and given the extra effort the door takes in assembly, as well as the premium in price which you pay for this extra, I think VOUNOT have got the right idea in keeping things nice and simple with a roll-up plastic door.
Aside from this feature, essentially everything else is the same between the VonHaus and VOUNOT polytunnel, apart from one essential detail – the price. Given the fact that both polytunnels measure 2 metres in height, 3 metres in length and 2 metres in width, both have the same strong and sturdy frame, and both have ventilation windows, you would think that they would cost the same. However, VOUNOT is considerably cheaper than its competitor VonHaus, which is the very reason it wins the top spot on this list.
The competition is tight, but price tends to be the decider so, in my humble opinion, the VOUNOT polytunnel is the best polytunnel on the UK market in 2021.
Final thoughts
A polytunnel is essentially a long grow tent, typically made from a steel frame with a polythene cover suspended over the top of the frame. They basically take the place of the common greenhouse, but due to the materials the structure is made from, polytunnels tend to be cheaper and easier to maintain and transport. Like a greenhouse, the whole point of a polytunnel is to aid crop growth, which is essentially achieved by extending your crops’ growing season by providing a warm and toasty environment for your crops to prosper in.
Of course, the way you use your polytunnel is totally up to you. If you wish to use it in the place of a shed, therefore simply as an outdoor storage space, then that is your prerogative.
So, what we really need is a way of increasing (or at least optimising growing times) for your allotment or garden space, in addition to a method of weatherproofing your crops so that they can withstand the temperamental British climate, no matter the season. Drumroll please for…the polytunnel! Let’s have a quick round up of the best polytunnels available in the UK at the moment.