Written by Terry Smith
Our site is reader supported so when you click a link to Amazon we may earn an affiliate commission.
UK’s best water butts and water barrels that are cheap, decorative, square, and slimline reviewed
This article was last updated on August 15th, 2022 at 1:13 pm
I was thinking the other day as I just finished the cladding on the side of my little extension, did I want to put a water butt or barrel in place of sending the water straight into a soak-away or worse the cess pit? Since I have to pay to have that water taken away if the level is too high, it’s a no brainer for me in my position to go for as many water butts as I can so I installed a water butt with standard waste pipe that then runs into the soak away – it was a handy test of the Strata! Perhaps in your case it may be you’re looking to capture the water just to save wasting it from your shed or greenhouse rather than main building, which is an equally sound reason and given they are pretty cheap these days due to the large volumes sold, there’s never been a better time to get one!
Apart from those good reasons, having a water butt up the end of the garden near the shed stops you from walking all the way back down the garden to get the hose pipe. And don’t fear, for those worried about the aesthetics or space, they’ve got slimline, square, round, and decorative water butts to suit almost any garden setup. Not to mention some cheap bargain options too though not many have solved the Leaks issue so pay special attention to that!
It’s ok just buying and replacing a water barrel, but what about if you’re buying and installing for the first time? Don’t worry. I have you covered on a step by step install guide too including how to collect rain on a polytunnel too:
DIY tips: How to install a water butt with guttering and downpipe and what to consider when picking the best water butts.
So with enough confidence to install a water butt from start to finish, or merely place one in your garden, let’s look at the best water butts available:
Editor top picks: the best water butts and barrels in the UK:
Best water butt overall: Charles Bentley 210L Water Butt
Runners up: Rainsaver Mini 100 litre Green Water Butt Double Kit and the Strata pro Ward 250L Slimline Water Butt [personally tested and proven with full installation of water butt and gutter guide]
Cheapest and best value water butt: Strata 100L Slimline Water Butt
Most decorative water butt: Sankey 1229 150L Beehive Water Butt
Most decorative rain barrel: RAIN BARREL WATER BUTT
Best square water butt: Strata pro Ward 250L Slimline Water Butt
Top slimline water butt: Mini Rainsaver 100 litre Water Butt or the Strata 100L Slimline Water But
Alternative space saving, small slimline water butt: BeGreen 100L Capacity Mini Rainsaver Water Butt
Largest water butt: Harcostar 350 litre Magnum Water Butt
How to install a water butt with guttering and downpipe.
Don’t worry – installing a water butt is absolutely doable even for the least DIY active of us and I’ll take you through step by step. Before we get going though, there’s little point unless you’re organised. There’s two effective methods. If you’re old school you will want to install a water butt with standard waste pipe. The alternative is using which is probably a bit easier – installing with a water butt rain diverter kit if you already have guttering.
So here’s a list of what you need to install a water butt in most situations:
What you need:
- Impact driver or drill and
- Fixings for wood or brick
- Guttering of your choice and I’d recommend gutter guard to keep the water clear or leaves and debris
- Guttering brackets, one every 500mm or so is fine, some even place one every metre so just calculate your meterage.
- A slab or sturdy base
- Downpipe
- 25mm hole saw or flat bit
- Spirit level
- Your water butt + stand + diverter kit
- Plumbers putty or silicone
- Utility / Stanley knife
Installing a water butt with standard waste pipe
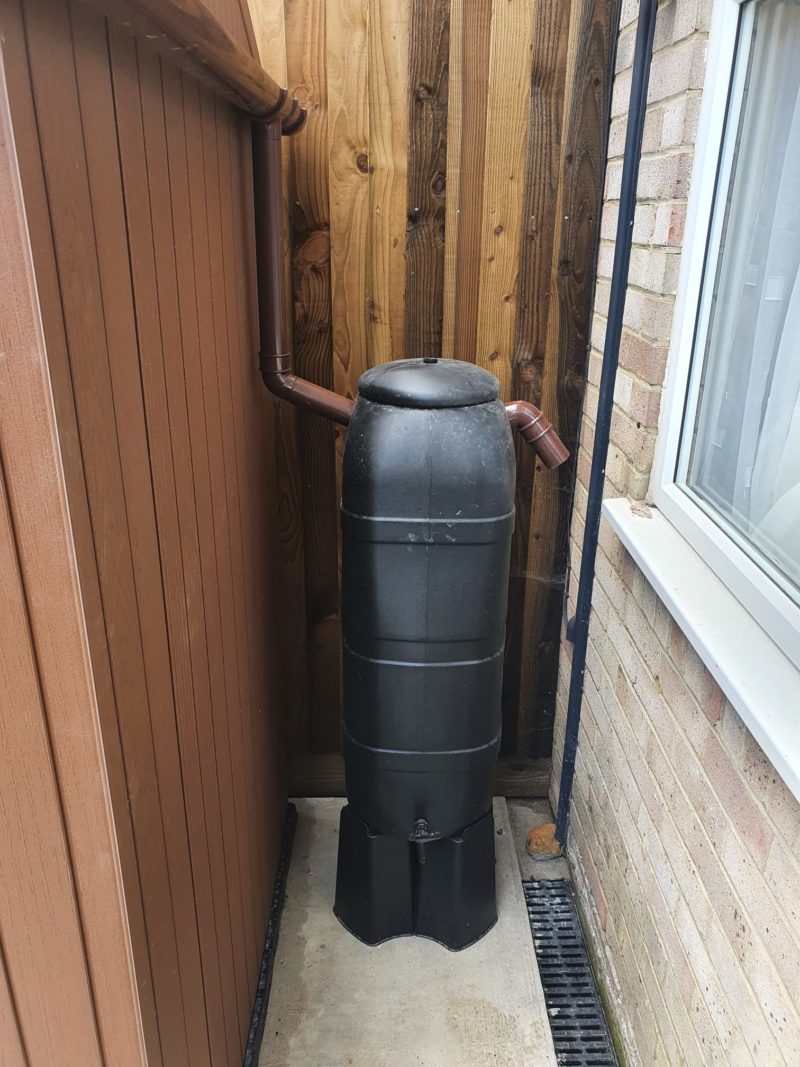
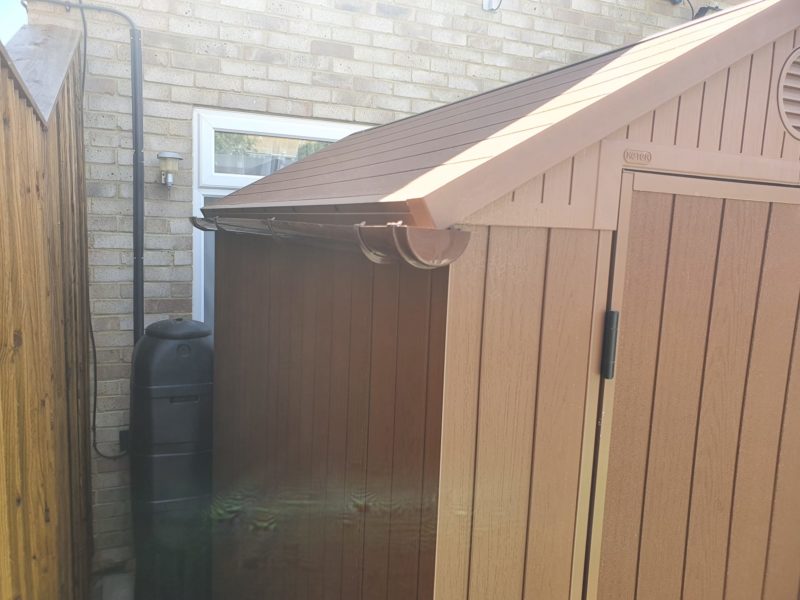
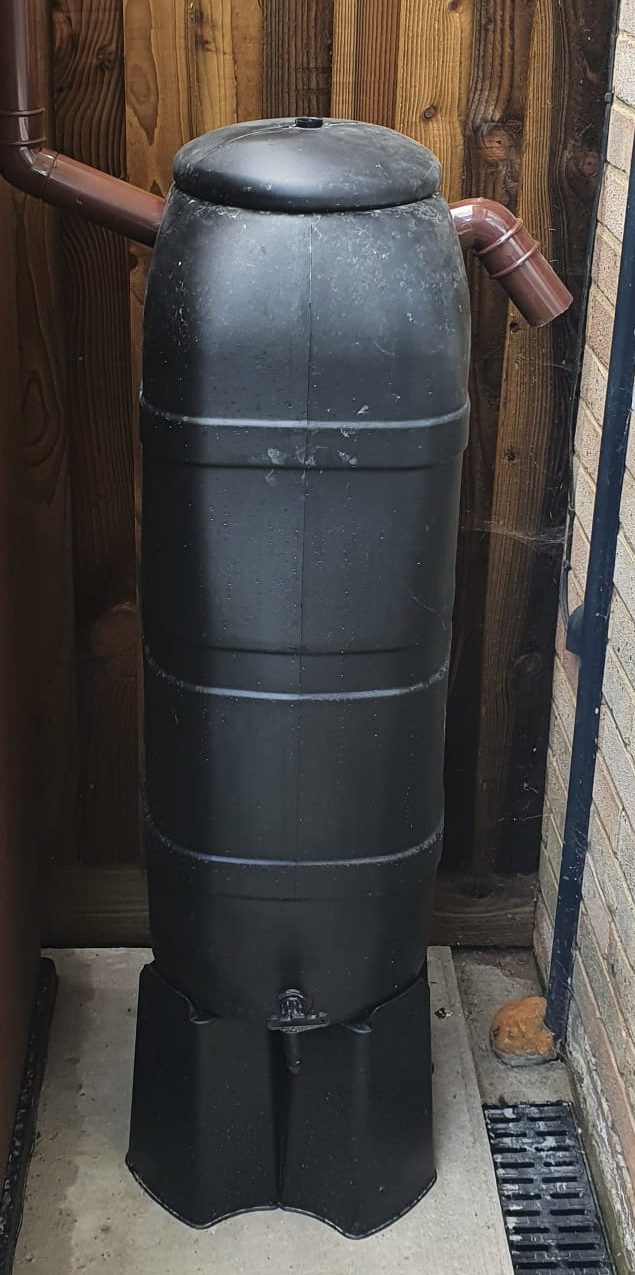
Now, there’s all these fancy kits out there but my preferred method of install over the years has been to simply divert/convert your guttering to take run off rain water, but with the added bonus of any overflow finding its way to a soak away or drain. So that’s what I am going to show you first up. I’m installing a gutter on my new plastic shed and simply running an overflow off of the water butt pointed at the soak away. A picture is worth a thousand words in this case:
First up you want to get all your materials ready. There’s nothing worse than being caught mid project so what I do is lay out everything I need and make sure I can go straight at it:
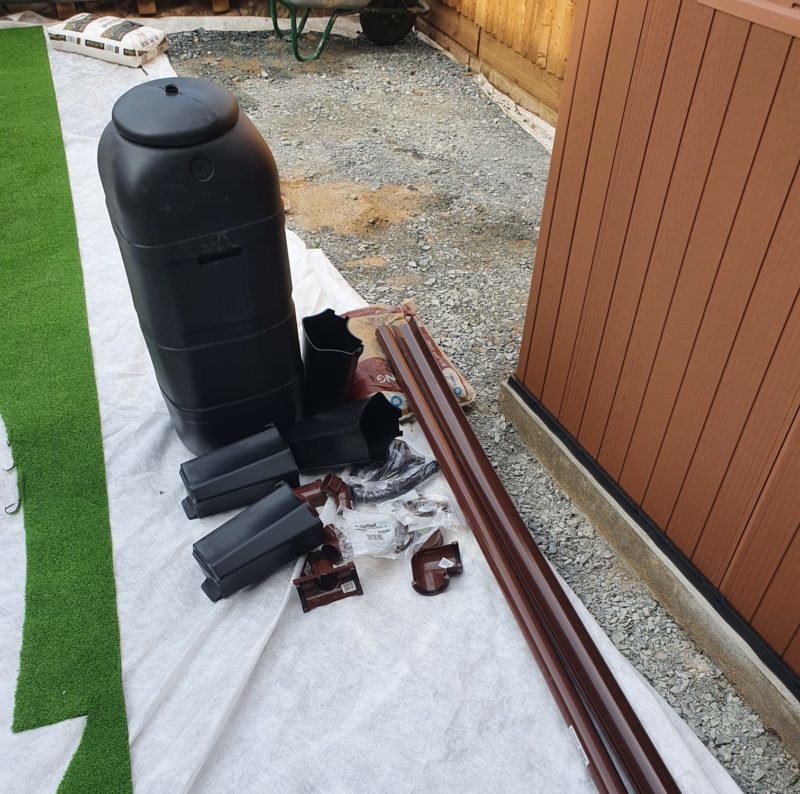
In my case I needed:
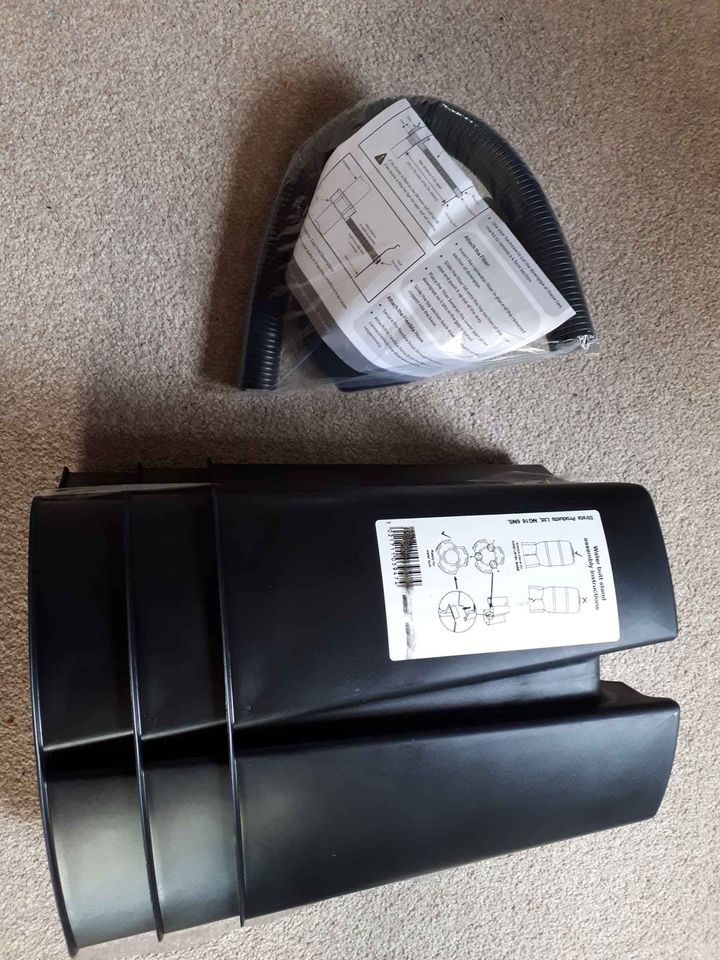
- Water butt – I personally decided to test the Strata 100L Slimline Water Butt and this works for the Rainsaver Mini 100 litre Green Water Butt Double Kit and the BeGreen 100L too.
- Feet for water butt
- Enough gutter to go all around the shed
- The gutter elbows, and one Tee for the water to run down the pipe
- Gutter brackets
- Cordless drill
- Impact driver
- Stanley knife
- Saw for the pipe and gutter
- Hole saw cutter if you don’t want to muck about with a stanley knife cutting into the water butt.
- A spirit level unless you know your shed is perfectly flat.
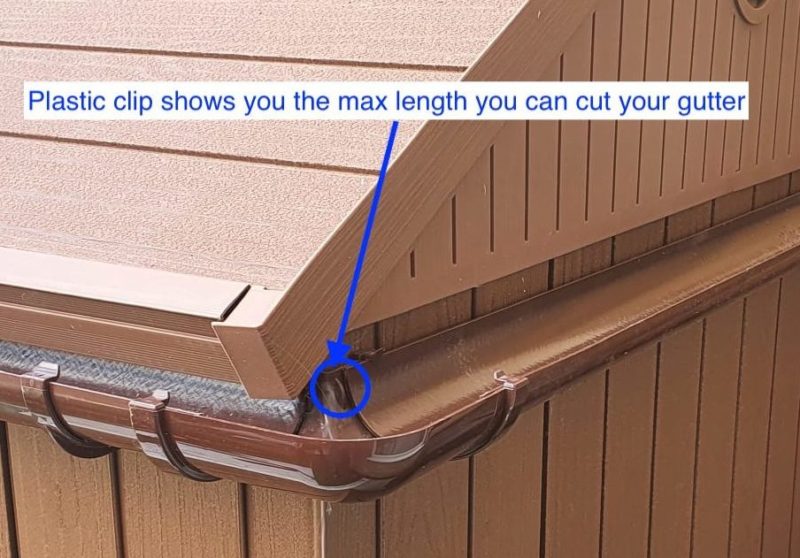
The first thing to do is fit your gutter brackets with the angles – these hold the gutter in place but also if you install the angles it’s super easy to measure what size gutter you need. Once you’ve got the brackets installed then cut your guttering to length. If you do it the other way around, consider that the angles take up some length, you’ll need to allow for that but my preference is to hand the angles first because they give you a guide to measure:
Obviously when you fit these brackets you need to make sure the gutter has a sensible gradient for the water to run toward your down pipe. A few degrees is fine. With the gutter on you simply drop in your downpipe tee and that readies us to focus on the water butt – in our case the Strata 100L Slimline Water Butt.
In my case I have used 2 inch guttering downpipe. I decided the plastic on the water butt was so think I would carefully nick out the section I needed to fit my pipe with a utility knife. You’ll obviously need to be extremely careful. Other easier tools include a jigsaw or a hole cutter as I linked to previously. Here’s a look once I’ve carefully nicked this hole out:
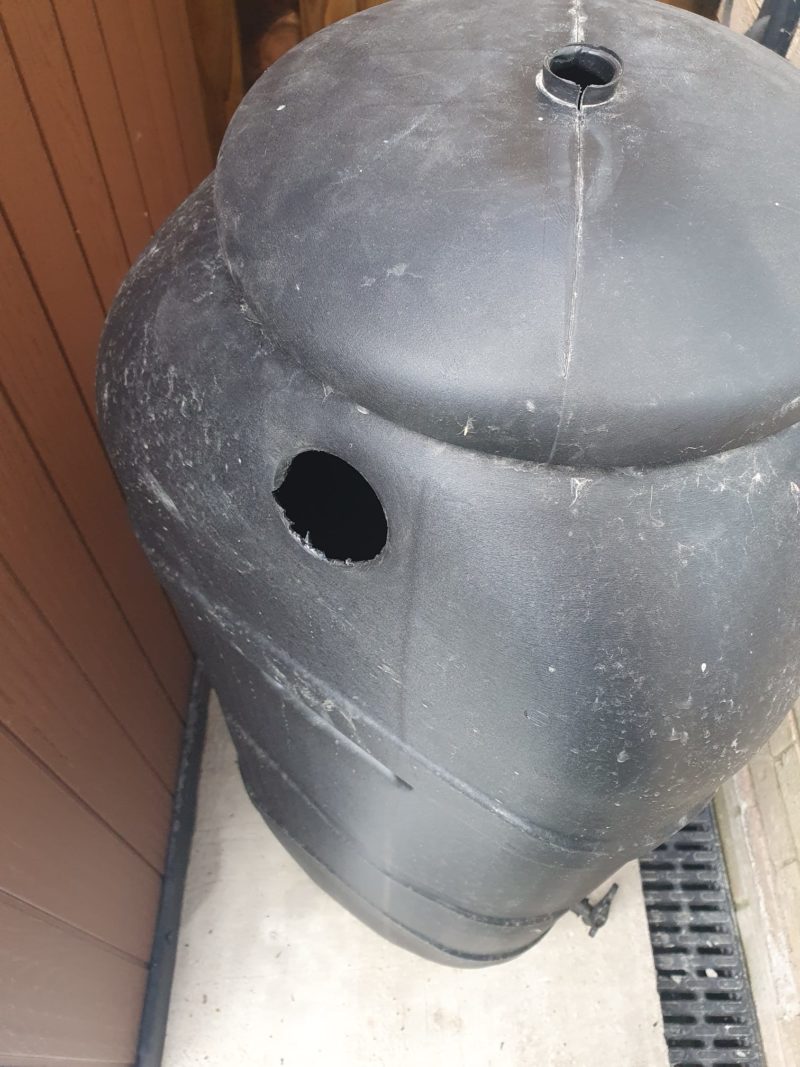
Then I position my water butt on a base (easier access for the tap) and use a 45 degree elbow to run into my water butt. I’ll be honest and say the position of my water butt is slightly dictated by where my pipe finished 😀 but there wasn’t much in it. I then create an overflow into the soak away with a bit of left over pipe and another 90 degree elbow:
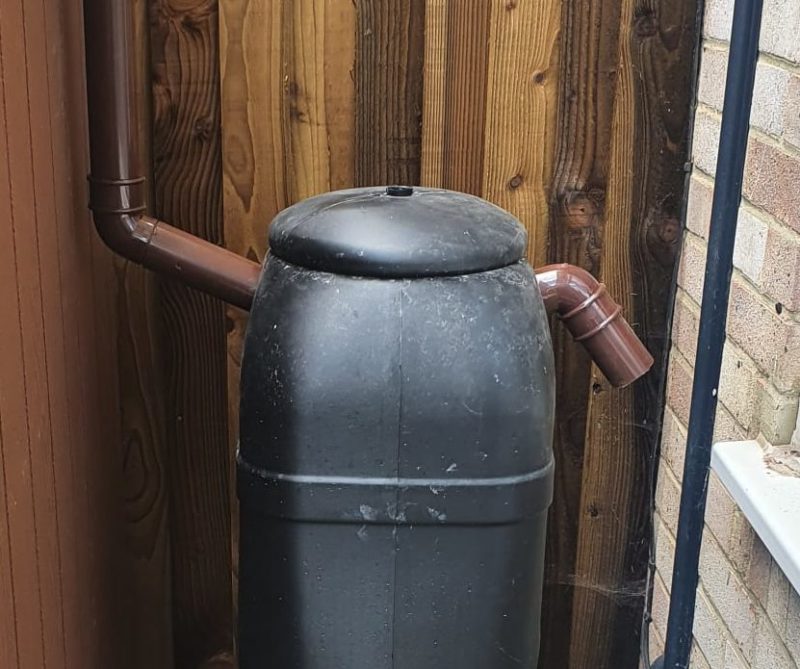
And there you have it, a neat install of guttering and water butt. You are seeing down the side in the hidden area. From a more prominent position that isn’t covered, the gutter and water butt looks like this:
Installing a water butt with a rain diverter kit if you already have guttering
Before we get going here’s a good rundown of what you want to do to install a water butt:
So start by placing and ensuring your water butt stand is level. Use a spirit level for this (something missed in the video above). You then want to fit your tap, our mate in the video shows hand tight with no sealant. I always to this with silicone or plumbers putty and use a set of mole grips either side with a reasonably soft grip. This will get you much tighter but don’t go ballistic or you’ll break something 😀
Once connected he drills a hole for the diverter kit. You want to be a bit more accurate with this – the standard is 100mm down as to avoid overflows. However something that is handy in his demo is the spirit level trick to ensure you are at the same height as the diverter kit hole you just drilled:

Where he cuts the downpipe with a handsaw (use a multi tool if you have one). Likewise check your kit for the width of downpipe that needs removing. If you’ve bought any of my top picks from amazon there’s much less converting and it slots together whether you’ve got round or square downpipe so unlikely to need a Stanley knife unless you pick the Charles Bentley which is similar to this diverter.
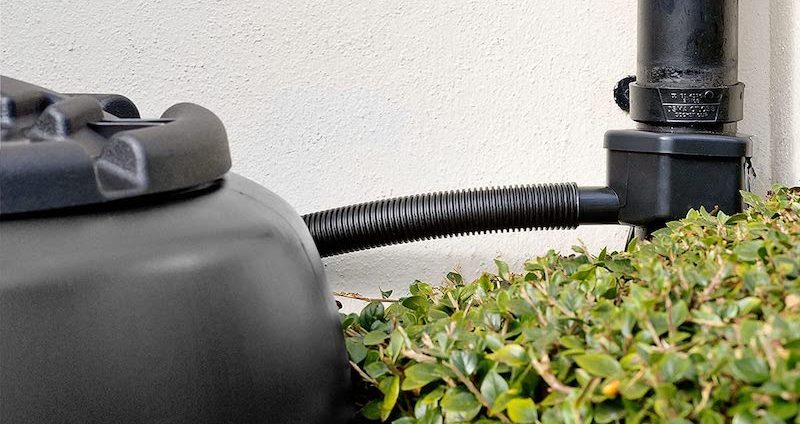
Then connect the diverter to both ends of downpipe and put back on your brackets. From here it’s a simple case of pushing the flex pipe on both ends!
What to consider when picking the best water butt?
There’s loads of different water butts as we’ve already discussed. You literally get round, square, thin, tall, wide, cheap, ornate, well made, and different colour water butts. So choosing from so many may feel a little difficult, especially knowing who to trust for the right quality. So the best thing to do is look at what should be considered when buying the the best water butts and barrels:
Price
Price is a tricky one because the best value is the Strata 100L Slimline Water Butt but you have to buy the stand and filler kit separately. And don’t get me wrong, it’s still cheaper buying all three apart with no compromise on quality when compared to either the Mini Rainsaver 100 or the BeGreen 100L Capacity Mini Rainsaver but it’s deceptive because equally good value for money is the Charles Bentley 210L or the Strata pro Ward 250L Slimline Water Butt if you need to store more water, in fact, given the Charles Bentley includes the stand and diverter kit, it probably works out cheaper per litre! Food for thought and some great options at differing sizes!
Leaks
Leaks are literally part and parcel with a water butt. The best picks in this article are top of the options available in the UK and they still leak in varying degrees (which is covered in each review). With that said, it is an easy fix. You either need plumbers putty or a decent waterproof silicone. Either are good enough to get you leak free. Remember silicone takes a while to set, plumbers putty is effective faster but if it does leak, you’ll need to restart the process so give it some time if you can as emptying a water butt full of rain water is annoying to say the least!
Why is my water butt over flowing?
There are normally two good reasons which your water butt overflows. One is the height of the diverter from the downpipe. If you install too high it’ll keep feeding water due to gravity. If you install lower beneath the height of your water butt, gravity will stop send water at that height. So be careful as you don’t want to be too low as you will lose considerably capacity but each water butt instruction set varies so keep an eye – what I’ve explained is the general rule of thumb!
The other is uneven ground resulting in the water reaching the edge, but still a result of the height of the diverter kit.
The not so good reason for overflowing is because you don’t set it up to a downpipe and just allow rain to free fall. You’ll end up with tell tale signs of this and the minerals in the water will quickly help to fade your water butt:
Shape – round, square, slimline, or wide
There are loads of ways to store your water. If you need space saving and slimline you’ll pick from the Mini Rainsaver 100 or the BeGreen 100L Capacity Mini Rainsaver. You may also prefer the Strata 100L Slimline Water Butt which is also the same size. However, a nice larger square one like the Strata pro Ward 250L Slimline Water Butt isn’t a bad shout either as that uses the same footprint litre for litre as the best slimline picks
Round and wide is getting a bit boring but can still look good. The sensible well built Charles Bentley round water butt is an example that classic can still fit into a modern setup.
Does it come with a stand and water downpipe diverter kit?
It’s important to know that there are two ways water butts are sold in the UK. One is a complete setup and the other just the water butt. In this listing there are a mixture of both but to be absolutely crystal clear each one of the reviews clearly states whether this is a full setup or just a water butt.
If you’re looking for a full setup then you might want to look at the Charles Bentley or the Rainsaver Mini 100 litre Green Water Butt Double Kit which also includes a setup to overflow into the next water butt 🙂
If you want bare bones then you’ll look at either of the Stratas: Strata 100L Slimline Water Butt or the Strata pro Ward 250L Slimline Water Butt.
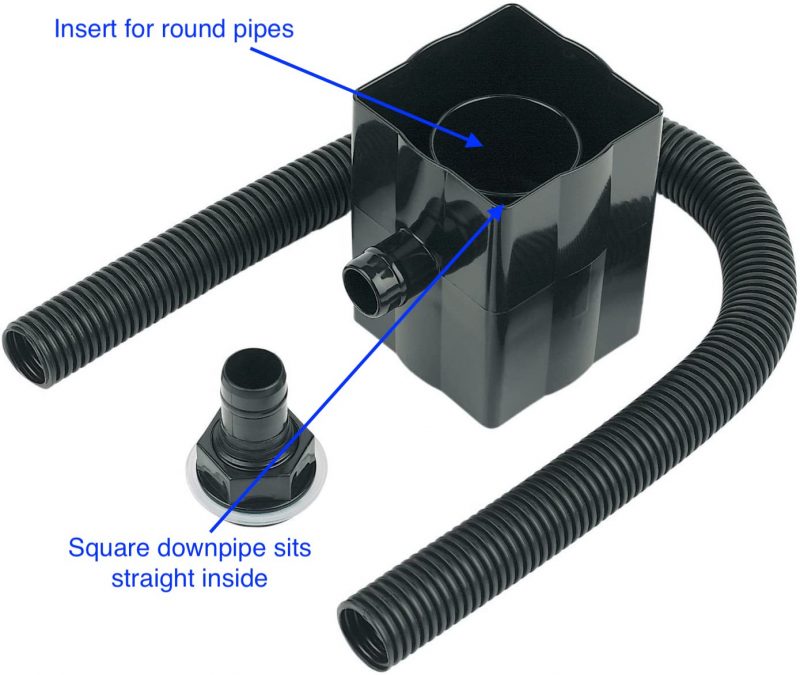
Square or round rain water diverter kit?
All of the diverter kits or filler kits if you prefer the term, are setup so that you can fit onto a 68mm standard round downpipe or a standard 65mm square downpipe. They do not compensate for non standard setups which is pretty understandable.
They are basically square with the round insert. This means when you cut your pipe, you’ll then be able to slot into the round downpipe with an insert that inside, and of course, if it’s the square, it fits into the square:
Do I need to drill holes in the water butt?
It depends which model you go for in this review. Some are predrilled like the BeGreen and the Harcostar. Some models aren’t drilled because they want you to pick location of the diverter kit inlet yourself, a prime example of that being the decorative RAIN BARREL. By contrast the other decorative water butt, the Sankey is not pre drilled.
If it’s not pre drilled you’ll need a 25mm flat bit and a drill. I always use my impact driver, though overkill, it’s perfect for a 25mm flat bit so lovely and light.
You’ll also want some sealant in the form of plumbers putty, it will ensure you don’t have leaks when all is tightened up!
Type of water butts – plastic, wooden, steel: wall mounted or floor standing
You get all different types of water butts. Firstly there is the material to consider. They generally come (most commonly) plastic, wooden, and steel. In this article we focus on the plastic type as they are the best wearing, least maintenance, and cheapest. That’s not to say they aren’t without fault. Naturally a steel water butt is far more heavy duty but also comes with the drawback that it’s heavy and costly.
Then there’s wall mounted or floor standing. You have to be brave to wall mount a water butt but it’s becoming far more common in built up areas looking to be that little bit more environmentally friendly!
Best water butts and barrels in the UK
1. Charles Bentley Ward 210L Garden Round Plastic Water Butt


I don’t think I’ve reviewed a set of products in such a long time with a beautiful array and choice. And while I didn’t buy the Charles Bentley Ward 210L Round Plastic Water Butt myself because I wanted a space saving option. I opted for the Rainsaver Mini 100 litre Green Water Butt Double Kit that looked a bit snazzier (it’s right to the side of my extension collecting rain water directly off the house roof). But, with that said the Charles Bentley Ward water butt definitely deserved top spot. Let’s take a look at why:
Firstly it comes with everything you need – The stand and a reasonable length strap to tee into your gutter downpipe. This may sound trivial but some of the other best picks do not come with these options in a bid to save costs and for some, that makes sense, for the example the best value pick (no surprise) the Strata Products Ltd GN334 Ward 100L doesn’t have anything but the butt. No pun intended 😀
So fitting the strap is really easy if you follow my simple guide. The strap goes around the downpipe but be sure to make your cut about 3 inches below the height of the stand + and water butt. The reason for strapping slightly below is eventually the cup holder on the inside of the strap will fill up and from inside the downpipe and pass the water to your butt. If you fit this on a level surface it won’t flow over because of gravity, you can easily drill into this and feed a second and third water butt if you want to. Don’t make the same mistake as I did 😀 – go lower than the butt and you self regulate the amount of water:
It weighs about 8kg and pretty comfortable to move around on your own though a little cumbersome being half a metre wide and the best part of a metre tall. This doesn’t include the stand by the way so as not to throw you off. The stand combined takes you up to about 1.4m so as you can imagine this is pretty large but not over the top. It falls well short and hidden on a 5ft fence. The top will poke over a 4ft fence but nothing too obtrusive given it looks pretty nice. With all the height it makes for the ideal platform (40cm) to place your watering can. This is about enough space for a medium to large watering can but I’d recommend you take a tap measure out to be sure this is going to the comfortable. There’s nothing worse than holding the watering can at a funny angle:

It’s made from high density plastic which is pretty sturdy, and whilst they don’t give the thickness, with so many positive reviews all over the net it’s hard ignore this if you’re looking for a high quality hassle free water butt that’ll last.
The stand is overly strong and not a problem at all. Being 210 litres though, I’d be putting this on a slab or solid surface, freshly dug soil is definitely a no-no. A level water butt will also stop overflow problems and be less likely to sink over time too.
There’s a couple of niggly problems I hope they’ll resolve on this at some point. The tap is a bit loose and therefore leaks (no surprise I think all of the water butts I’ve ever owned have). So, you definitely want to use some plumbers tape and tape it up good before bolting it in. That’ll solve the problem.
Also, don’t forget you’ll need a hole cutter for the inlet. (the pipe that you’ve installed from the downpipe to the water butt) so if you was planning to replaced a pre-existing setup you’ll still need a little DIY but well worth it for a quality bit of kit and easily deserves top spot for the best water butt. Whilst the problems above sound significant, I’ve literally had water butts come apart at the seams 😀 and the base just randomly start leaking. So all in all a top quality unit!
Pros:
- Best water butt/barrel for quality and durability in the UK
- Complete solution – butt, diverter kit, and stand.
- Well constructed – rarely leak
- Not too tall as to be a problem
- Set and forget – if you install level and on hard ground, this is a long term solution
Cons:
- Some install work
- Leaks – to be expected from every review
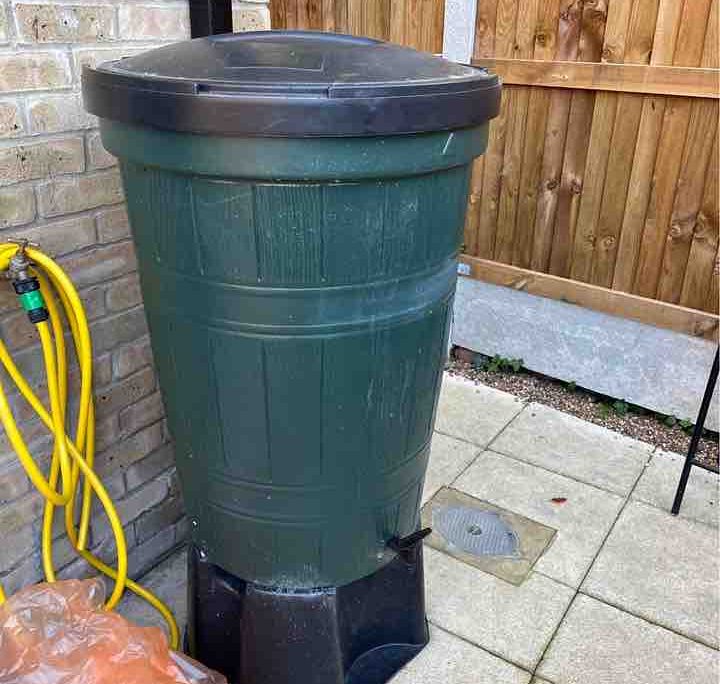
2. Strata Products Ltd GN334 Ward 100L Slimline Water Butt


Next up is the bare bones Strata 100L Slimline Water Butt. This is easily the best pick for cheapest water butt in the UK right now and I decided to test this myself personally by installing a water butt with standard waste pipe. Essentially it holds the same amount of water and pretty much equal in quality to the Mini Rainsaver but without the rain diverter or stand but you do get the lid and tap – I bought the rain base separately – you can buy the Strata water butt base but I went for one I had locally. The lid has a simple lock mechanism which is handy as some of my earlier water butt purchases didn’t and have blown off in the past. If you can be bothered to search Amazon for a stand and diverter which isn’t all that much hassle you can save a few quid on the Mini Rainsaver and most have done so taking advantage of the prime delivery no doubt 🙂
In terms of real life practical use I won’t sugar coat this. As you’ll see in my example I was able to cut this with a stanley knife. When I bought one of these a couple of years ago I got a slightly different design. If you look at the one in my install it looks different but they are definitely the same maker and product – both are equal quality and my original lasted very well. Here’s a look at the latest one I got:
Given this has been so good to me I am moving it up to second in the ranks ahead of the double mini water butt setup.
This water butt has sold many more than the Rainsaver online and there’s some other good reasons apart from price. Firstly, Strata is a well known and reliable brand for water storage – they make a super larger square water butt too: the Strata pro Ward 250L Slimline Water Butt which is also top rated. It matches the slimline Rainsaver on width too at 35cm wide and 95cm tall. The weight is almost identical and so is the look:
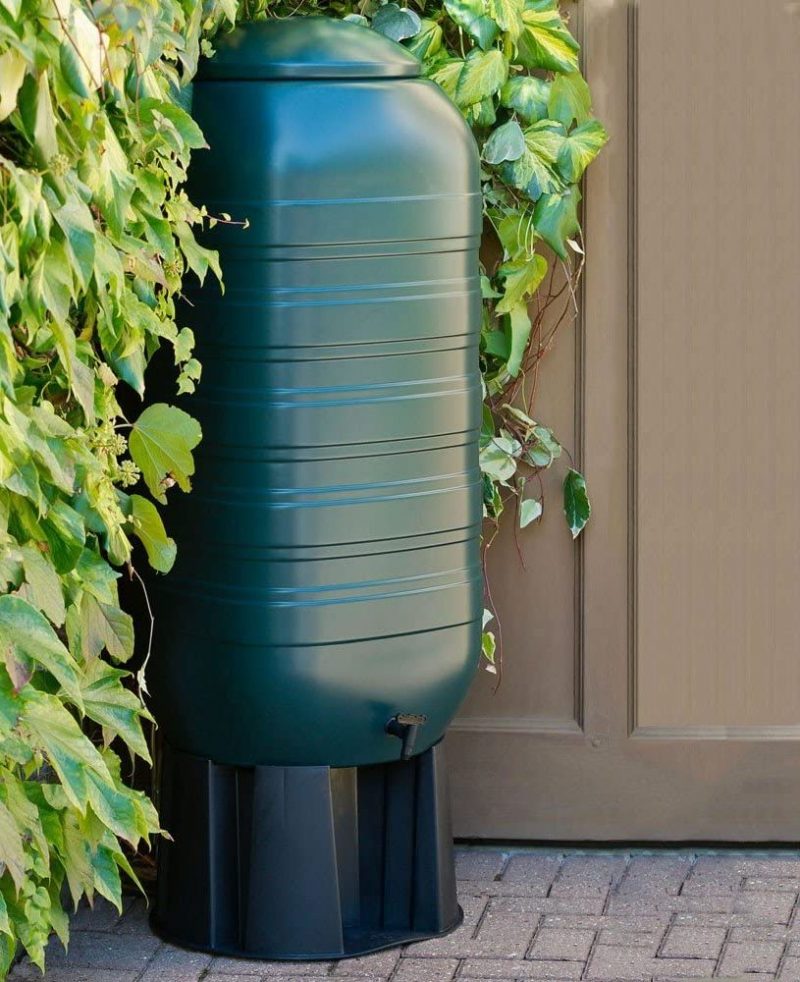
Apart from the extrusion being blown in a slightly different patter you’re getting a top notch product at a great price with the option not to have to buy the diverter and stand! In fact this would probably be the best in the country if not for those complaining as a result of not reading the description carefully enough – though I hope I have made it crystal clear 😉
Installation is much down to you but standard kits are available and as I say, not having to pay for the kit and stand means that if you have something other than standard you’re good to go making your own plan! Definite a buy rating from me on this one!
Pros:
- Cheapest water butt that’s high quality
- The price means no diverter or stand but this gives you flexibility if you have a non standard downpipe or stand setup.
- Decent quality material and easily on par with the Mini Rainsaver
- Lockable lid
Cons:
- Usual leaks which is covered in my guide to install
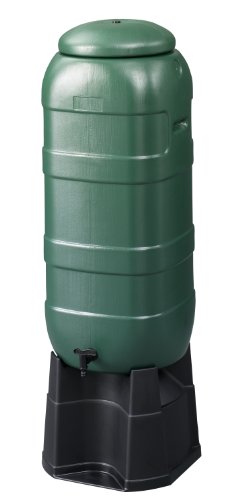
3. Rainsaver Mini 100 litre Green Water Butt Double Kit
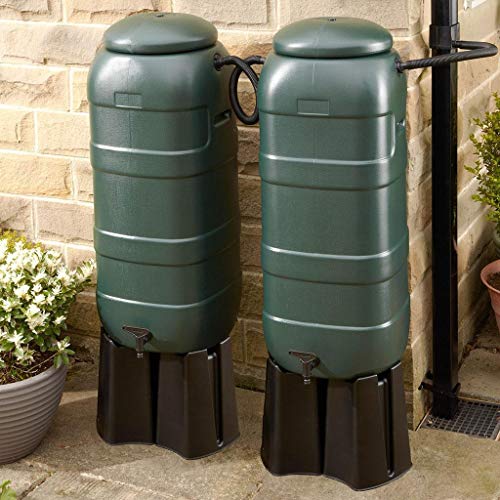
Next up is the Rainsaver Mini 100 litre Green Water Butt which is the one I actually wen’t for (well two). There are so many good reasons why you would want to distribute the load so to speak. This is almost certainly what you’ll end up with if you want a decent amount of water storage but at the same time, need something flexible in terms of how it’ll fit or can be placed to save space. It’s exactly the same as the Mini Rainsaver 100 litre Water Butt which is a single and voted top for slimline and space saving so it goes without saying this is the same level too:
Firstly you’ll notice just how light a 100L tank is compared to the heavier versions and having two side by side means you get the same capacity near on as the top pick Charles Bentley 210L but with a much slimmer fit to your wall. It goes without saying space is everything, especially when placing these on a patio area as I am doing.
You’ll appreciate the tap height. given these are mini containers the stand height is just shy of 30cm and that’s pretty generous. The unit itself measures a tad over 90cm but where this really scores is the width. Being less than 40cm, I think about 38cm exactly, but allow 40cm to be sure, you are saving a third in space from the wall when compared to the top pick and since I wanted them tight and out the way that was a deal sealer for me.
You get a kit that fits a round or square downpipe. Remember this is standard 68mm and 65mm (square sizes) so if you have something custom then you’ll need to make a bit of a bodge to get it on.
From my perspective the key to getting these working perfectly was levelling them well and making sure the diverter kit you install onto the gutter is positioned below the height of the rim to stop overflow. Joining is easy – everything comes in the kit read to go but i will say this, there’s no way you’ll install this without water proof silicone or plumbers putty. Universally water butts are leaky. It’s pointless to complain about it. When you make a tank from a big oil drum you buy a tap, cut your hole. First thing that happens….leak 😀 So don’t forget some sealants and good preparation. If you do this you’ll have a quality water storage solution.
One complaint I have is I am struggling to get the tanks to fit together tightly because of the overflow kit so they need to be spaced apart a little. Other than that I can’t really fault them.
Pros:
- Beautiful space saving and design looks great – only 38cm width
- Easy and clear install instructions
- Butt, diverter kit, and stand included – nothing else to buy except sealant for leaks
Cons:
- Some leaks as expected
- Can’t quite get them to go snug together – needs a little space between
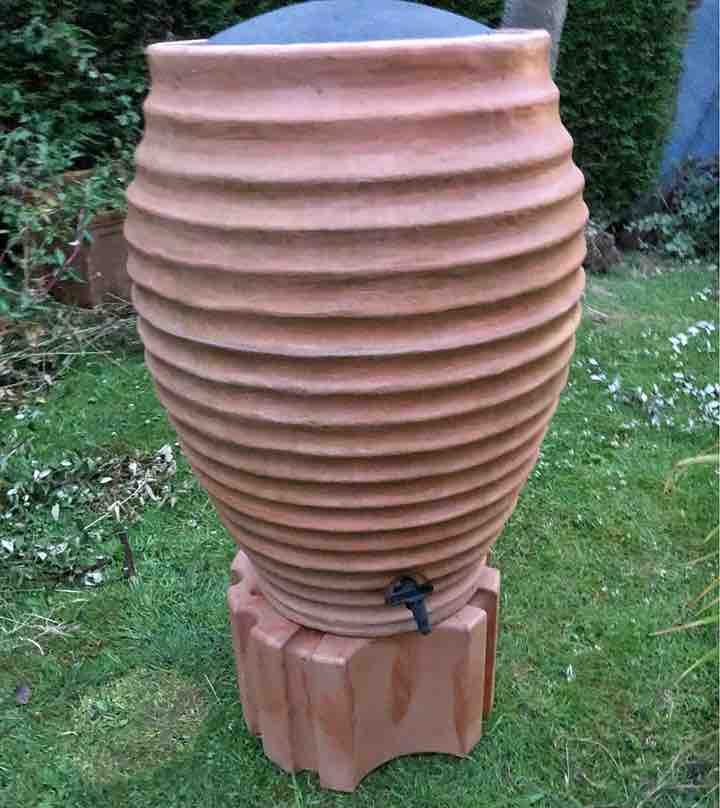
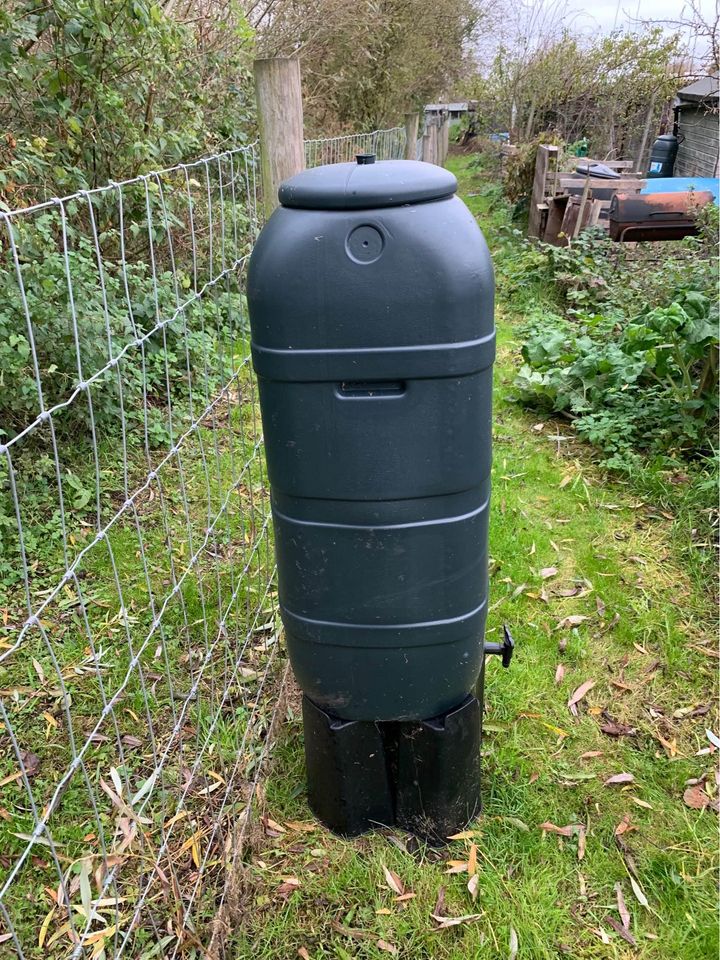
4. Sankey 1229 150L Beehive Water Butt


Next up is the Sankey 150L Beehive Water Butt. This is one of the only survivors from the original review a couple of years ago and definitely deserves it’s inclusion still. That should give you some confidence knowing you’re with a trusted seller and it remains my pick for the most decorative water butt as I just love the beehive design 🙂
Some people are put off by the look of the standard water butt and, let’s be honest, they’re not he most eye catching things in the world are they?
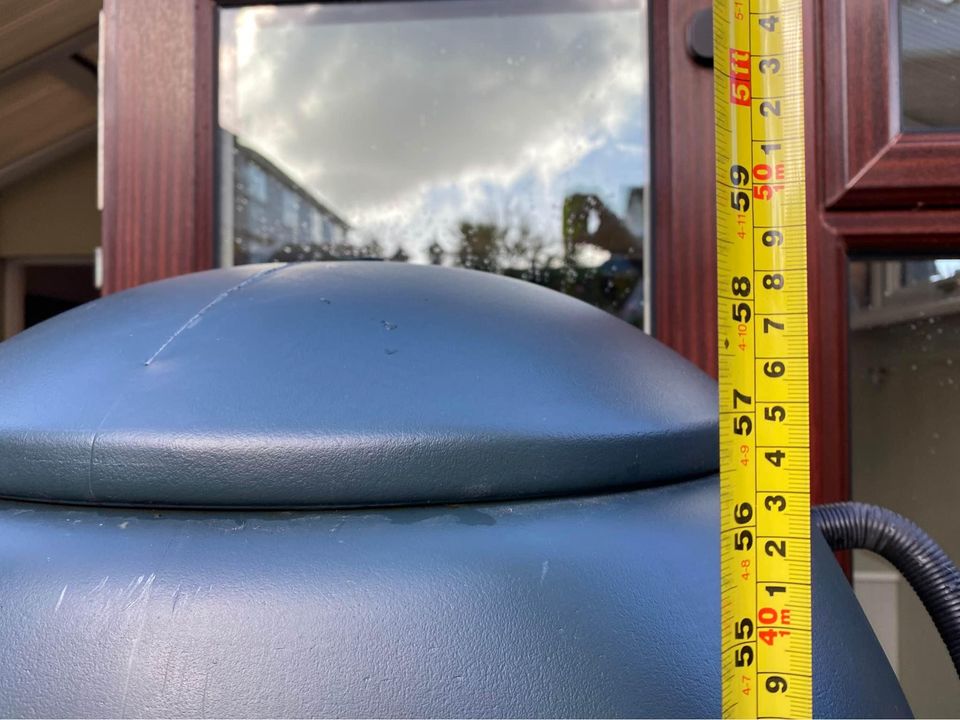
Well, Sankey have thought about this problem and have come up with a solution- the Beehive water butt. As the name implies, this model is shaped like a beehive and looks so much more natural and pleasing to the eye than what is usually on offer. Made from 100 percent recycled materials but styled to look like a ceramic construction, this water butt will look great in any garden. It is also shatter proof and resistant to UV damage. It stands 77 (height) by 60 cm diameter at it’s wide point and weighs 4 Kg when empty.
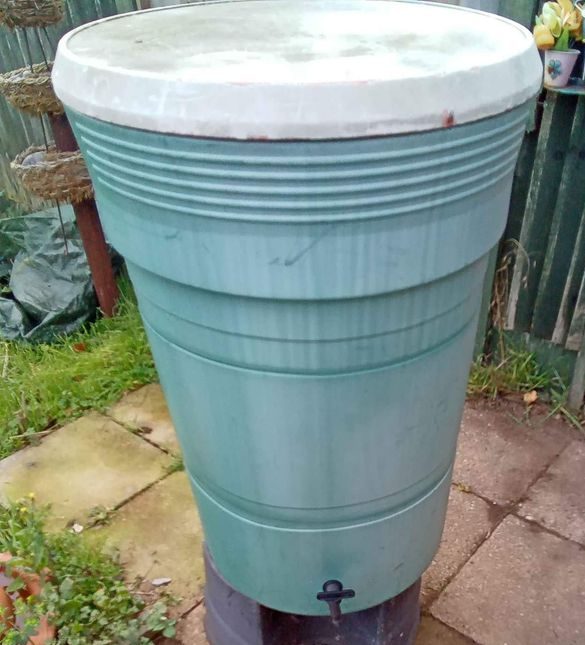
The capacity is 150L so on the lower side for storage solutions. If capacity is your thing as well as decoration you might want to look at the RAIN BARREL WATER BUTT, but before you do, have a look at how well this ages over time. This picture is a couple of years on from original, one of the biggest benefits of buying a product with history is getting to see what you’ll have in time ahead:
This model isn’t a kit and the stand and diverter have to be purchased separately. They are still recommending to pair this up with the premier water butt stand which you’ll find when following the water butt link to Amazon.
However, there are some draw backs. Over the years there’s been a couple of complaints it isn’t quite as nice looking as the pictures. I’m not really sure if they realised they are buying a plastic tank, and not a multiple hundred pound stone beehive? For the money it looks great in my opinion. Also, as with all water butts you’ll get leaks so I recommend sealant or plumbers mate on install. There’s been a few broken seals over the years now but not enough to worry about and with a trusted seller you have a genuine returns policy so you can buy with confidence.
Pros:
- Unique beehive design looks better than the standard models
- Made from recycled materials – that’s great it’s 100% recycled.
- Shatter and UV proof – strong and durable, really does hold up well.
- Not crazily priced
Cons:
- Not ideal if you need a large water storage solution
- Not as good as the real thing in stone
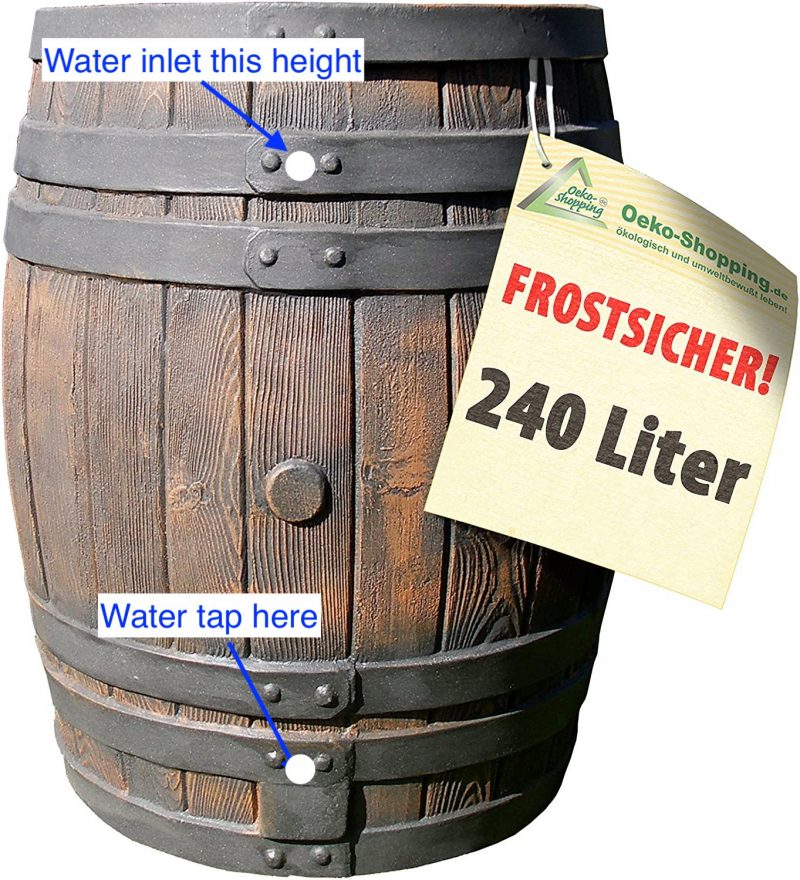
5. RAIN BARREL WATER BUTT


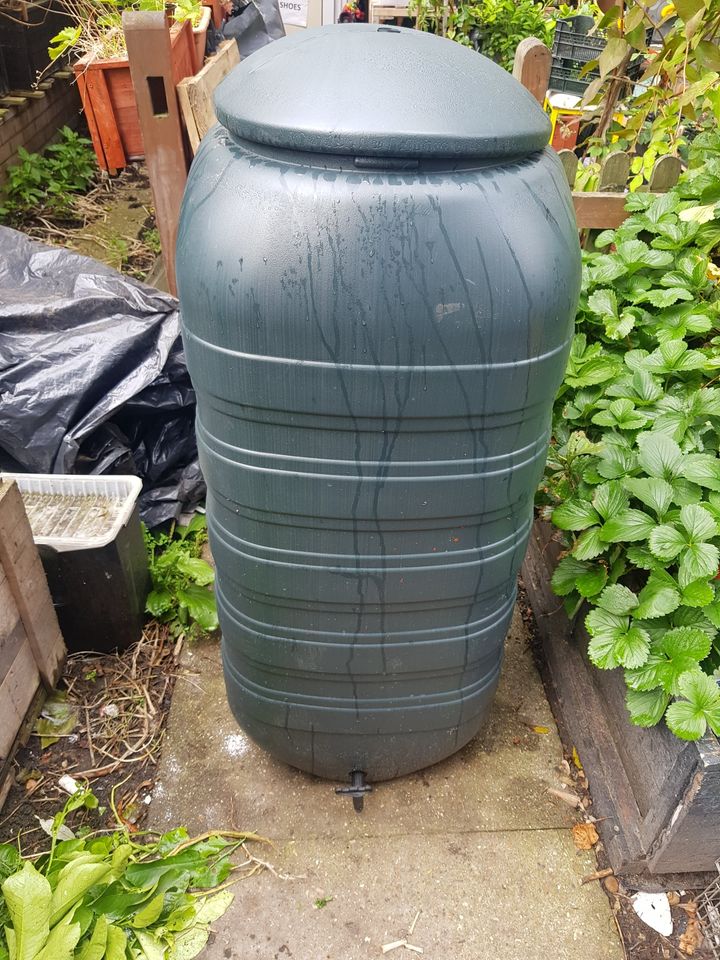
New to the reviews this time round in the decorative water butt category is this lovely wooden looking, plastic water barrel. To be absolutely fair, this thing looks great from a few metres, the closer you get the more you’ll realise it’s plastic:
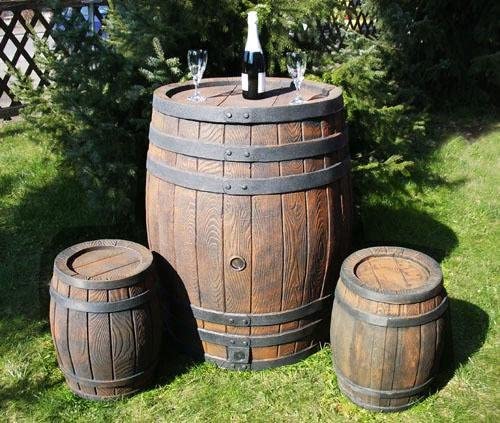
As you can see from the picture there are two sizes. I’m reviewing the 240 litre larger version but as you can see you can make a bit of a feature with the smaller ones, carefully linking them up in the background. Water storage doesn’t need to be ugly 🙂
So I’ve got a question for you before we go any further. Have you got time to maintain a wooden water butt? (if yes I envy you) 😀 I will say this though, they do look super if you have the energy to convert one and keep the teak oil up.
Back to the listing though – this thing only weighs 12kg and so can be moved around and sort of spun on it’s edges into position pretty easily, even for those not so strong anymore.
The install is pretty simple and easy to follow if you can read GERMAN 😀 so don’t worry I’ll help out. You’ll need to drill your holes The inlet want’s to be on the second rung and although totally obvious I’ve still highlighted where to install the lower tap. Obviously you want to put the water inlet (where the water flows in from downpipe) around the back or to the side, or wherever is most convenient but out of sight:
I suppose it was pretty easy to follow and almost guided by the plastic extrusion, but still, it would have been handy if that was cleared up for us.
Before I start my usual moaning there’s more good news on this – it’s split proof guaranteed. So should that happen, you can send back for a replacement but what will impress you the most is the size. At just 58cm wide and 78cm tall you store 240L of water which is pretty good going given the extra decorative bulk and not far off the dimensions of the top pick Charles Bentley 210L.
Looking up close they’ve tried to make the oak like effect and I have to say it’s not bad:
I think given so many positive reviews elsewhere my comments are reasonably founded and if this continues to attract the positive feedback it has over the last year or so on the UK market I’ll be inclined to move this up to top decorative water barrel next time round. If you consider it’s a bit more expensive than the Sankey Beehive Water Butt but holds considerably more water, storage wise the prices are pretty much in alignment litre for litre. Overall it’s a solid confident buy.
Pros:
- Looks really authentic without actually being wooden
- Well priced – litre for litre its on par with the Sankey
- Sturdy and a split proof guarantee
- Smaller model can be bought and linked up to make an interesting looking display
Cons:
- Instructions are German but I’ve got you covered on this review
- Need to purchase stand (if you want one) and diverter kit separately.
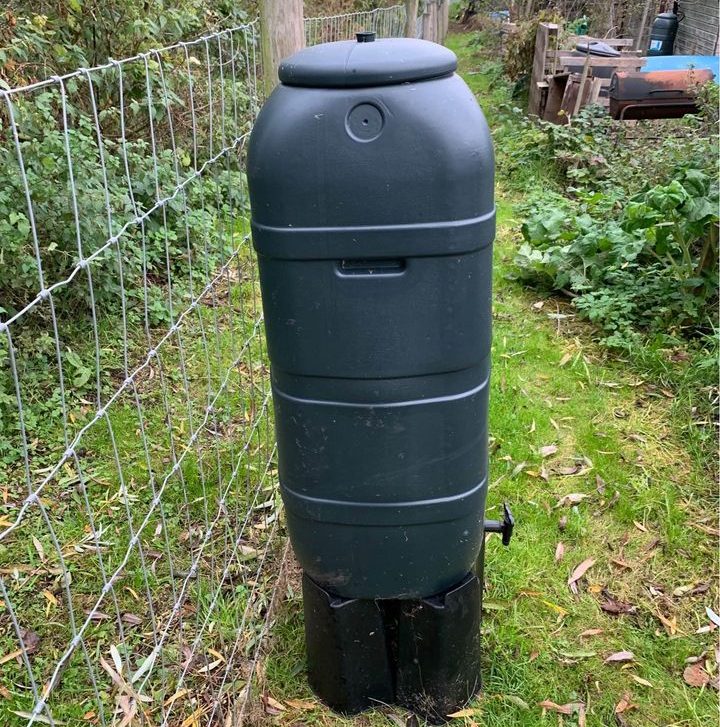
6. Strata pro Ward 250L Slimline Water Butt

Next up is one of my favourites and no surprise Strata are involved. They one the cheapest and best value water butt and I feel they deserve the best square water butt too. Mainly because they’ve tried to make this slimline and space saving whilst maintaining very sensible aesthetics you wouldn’t mind have around the home. In terms of space saving I opted for the Rainsaver Mini 100 litre Green Water Butt Double Kit because I wanted them as tight as possible against the wall, but this solution despite only being one barrel provides more storage and actually uses the same surface area (per litre) and might be better for you on that front too. It’s also not too bad on height at around 150xm with a 30cm stand (so the unit is about 1.2m) – it’s also 54cm square if that helps to know:
Here’s a look at how one ages, as you can probably see the lids a bit out of shape but that’s because it’s not engaged on the lid clips, otherwise not bad at all:
For this quality and storage of 250 litres you are getting a bargain. It’s basically litre for litre as cheap as the cheapest option in our picks that are good quality. You can see where you need to install your diverter kit but note: it is not supplied, and again, neither is the stand. Hence the excellent price of this unit as it’s not a complete set.
It’s quite bulky so there’s been the odd complaint of damaged on arrival – and I mean a handful of thousands sent – it’s the only thing that stopped this being my top pick actually. This is more down to courier than the seller. It’s understandable as this is essentially a big bit of hollow plastic and just on of those things. The seller will replace so don’t worry if that did happen to you. Also, you’ll get the odd complaint of the water leak issue. It’s normal and so you should consider sealant when installing both the tap and the inlet, of course the tap has far more pressure on it so pay special attention to that.
Overall it’s another great water butt from Strata and if you want to save space you really can’t go far wrong here.
Pros:
- Excellent value for money
- Decent quality plastic and guarantee period
- Stores 250 Litres so on the larger end of the scale
- Square water butt so saves space in corners
Cons:
- Some damaged in transit
- The usual occasional water leak so need to install with sealant.
7. Mini Rainsaver 100 litre Water Butt Kit with Lid


The Mini Rainsaver 100 litre Water Butt is identical to the Double Kit I have reviewed above with exception that it is obviously just half – to be clear though: you still get a diverter kit and a base so it is a full solution. There’s not really too much to add to this part of the review other than I can share with you how this ages very well. Here is a picture of one a year old that’s been taking full sunlight:
Something I didn’t mention in the previous listing though, these are made from recycled plastic, which is a bonus and should make you feel better about buying! In case you arrive to this listing before the top pick, it’s 38cm wide so really good on space. With the supplied base you are a tad over 1.2m in height which is all pretty standard.
One benefit of buying the single as opposed to the double is the fact you can’t really get the double kit that close together, so if the plan is to push this tight to a corner it works superbly as a slimline solution. Overall if you’re looking for small and slimline, this is by far the best solutions of all the quality picks in this article. It really boils down to how many you want to link up 😀 Buying the double offers a slight advantage price wise and even more so if you don’t have amazon prime for delivery!
Pros:
- Only 38cm wide – super slimline and ideal for tight spots and corners behind patio doors etc
- Well constructed for the price – not far off the best value for money Strata 100L which is also slimline.
- Comes with stand and Diverter kit for square or round standard downpipes. (68mm round, 65mm square)
Cons:
- Usual leak complaints that is the same for all top picks – need sealant
8. BeGreen 100L Capacity Mini Rainsaver Water Butt
The BeGreen 100L Capacity Mini Rainsaver Water Butt in my mind is almost identical to the Mini Rainsaver 100 litre and the Strata 100L. And is one of the only surviving water butts from my review a couple of years ago.
This water butt is made in Britain from recycled plastic is on sale for the same price as the Mini Rainsaver at the moment. The kit includes a 100 litre water butt, a rain diverter that fits 68mm round and 65mm square downpipes, a stand, and a hose fit tap. Basically everything you need.
Its sleek design means finding a space for it in the garden isn’t too much of a hassle and it remains stable on its 3 part stand. The stand itself holds the weight of the butt well, even when it is filled to capacity. It has been made to a high standard and there are minimal complaints of leaks which is unusual :D. It is also surprisingly easy to set up thanks to ports for the filler tube already being cut in the sides – a bit of an advantage especially if you’re only replacing a water butt and filler kit. The product measures 38 width both ways and a tad over 1.2m in height with the stand.
Pros:
- Great alternative 100 litre water butt to the Mini Rainsaver 100 litre and the Strata 100L
- British made to a high standard
- Doesn’t take up too much space
- Easy to set up – the pre drilled filler and tap is a real bonus if your downpipe is already cut!
- Comes with filler/diverter kit for standard downpipes
Cons:
- The odd leak
- Other choices for the exact same item near enough
9. Harcostar 350 litre Magnum Water Butt & Raintrap Diverter


This very popular kit from Harcostar contains a water butt that can hold 350 litres which is the largest of all in this review. It also includes a raintrap diverter and stand.
The components are all well made from strong materials so you don’t have to worry about the working life of this product. Like our previous review, ports have been pre-cut on each side to make set up easier, but this model also has removable plugs in the ports, and handily, threaded tap holes have been pre-set up in two different places so you can choose which side to install the tap.
Another great feature is the lockable lid which has a spring loaded fastening clip. The rain diverter will for any downpipe, round or square with a little bit of adjusting and does what it is intended to do better than most.
Given this is a pre drilled kit and well built, if you want a large water butt and you’re doing a swap over so already have the downpipe cut at the right height which by the way is 1.2m without stand, this is absolutely ideal.
You want to make sure this is set on a solid surface. 350 litres will move and lean over if not setup right. There’s been hundreds of sales since I last reviewed this and only a couple of complaints with regards to leaks. Other than that, this is a top product and ideal if you need big!
Pros:
- 350 litre capacity
- High quality materials used in the butt’s construction
- Precut and plugged ports on both sides of the butt
- Two threaded tap holes have already been set up for you
- Lockable lid
- Includes stand and filler/diverter kit
Cons:
- The odd leak
- Need a really solid level base to store this much water (concrete or slab)
- Pretty standard bin look