I recently decided to insulate a shed as part of a larger refurbishment program that included running electric and fitting an RCD, cleaning and painting the roof, and then cleaning and creocote finishing the exterior. Little did I realise once it was all boarded out that I hadn’t really considered the benefit of a couple of windows overlooking the farm at the rear. So in this guide I thought I would help my fellow hapless gardeners plan a little better than I did and run through the correct techniques.
1. Deciding what windows to use for your shed
2. Plan where to position the windows
3. Mark out carefully
4. Cut the opening with a plunge saw or carefully with a chainsaw
5. Build back a solid lining and screw in the window
6. Seal up inside and out
7. Trim the window up if they need it
1. Deciding what windows to use for your shed
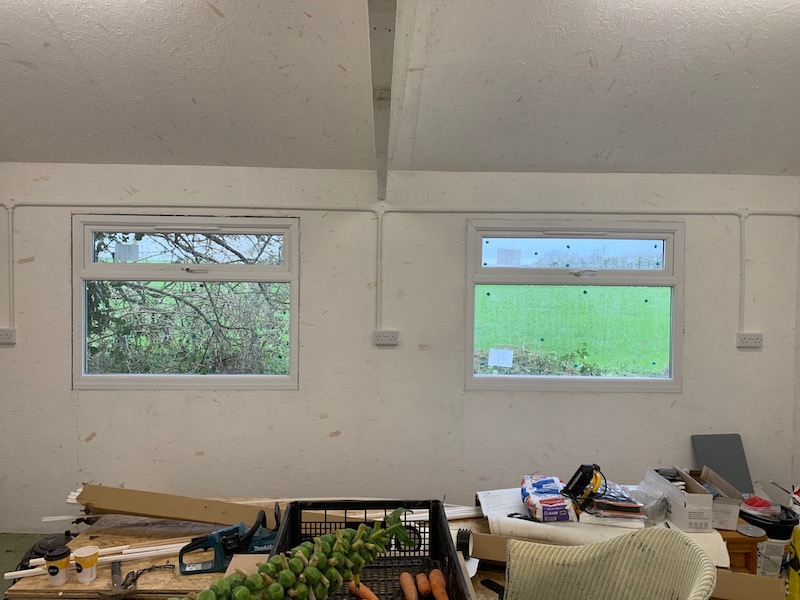
As you can see from the main Image I chose double glazed windows which given the external colour of the shed, would seem a dubious selection. Let me explain why I did that. I consulted with Brian Turner (respected and trusted window installer) at London Sash Window Repairs Ltd who told me wooden window prices don’t make sense on a shed. Fair enough, I appreciated the honesty and so all too glad to recommend him.
Internally I always had a plan to white wash the walls so it would fit in from an internal perspective. Externally, it is the rear of the property with a field behind so no one can see the windows. In fact, I rarely venture round the back unless to clean up. So with it being so sheltered security is an issue. As well picking the best shed alarm, you should be thinking along the lines of how else to secure your garden shed. Well, double glazed windows really do take some breaking into and double glazing is better security than wooden windows.
Then from an efficiency perspective they win hands down. I only paid £400 for these windows. If I were to have them made of wood then it would be in the region of quadruple that money for the same efficiency. That’s just not the kind of money I’m looking to spend at the rear of my home, let alone the shed! So now we’ve got the selection process out the way, let’s look at how to install these windows.
2. Plan where to position the windows
Amazingly, it’s the easiest step in the world but so quick to get it wrong. I set my windows in a position for the best view when sitting down. In walks the wife who points out to me the horizontal mid rail is right in her line of sight. So I stand up and sure enough I haven’t got the optimal height for both 😀 So what I recommend is carefully measuring out and both sitting and standing (if you have a nice view) before making the decision where to mark and cut. It’s not so important if you’re only looking for extra light.
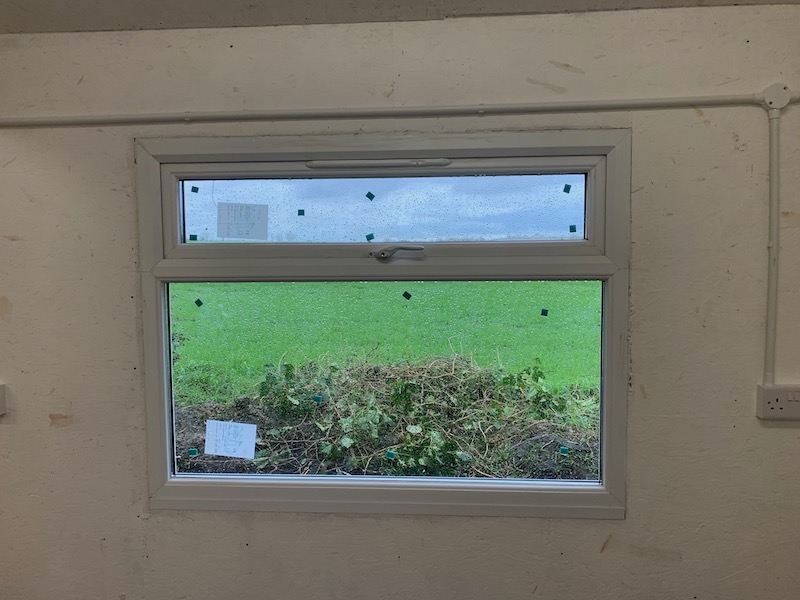
Sorry about the weather, makes the view look less inspiring. I’ll get a couple of pictures and update this again in Summer!

Some cool shed articles that might help you:
- 4 Best shed bases reviewed (UK) (November 2020 Updated Review)
-
Pick the best garden shed of (November 2020 Updated Review) -
Best wood preservative for sheds ranked by strength and price [Summer 2020] -
Best shed and fence stain for woodwork in your garden (November 2020 Updated Review)
3. Mark out carefully
Once you’re decided use a carpenters pencil that’ll leave an easily visible line on the wall. Check that there are no screws on the boarding in your path and make the plunge cut with a circular saw , or better yet a plunge saw if you have one to the depth of the OSB. Be careful though, plunge cutting with a circular saw is dangerous and needs care and attention. If you’re not sure don’t do it but the link provided shows pretty good technique. It’s possible you don’t have an internal boarding so you’ll just ignore this step. Use a plumb bob to run accurate lines. The more accurate the marking the easier the cut to get right.
4. Cut the opening with a plunge saw or carefully with a chainsaw
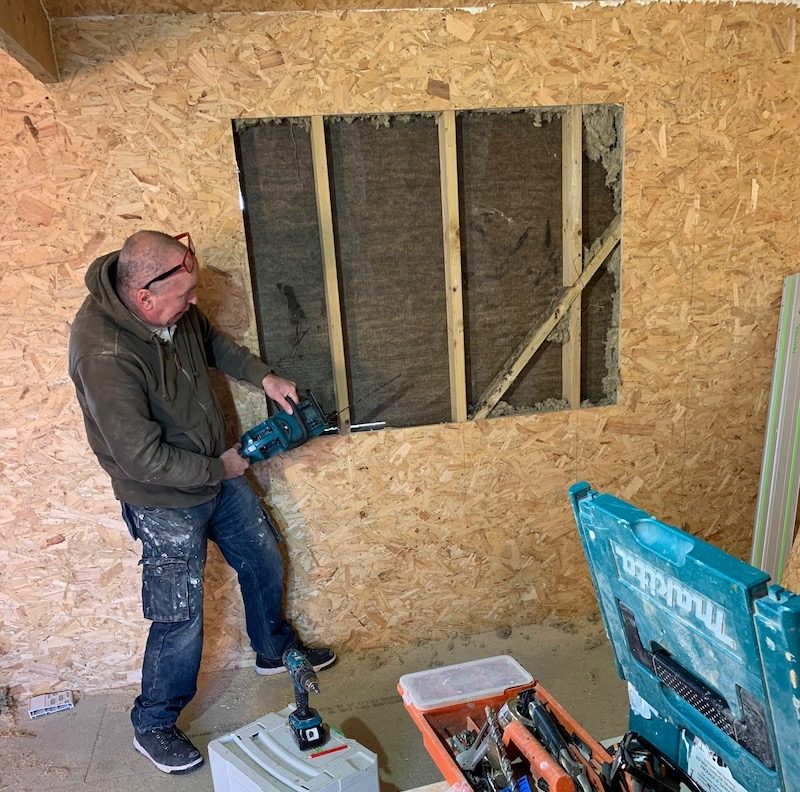
WARNING: Before you cut into a wall always know that you do not have any cable or pipes. If you’re unsure, don’t do it!
A plunge saw is much neater than a chainsaw and far safer. You could use a circular saw to cut the studs carefully. The big problem though is the depth. In my case I needed to cut nearly 150mm from front to back. So I had no choice but to make the opening with a chainsaw or a handsaw. I used my cordless chainsaw. The Makita DUC302Z Cordless Li-Ion Chainsaw is a super bit of kit. As you can see from the pictures it has plenty of power and it’s so much less hassle than petrol. It’s also way quieter. So for mid range jobs it’s actually a stunning bit of kit. I used an oscillating multi tool just to clean up after the chainsaw and tidy up the cuts a little so the frame fitted nicely.
5. Build back a solid lining and screw in the window
To fully secure the window the best thing to do is build a lining for the window to sit in. Depending on the current thickness of your shed studs, (maybe 3 by 2 or 4 by 2), use the same and make a square lining so the window can be screwed and fixed in securely. This is where you want a good cordless drill to make light work of 70-100mm screws.
Other useful shed articles that may help you:
- Best ways to clean a shed gutter and not need do it again for years to come
- Learn how to clean and refurbish a shed roof rather than replace
- Learn how to clean up the exterior of a shed that looks tired
- How to install electric with RCD into your shed or workshop garage safely?
- How to insulate your shed and turn it into an office or summerhouse garden room.
- How to Build a Shed Base on Soil
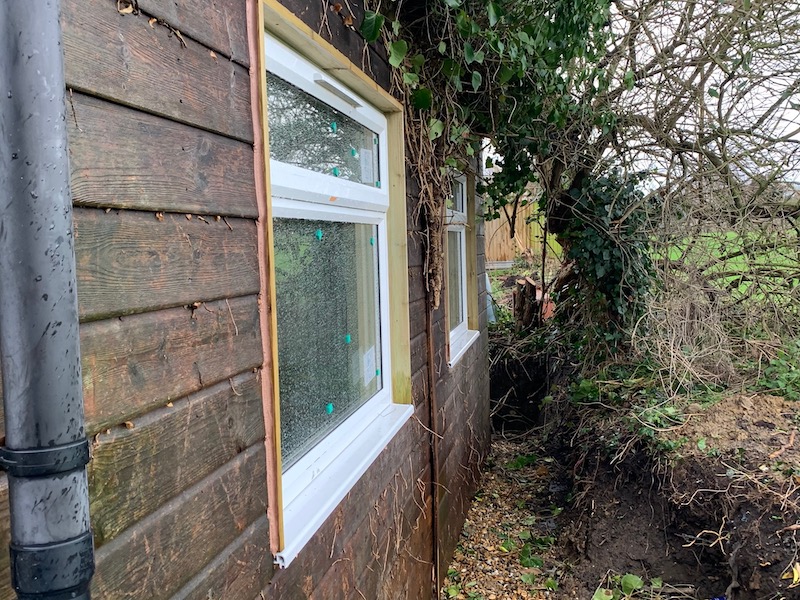
6. Seal up inside and out
Depending on how big your gaps are, you may want to use expanding foam to seal up the joints between the lining and window frame. Once this foam sets, cut off any foam that spills out further than you need and seal the window both internally and externally with an exterior frame seal. Silicone works too. Just make sure there are no gaps for moisture to get in or you’ll end up with damp and eventually rot.
7. Trim the window up if they need it
The last step is to pop a lining both inside and out to tidy the window. As you can see it’s basically designed to stop moisture running into the wall. I still need to put a little architrave and nosing around the inside of the window but I want to run worktop along there so I can decide how to finish in the window after.
I hope this guide helps you plan and avoid mistakes when fitting windows into your shed.