
With the Covid-19 shift toward home working for office staff there has never been a better time to convert your shed into an office, studio, or workshop space. Many office staff will never be returning to work. How do I know that you ask? Well for a start I have closed our office and insist on everyone working from home, especially since I’ve worked out we are getting more done as a team – why would I go back to a less efficient, more expensive model? the one big challenge for all though is a quiet area to work if you have a family with young kids and an office in the garden affords you that peace and quiet to get things done.
That’s not going to happen for any business who realises the same… so we recently converted a shed into an office workshop area come summer house, basically an additional room that improves the enjoyment of the main house.
This article is pretty relevant to all concerned even if they don’t actually have a shed yet. Looking at the costs, it is probably still cheaper to buy a new shed as a carcass, then convert it as opposed to buying a full blown out of the box office solution.
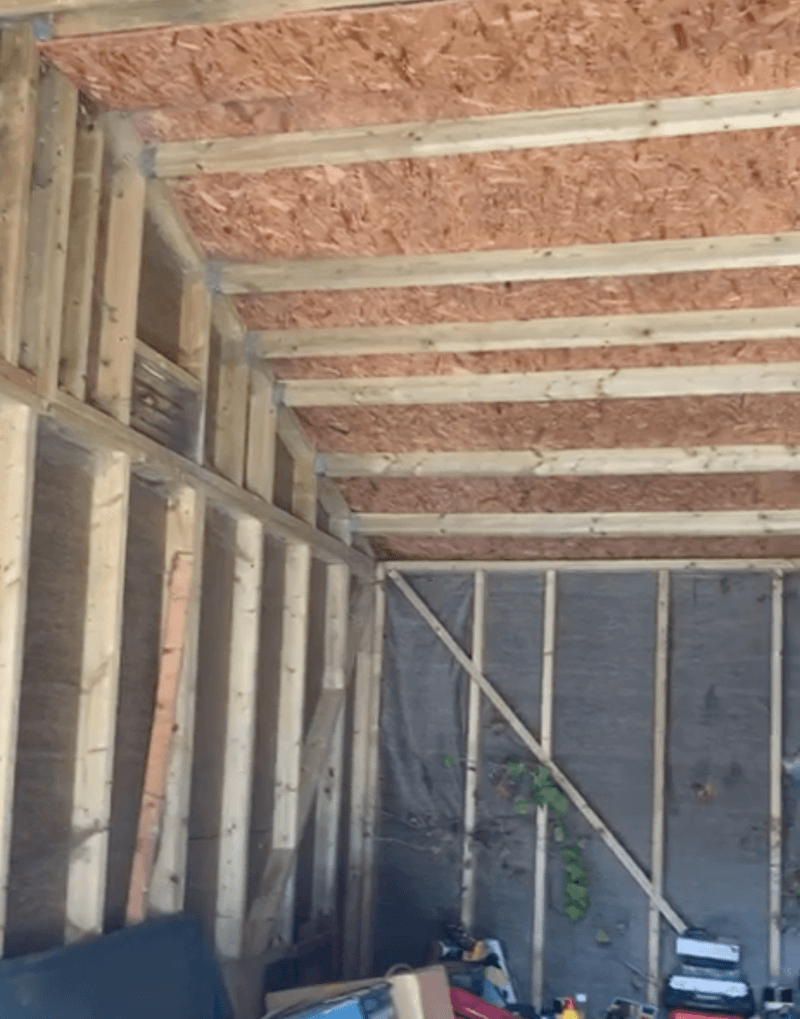
Part of that conversion was cleaning the shed roof, cleaning the shed exterior walls, cleaning the gutters, and installing power with an RCD breaker unit in the shed too. We gave the shed the full going over as well as wood preserving it to make sure we don’t have any maintenance issues in the near future.
In this article you’ll learn about:
Why would you insulate a shed if you’re making an office?
1. Install Rockwool in the joints between the studs
2. Cover the Rockwool insulation with Steling board (OSB)
3. Install an insulated shed floor the easy way – Jablite EPS70 100mm and Chipboard
4. Paint and seal the joints with a good quality emulsion
5. Install power with an RCD Breaker for sockets and lighting
6. Consider heating options
How much did this shed insulation and the conversion cost?
Why would you insulate a shed if you’re making an office?
Working from home is a big challenge and the best way to beat it is an office in the garden. That’s what I’ve found so far. The main problem is the kids arrive home at 3:30pm or don’t go at all due to Covid restrictions but we both know as I write this, work doesn’t finish until much later normally. Emails, calls, and meetings require peace and quiet to fully concentrate and engage. That’s when it’s time to start looking at a building outside as a viable work area. This shed is being used as a junk room and could be so much more!
One of the biggest challenges of using a shed as an office or Winter garden room is the warmth. A typical shed is COLD, and depending on the shed base / walls, it would be almost impossible to cost effectively heat, or even retain enough heat to be comfortable. So for that reason, I wanted to share some pointers that turned this shed from a damp and cold storage space to a crispy warm and very comfortable work area with a huge drop in noise from the insulation too. A nice bonus if you have some noisy work to do from time to time.
1. Install Rockwool in the joints between the studs
The first part of this job is to pick your Rockwool thickness. This shed in question is rather large and built from 4 by 2 so the studs were 90mm or so deep. For that reason I chose 100mm Rockwool and really jammed it in there to give myself maximum insulation and expanding foamed all the joints. The other benefit of jamming it tight is in the roof trusses it’ll hold itself long enough until you board over with OSB.
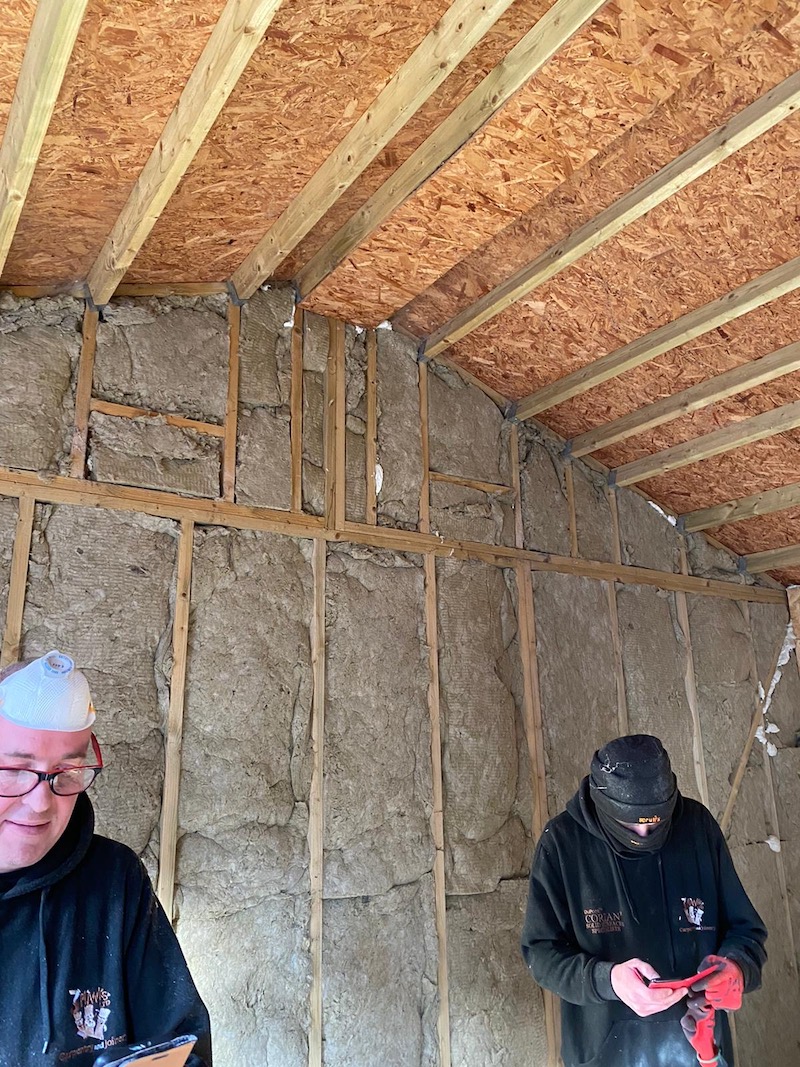
As you can see from the picture I really do my best to ram the insulation into the gaps for maximum performance. Talking of maximum performance, I chose Rockwool as opposed to Celotex because I was interested in noise and heat insulation. If my only interest was heat then I may have chosen Celotex. It’s worth doing a little further research on which material will suit your project best. This is also the time to consider your wiring if you want to hide the cables and you should consult with an electrician. I wanted to surface mount my wiring in conduit so that came last for me. I also measured out for the large sheets of 8 by 4 and added extra studs to minimise the cutting when it comes to installing the 18mm OSB.
If your shed is smaller in construction, some are 3 by 2 or even 2 by 2. If you want maximum insulation then you could always build a second stud, or easier would be to install ply with an insulation backing but that’s expensive be warned. You’ll be shocked by the performance of 50mm Celotex or Rockwool though so certainly not necessary!
Once the Rockwool is in and the expanding foam has set, it’s time to trim that up and prepare for the next step of boarding out the shed and sealing in the Rockwool.
2. Cover the Rockwool insulation with Steling board (OSB)
The next step is to board out the shed. Because this shed is 5.5metres square and rather large, I decided to use 18mm OSB (mainly to seriously improve the overall strength of the construction). This is the cheapest and strongest material if you’re looking for value for money to keep the costs sensible. Beware though, it won’t give you a smooth finish, you’ll need to use plasterboard or ply which is much more expensive if you want that. I had no problem with OSB though because it was less than half the price of external ply and so much more durable than plasterboard.
The first thing to do is workout for your studs and fit any whole sheets that you can. Most sheds will be measures with a full 8 by 4 sheet in mind so you should be able to find the middle of a stud assuming the shed is bigger than 8 by 4. If not, then you’ll need to cut the boarding down or add extra studs. I added studs In the previous step and probably you did too if you read the first step carefully 🙂
A good tip is to use full thread screws. This means the boarding will continue to pull tight. I used 50mm woodscrews with a full thread but anything from 40-70mm would work just fine. As you can see from the picture below boarding out is an easy job, made much easier with the extra studs to avoid making cuts. Here’s a look at the room boarded.
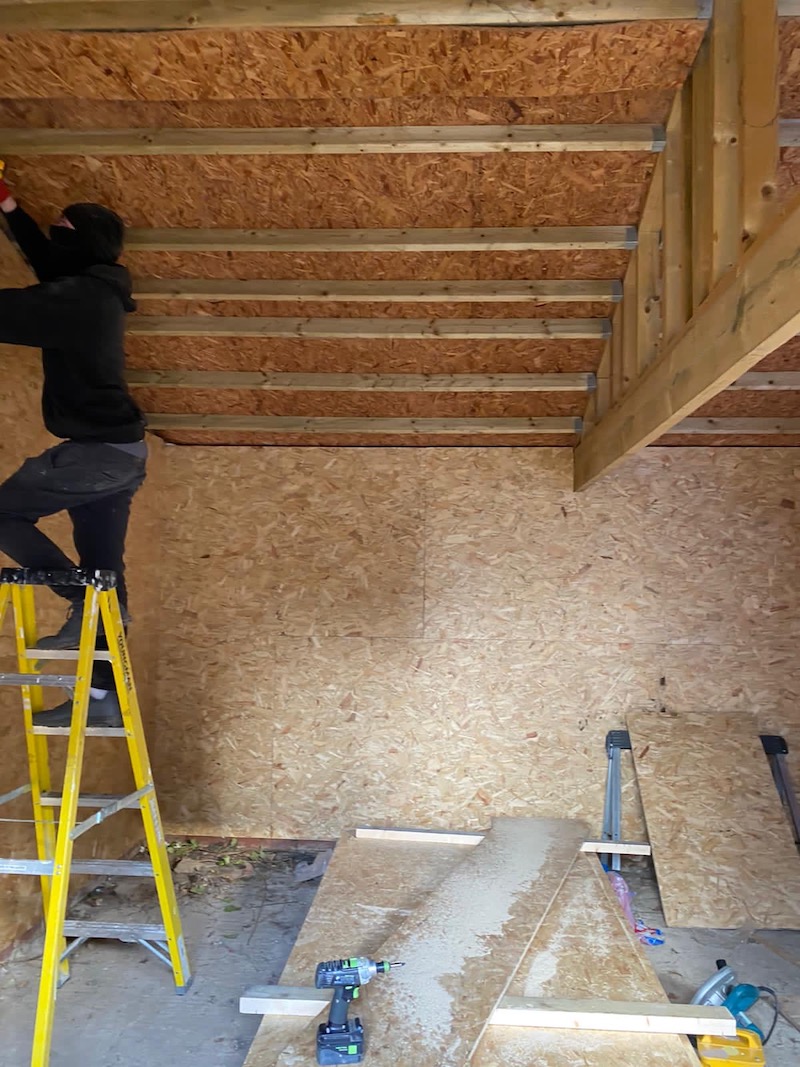
Another handy tip is to mark your studs with a line. So as you see the timber stud running vertically, either measure its position all the way down and mark it or use a plumb bob to help you find the centre of the stud. It’s really annoying to miss the stud behind and make holes when it only takes a couple of minutes to mark accurately for your screws.
For the roof you could use a lesser thickness OSB to make the job more manageable but I stuck with 18mm all over and it was reasonably comfortable to install for two people using a good cordless drill.
Again make sure that you expanding foam all these joints too. This ensures that you’ve sealed the rockwool and then sealed the OSB to the rock wool forming a secondary layer of complete insulation.
3. Install an insulated shed floor the easy way – Jablite EPS70 100mm and Chipboard
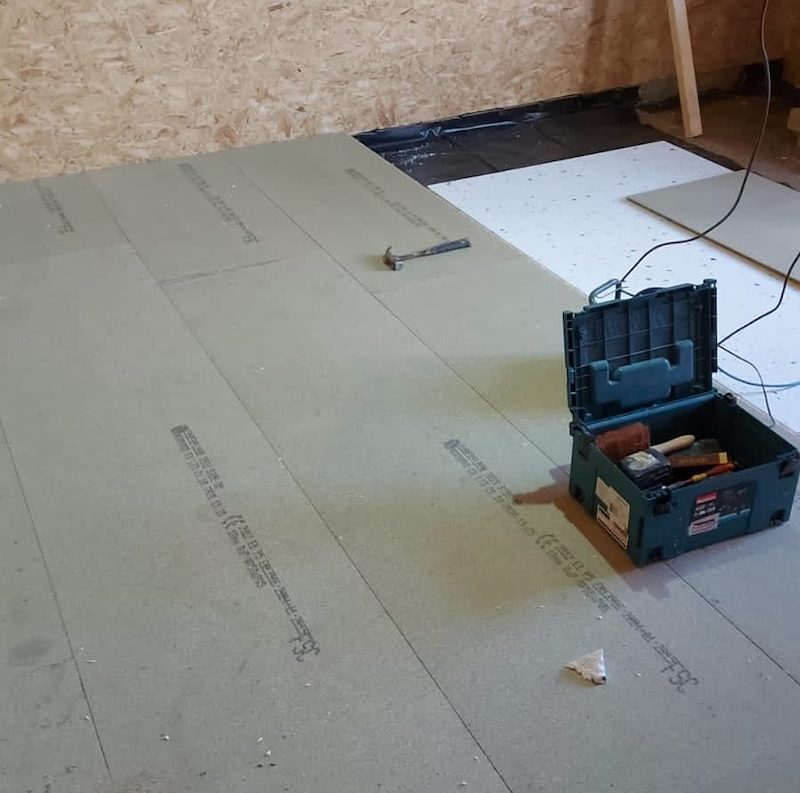
An insulated floor makes a big big difference. Surprisingly you lose a big chunk of heat from the cold rising through the floor. I chose Jablite (EPS 70) 100mm thick and a chipboard because it’s an excellent insulator but also gives a very nice feel when walking on it (oh and this is SUPER value for money). Almost like a floating floor with a little give. Don’t worry though, it is extremely strong, you can put a pool table in it without worrying about it sagging. It’s also the cheapest way pound for pound. You can finish over the top wit ha carpet easily if you like.
Jablite is so easy to install. You just lay down DPC, lay down the Jablite, then adhesive them together and then put the chipboard together (it’s tongue and groove). Just pick a corner to start in and it slots together like laminate flooring. You’ll just need to glue the joints and keep the chipboard tight together. Even a 25m2 floor will surprisingly only take a few hours to lay, it’s that easy! Here’s a look at the DPC, the Jablite laid ready to then continue the chipboard:
You’ll only really lose time on the cuts trimming it into the wall. I was going to pop a skirting board on to keep it all down but instead I just kept the joints tight cutting them in with a circular saw and neat so decided against a skirting in the end. Give this a couple of hours to set and you’ll be good to walk on it. As you can see it looks great:
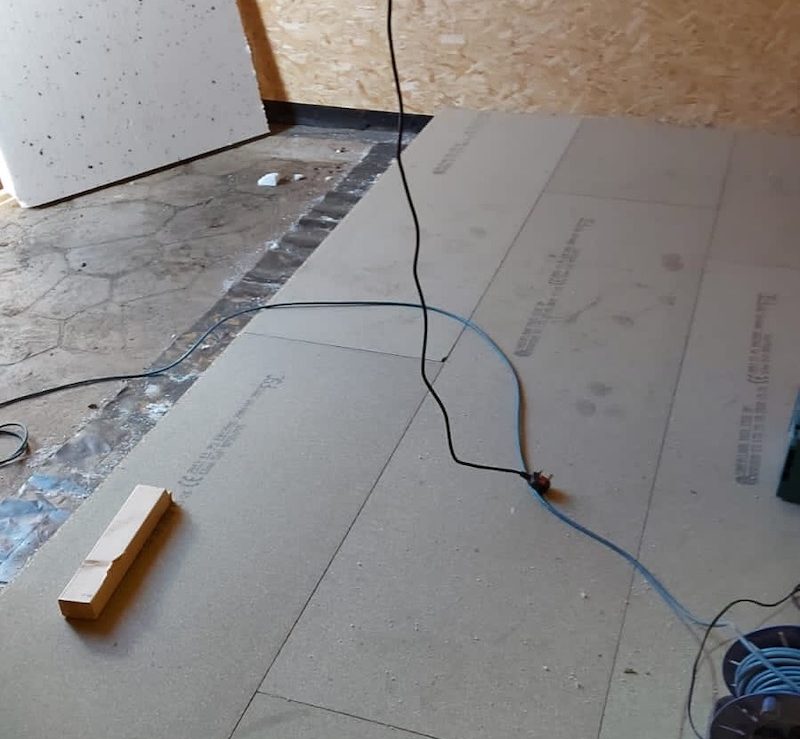
Here’s a picture of the chipboard and Jablite as a cross section by the door:
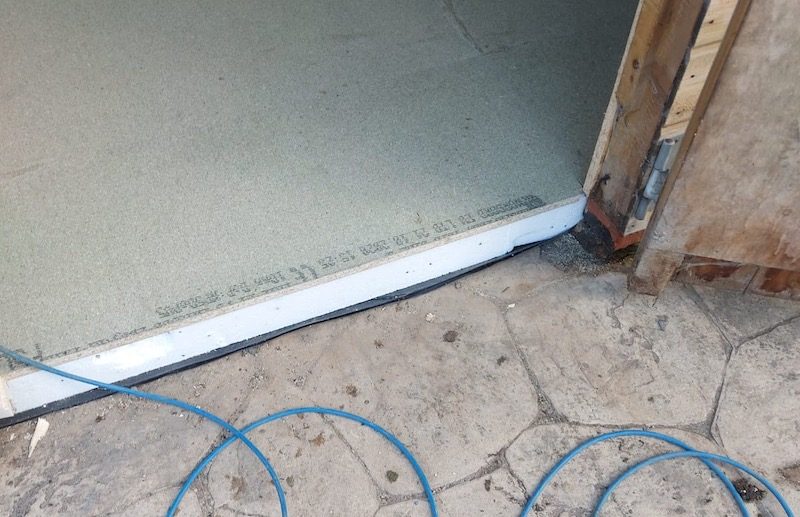
This floor really made a big difference to the overall comfort of the room. I highly recommend going this route as it’s cheap and effective as well as comfy to walk on!
4. Paint and seal the joints with a good quality emulsion
First run around any joints with a caulk gun. Use a decent caulk like Geocel Contractors Caulk. Give that overnight to set and then lay on your emulsion with the paint roller. You’ll need to lay three coats of emulsion with the new OSB and it’ll still bleed through in patches. An option here is to use a paint sprayer. You’ll want something quite serious like an airless paint sprayer if you go down this route. Personally I think a roller is better because I don’t want to paint the floors too so would require a lot of masking up if I did blast it with a sprayer.
Here’s a look after a few coats. You’ll notice it’s still bleeding through but I’m happy enough with that for now, I just wanted a white wash to improve the look:
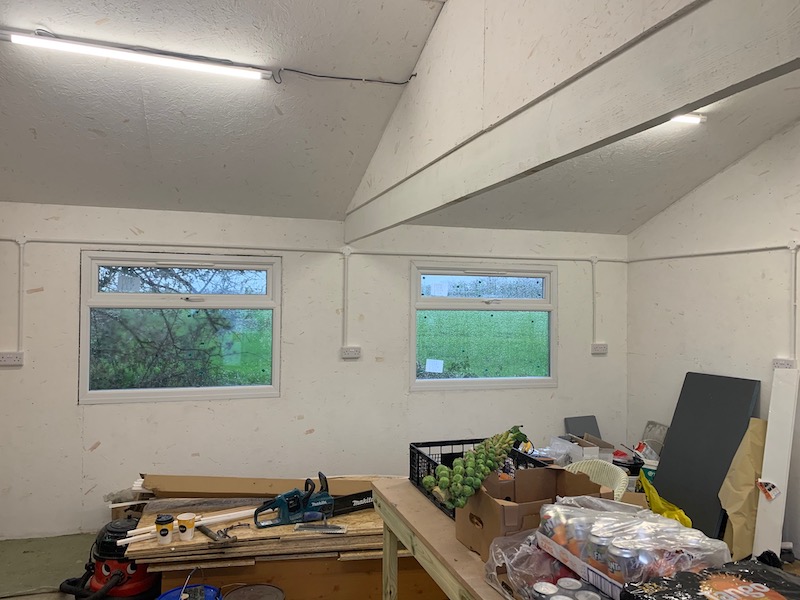
Things are starting to come together and you should be feeling pretty good about the whole thing by now.
5. Install power cable with an RCD Breaker for sockets and lighting
Let’s be clear – you don’t need to run a professional power supply but it’s safer, there’s no tripping over power leads, and injury from electric shock is significantly reduced by doing things properly. In my article previously of how to run a power cable to your shed you can see the entire process. The idea of the breaker is simply you can control your power better. You can have the lights and sockets on a different circuit so you can safely isolate your power.
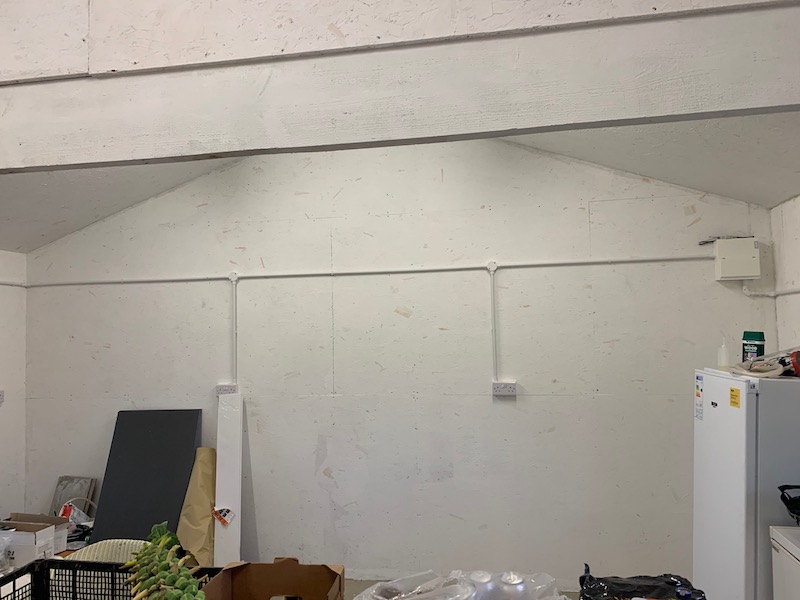
I chose to surface mount my cables in a conduit. I thought this was appropriate for a workshop and office space. IF you feel your space is more office and summerhouse garden room then you may feel hosing the cables in the second step a better option. I wen’t with simple LED strip lights for maximum brightness and minimal costs.
6. Consider heating options
If you decided on an RCD you can now safely consider electrical heating such as a space heaters or table top heaters will work nicely in an office. You could even go with oil filled electric radiators. If you’re still using a power cable extension then you will trip the power or blow a fuse easily if you use a blow fan heater.
Given the size of my shed I am going to opt for two big radiators. I’ll run the pipework to the shed and then isolate them so if I am not working in the office then they will not be heated. This will save a fortune in the long run!
How much did this shed insulation and the conversion cost?
A wooden shed the size of a twin garage is going to cost you around £4000-£5000. The insulation in total including boarding cost another £4000. I cut the windows in and they cost me about £400. So for 27m2 you will pay under £10,000. You’l need to consider your shed base and shed alarms for security but other than that this is the entire cost.
Rounding up insulating your shed
I hope this guide to insulating your shed and converting to an office has given you some good ideas regarding planning. You don’t want to spend all this money and not protect your property! I know if this article was available for me before I started then I would have certainly saved money and time on some decisions. In a future article I am going to show you how I cut out and installed two windows to look over the farmland whilst working so stay tuned 🙂
Hello Terry
I have read your helpful review of various space heaters. I have a studio about 30 sq.m in size. I love it but at the moment I am finding it very cold. I read your positive comments about the warmlite convection heater. I looked at it on the Amazon website and comments about it were good apart from when it came to attaching the feet. There were a lot of negative comments about that. I do not have anybody to help with odd jobs so this has made me wary of ordering the warmlite. Did you have any problems.? Perhaps you have advice to offer? I do lots of Textile work in the studio and I love it but I can’t function if I am cold.
Hi Patricia,
I didn’t experience that. They really are just a couple of posidrive screws. Unless the model has changed? Please let me know.
Regards
Terry