You’ve (and by you, I mean me :D) looked over at the neighbours lawn recently and chances are you’re wondering how on Earth they’ve been able to get a perfectly sleek, level look to their lawn with a beautifully lush green 5 or so centimetre lawn height without calling in a landscape gardener. One of two things, they either learned how to revive a lawn after scarifying as well as how to overseed a lawn like a pro. The other possibility is they started from scratch too. I’ve got you covered either way now 🙂
Funnily enough, the Covid-19 lockdown has done wonders for many garden lawns because despite the lack of materials, some of the best grass seed and lawn weed and feed never ran out of stock. Whilst many other materials dwindled, it resulted in a huge surge of revitalised lawns. If you read my how to plant grass seed article, you’ll note I advocate planting grass seed in September (the traditional time to sow grass seed). From my personal experience of sowing many lawns, this is the best time because you’ll have a moist ground that doesn’t require watering. But actually, in lockdown when you had all the time in the world, March (as things just started to warm up) was the perfect time IF you had the free time to ensure a moist ground constantly (which we all did). You could also consider the end of March the perfect time if you have an automatic watering system set on a timer.
This latest lockdown has inspired me to write about how to level a lawn earlier than I thought I would this year, and it’ll payoff if Covid keeps you in the garden this March, rest assured! It looks pretty likely with school closures as they are currently. Plus, in the UK it’s quite easy to sort out levelling the lawn yourself with a bit of good old fashioned elbow grease and some tools. In this guide I am going through how to handle levelling a lawn completely from scratch. And yes, I do mean literally killing and removing the old lawn/weeds back to soil.
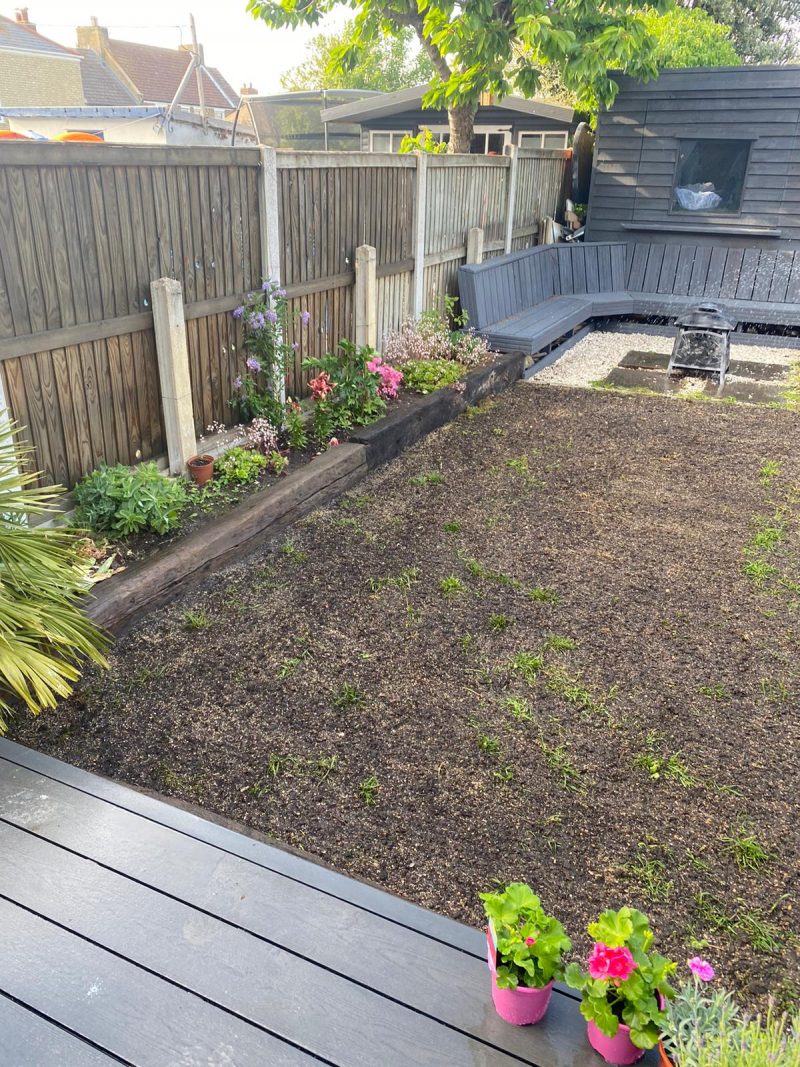
In fact, here’s a picture of my lawn (as you can see, I can’t really call this a lawn) looking pretty tired, patchy, and although the picture doesn’t show it well, full of weeds.
To be fair though it took an absolute hammering when I built my recycled plastic decking. So I decided enough was enough and I blasted the lot with a quality weed killer. If yo
So let’s get into the steps to fix your lawn.
Kill your remaining grass and weeds with a good weed killer
Dig the ground level where necessary
Turn the ground over with a rotavator, tiller, or dig with a fork
Use a rake to level and break up soil and mix in lawn fertiliser
Apply seed and roll it
Generously water and keep at it
Wait for the grass to come through, cut, and then level again with sand
How your lawn will turn out if you follow my guide to levelling and starting a lawn from scratch
Kill your remaining grass and weeds with a good weed killer
It feels a little uneasy killing your lawn, or at least it did for me the first time I did it. I like to think of myself as a constructive person and although I knew the improvement would be huge in the end, it was a little difficult to accept my half green lawn would be no more than a patch of brown with dead remains. This is where using the right weed killer for the job counts. In my opinion and from personally testing, I like Gallup home & garden glyphosate. It is probably the best weed killer for a lawn and general weeds where price point is concerned for home gardeners. It’s very strong with 360g/Litre of Glyphosate. In fact, it’s so strong, it’s the weed killer I use on block paving and driveways too. It’s a brilliant all rounder. But, why I like it the most, I have been able to start a separate compost bin for next year as the active ingredient Glyphosate doesn’t last very long. It has a half life on average of 47 days and generally ranges from 2 to 197 days.
Crucially for us as a gardener though and not to be confused, the study points to Glyphosate binding with soil on impact, thus rendering the amount of Glyphosate able to kill your new grass negligible almost instantly, making it superb as a pet friendly weed killer too.
Once it’s bound with soil it can’t have uptake in foliage. This however assumes all dead foliage is removed and the ground is turned over which we will come to in a later step. Expect results in a couple of weeks and rarely will you have to re-apply if you go quite heavy the first time. It mixes at 30ml per litre and is super easy to apply with a normal pressurised garden sprayer.
A couple of weeks later your lawn will look like a brown wasteland. I told you this Gallup weed killer is the real deal! At this point I raked up all the dead foliage and piled it into a second compost bin. I could have easily put it in my normal compost bin but decided next year is better. I really hit it with the weed killer thoroughly 🙂
Dig the ground level where necessary
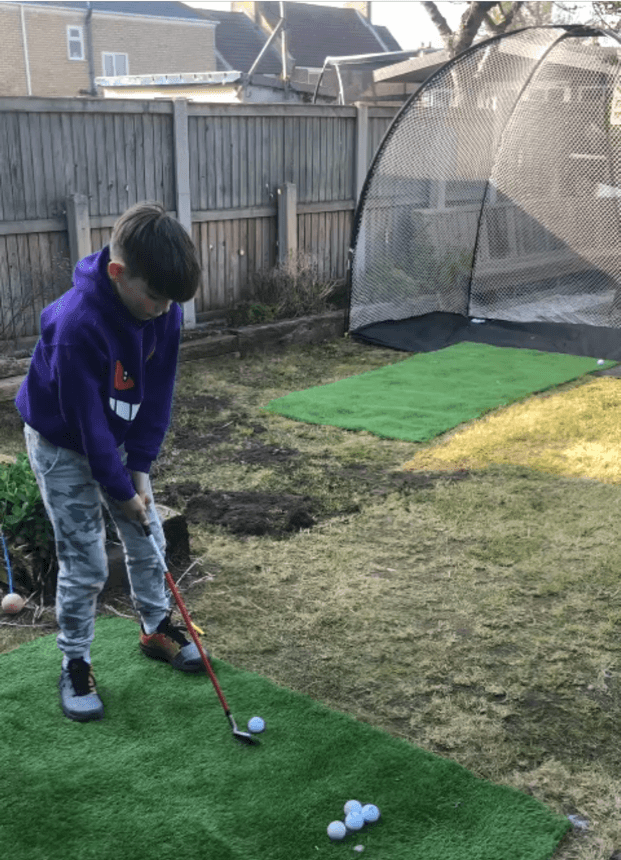
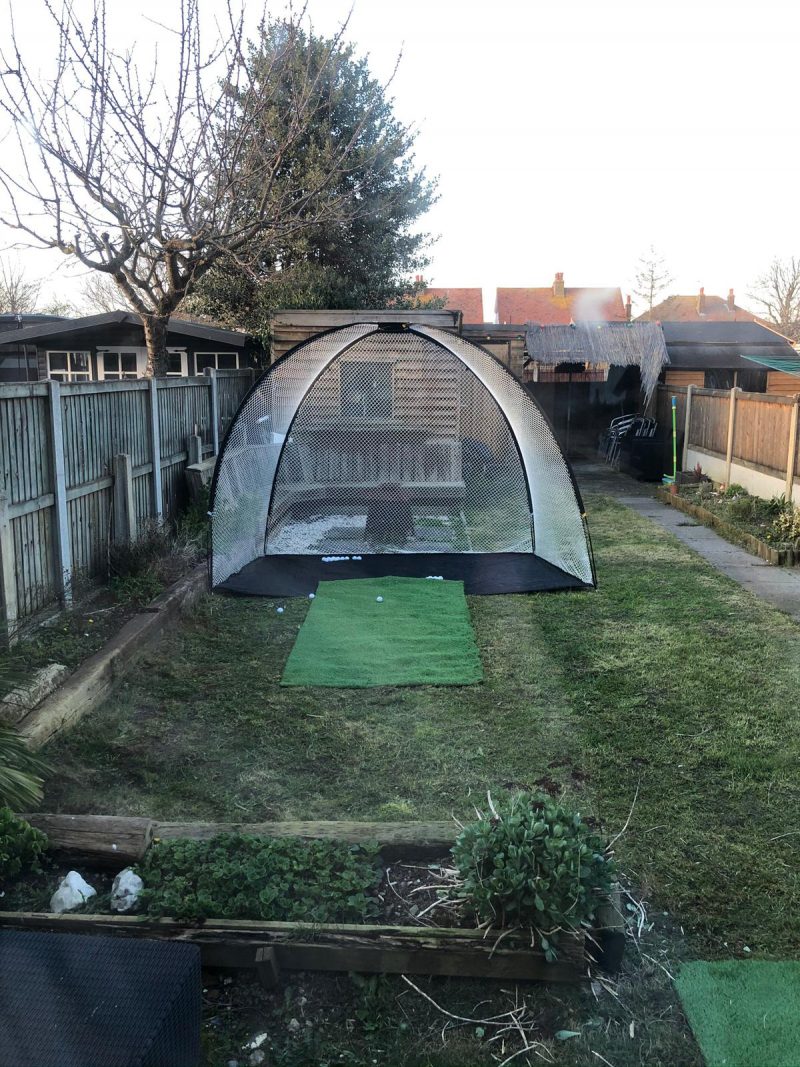
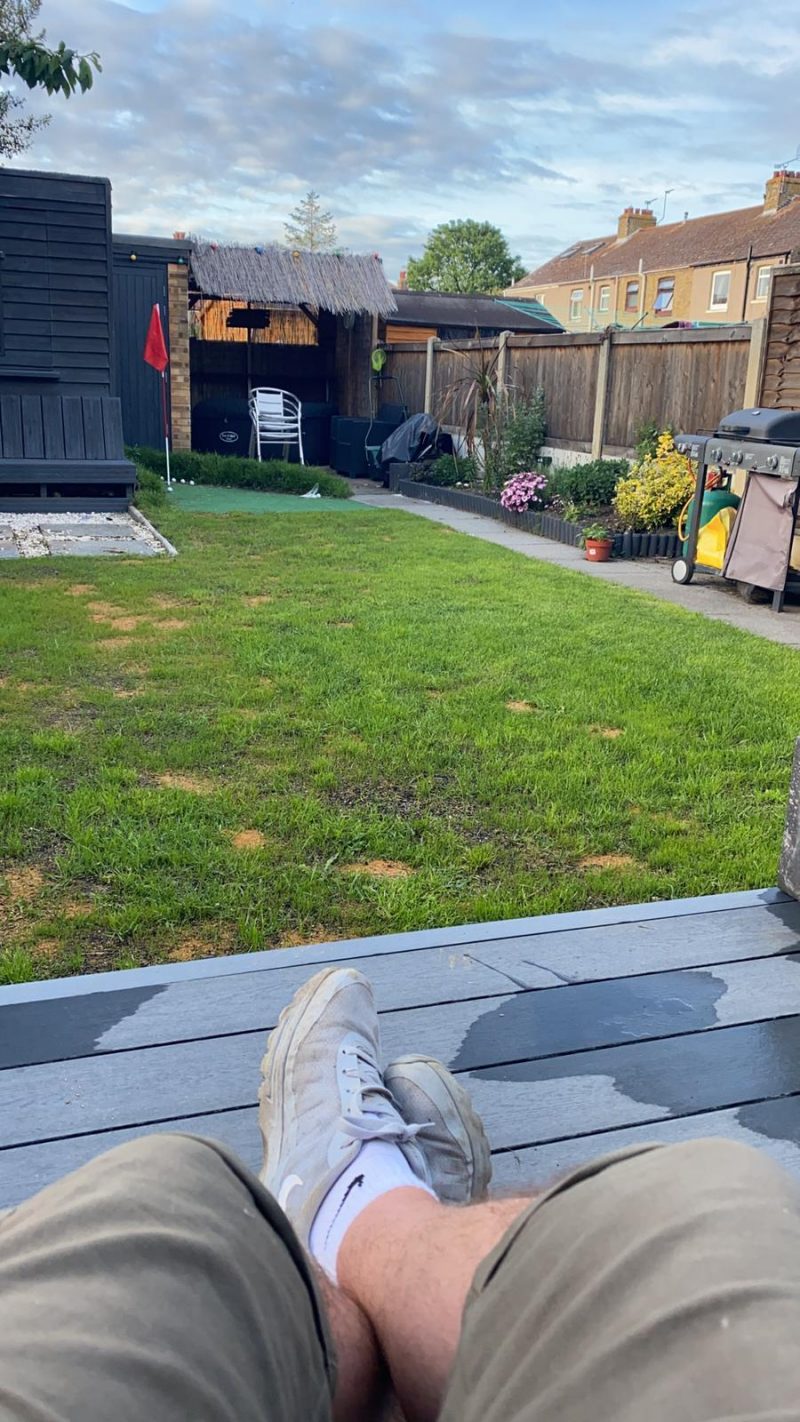
Now you want to look for high spots and dig them out. To be honest my ground was pretty level, with more low spots than high, so any material I removed was simply moved to low ground. If you take a look at my picture below, with my cool golf net I reviewed if you like to muck about at home with the lockdown. You’ll see my high spots are around the edges near the sleepers. I’m certain there will be many amongst you with far more levelling. In this instance you can run string lines or lay down boards to ascertain level. I cheated a bit with regards to low spots, I knew as my new grass came through I would get a chance to throw a few handfuls of sand on and the grass would highlight the low spots for me so I wasn’t perfect but it came out ok.
I do this before I turn the ground over with a tiller. You’re probably wondering why? In my opinion ‘fluffing up’ the soil makes it harder to know where you’re really at level wise once you roll. The ground. Now also, a roller is nowhere near as effective at finding levels and levelling as ground that has been compacted for decades. So to me the idea of turning ground over then levelling because ‘it’s easier’ doesn’t produce the best looking levelled lawn.
Turn the ground over with a Rotavator, Tiller, or dig with a fork
It’s important to understand the difference between a Rotavator and a tiller. Essentially a tiller is a smaller rotavator designed to dig about 150mm (or 6 inches if you prefer imperial) deep, absolutely perfect for turning over a dead lawn to start again. This assumes the ground isn’t really hard as a tiller may struggle, that’s also worth knowing too, especially if you go for a cheaper electric version. If the ground is wet then it’ll be no problem at all. If you’re doing this in March then it’s a safe bet you can get away with a cheaper model if you don’t fancy a hand dig 🙂 With the price of electric tillers being so low, the only possible reason to have a dig by hand is exercise.
The best way to get an even till is pick your direction and follow it. To ensure the entire ground is turned nicely I always turnover the ground both directions in a grid pattern. This serves two purposes. First it does the obvious (turns over more soil) but it also helps break up the larger chunks which makes levelling with a rake easier and less effort.
Use a rake to level and break up soil and mix in lawn fertiliser
Don’t take this step lightly – it’s easily the most important in my experience. This is a great time to get a good lawn feed well mixed into your soil. You need to break up and level larger chunks of soil. I cheat at this stage. Years ago I was told about a super trick to improve drainage on lawns. Mix sharp sand with your soil at this point. You will not be disappointed! This method is extra super if your soil is clay based but good for almost all soil. I’m not a fan of rolling or forcing the ground back down here, just a good tamp down with your rake is sufficient in my mind, after all, the grass will soon knit the soil together nice and strong. This means when it rains, the fertiliser will dissolve into the soil, rather than run off the ground. A big plus.
Gently and slowly break up the soil and mix in some pre seeding fertiliser. My absolutely favourite at this point that in my experience never fails is a blood, fish and bone mix. A decent fertiliser for the lawn can offer nutrient rich growth for about 4 months so is almost ideal for a new lawn grown from seed. I personally add about 250g per m2. This is easily overkill but the cost of the fertiliser is nominal when considering the overall effort so I want my seed to have an abundance of nutrients to take hold as quickly as possible. If you read manufacturer guidelines you’ll probably see 120-150g of fertiliser per m2 is more than adequate, I think when you sprinkle it though, it’s too easy to ‘miss patches’ of ground.
This is a slow process and I wouldn’t bother using a lawn spreader because the grounds are too uneven to easily pull it about. Just keep going steady with a rake and you’ll get there. Here’s a look at my garden levelled, feed applied, and soil broken up nicely. In fact, this picture is as the first grass is starting to germinate, it’s the best one I have that shows the before and after process from levelling!
Apply seed and roll it
Going back to the point about not rolling after raking because of applying fertiliser, it has a double whammy benefit when it comes to see. The light seeds stand a much better chance in life if allowed to fall into nooks and crannies from the slightly uneven raking. If you want to look into how to plant grass seed in more detail the link will help, it’s a nice read. Me personally on a lawn from scratch, I’m going to use a garden sieve or just throw it on by hand. A lawn spreader works good here too. If you’ve got a large area then it’s the best way of getting a fuller coverage from your seed.
Crucially though it’s time to pick your lawn seed. As you can see from the before pictures my lawn takes a battering. I’ve got kids, pets, and my own golf habit 🙂 That meant only one choice for me, a mix high in Dwarf Perennial Ryegrass. This is a tough grass, in fact it is the toughest cool climate grass going.
So once I finished seeding, I got out the best lawn roller pound for pound money can buy in my opinion, it’s just a heavy duty garden roller made of steel unbranded. It’s way cheaper than other models and just the ticket.
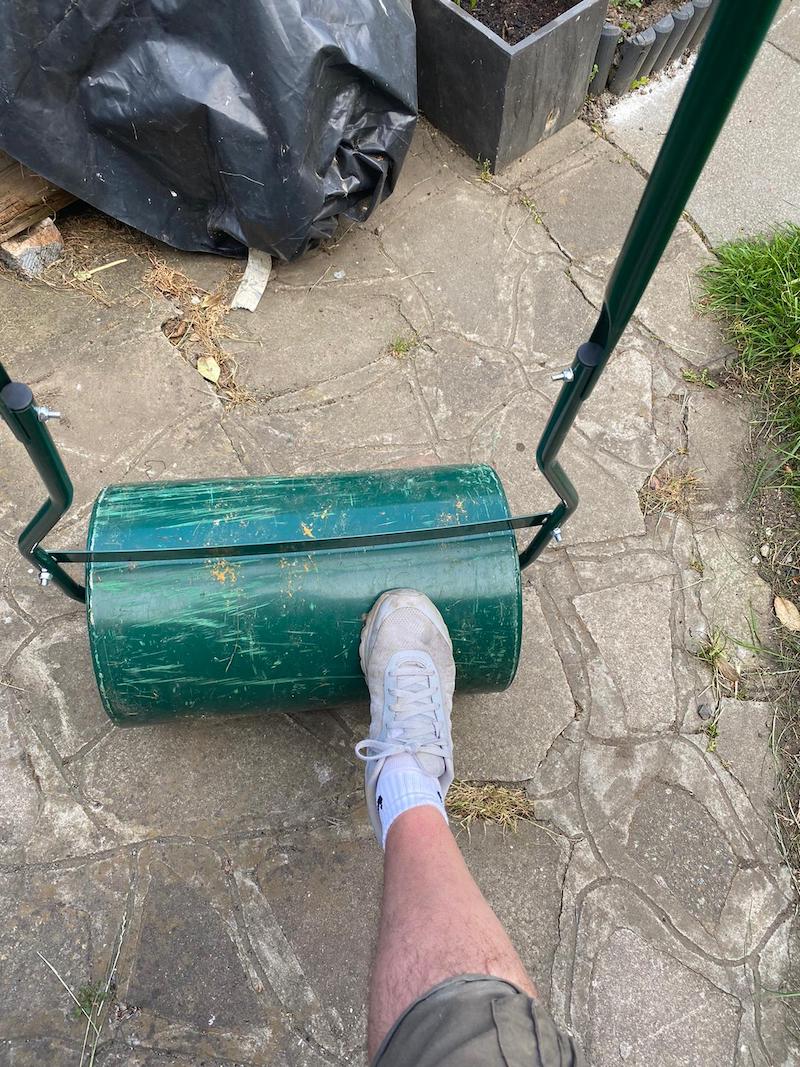
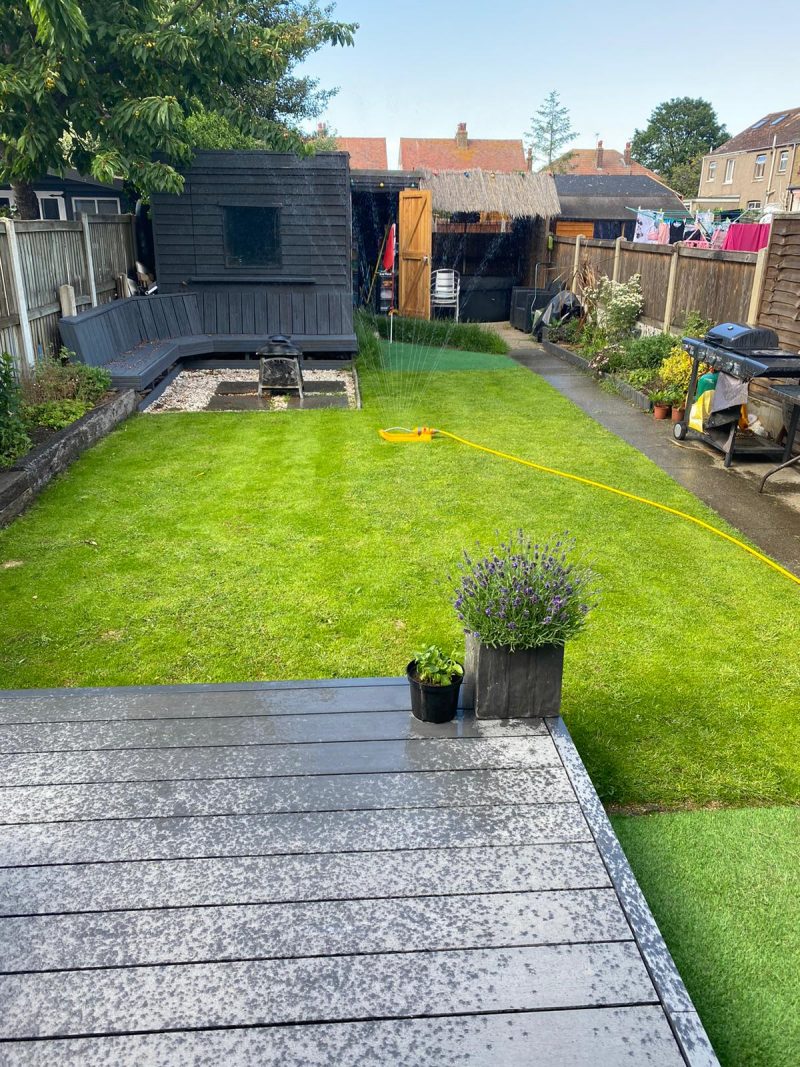
The setup time was minutes, and as you can see from the picture the paint was chipped and it looks well used from just half a dozen hours, so why pay more for a dead weight? Once completed to this stage you’ve earned a beer, while you watch the garden sprinkler for half an hour 🙂
Generously water your lawn and keep at it
I don’t care what the internet tells you to do, if you used the grass seed I recommended, water your lawn heavily for the first four weeks or so and do it everyday. I have seeded lawns using Dwarf Perennial Ryegrass plenty and it wants watering everyday. It’s not difficult, in this example I used a Hozelock garden sprinkler and would recommend a wall mounted automatic garden hose reel to make your life a doddle.
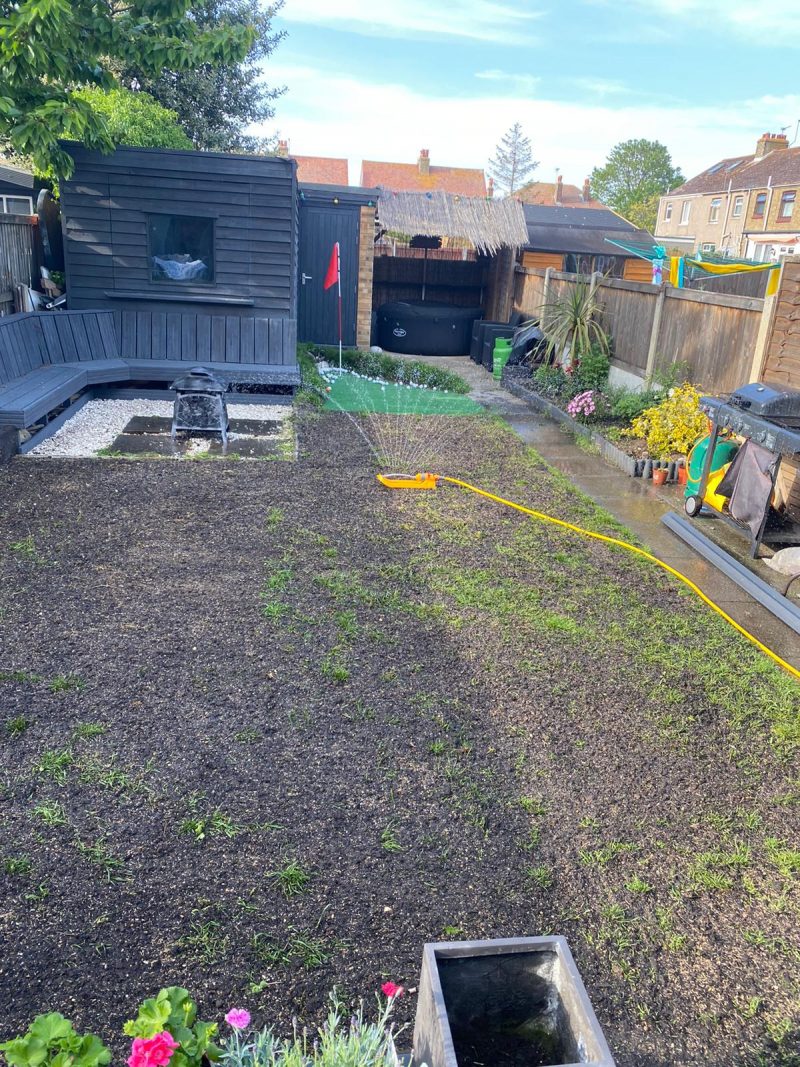
The cut off point is when the water isn’t absorbing into the soil, you don’t want the nutrients to run off. If it’s going to be a hot day, I’d go twice a day, early morning and early evening. At this stage your only goal is to see these little grass shoots coming through. It’s quite exciting because Dwarf Perennial Ryegrass will come through in about a week or so normally as you can see above. This is about 8-9 days.
Wait for the grass to come through, cut, and then level again with sand
It’ll take a couple of months for the lawn to come through fully. Wait until the grass is about 4 inches in height and cut for the first time. Don’t use a flymo, use a wheeled lawn mower, or my preference because I wanted to start getting a striped lawn, I used a hand push cylinder lawn mower. I’ve got the Webb WEH12R but it’s always out of stock because it’s so good for the money. Here’s a picture of my baby.
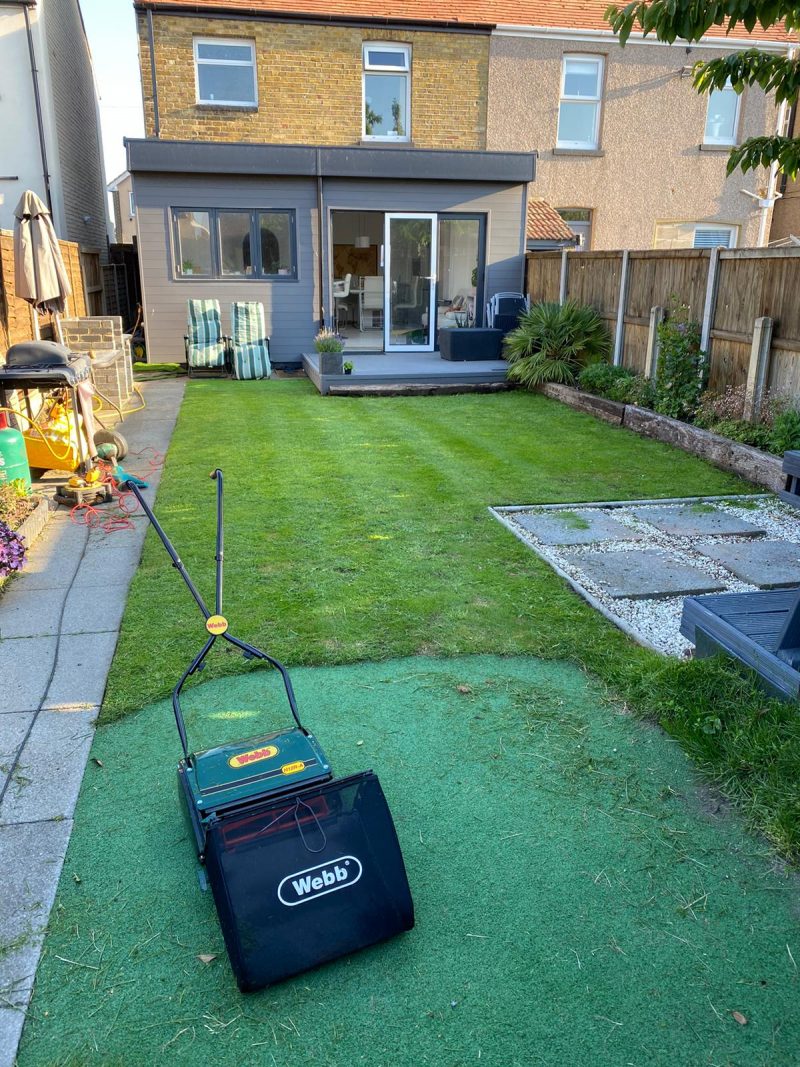
It really does make a lovely stripe pattern as you can see but let’s cover the levelling process a little more:
With the first cut made some low points will become obvious, carefully throw on a few handfuls of sand wherever required and then roll it in.
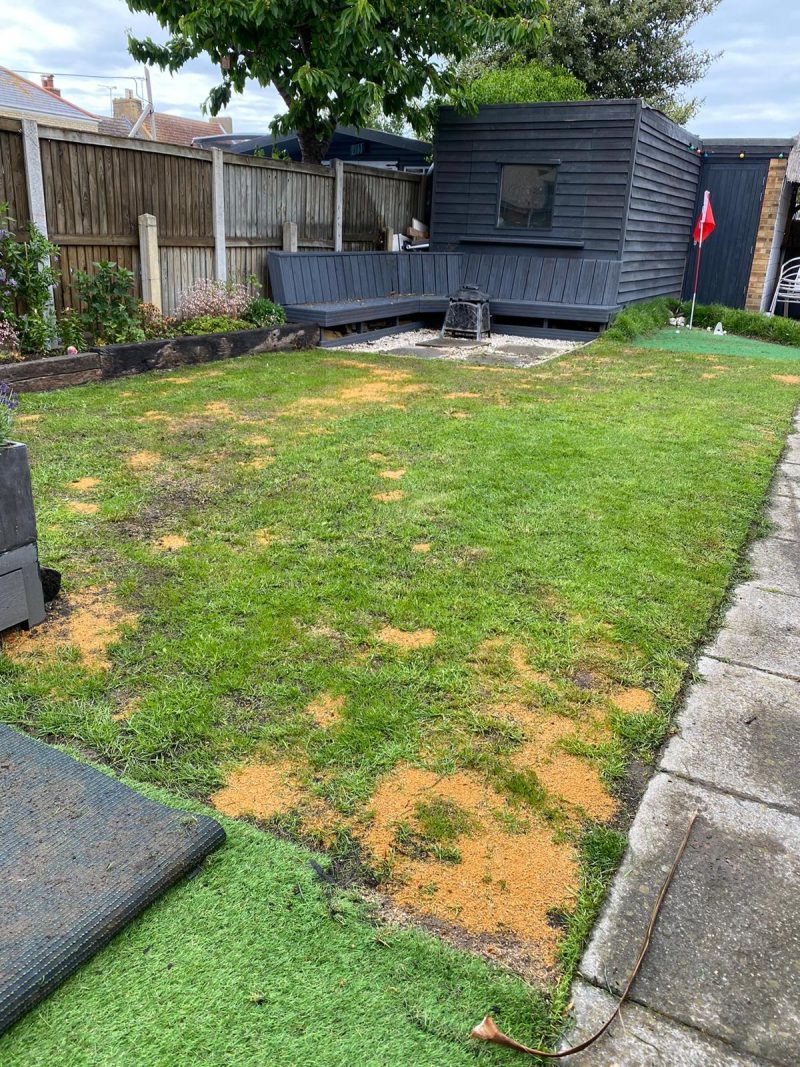
Depending on how finicky you are, you may want to repeat this step adding sand and rolling after a cut. As you can see, the second time round I had far less visible patches and a far more level lawn 🙂 Here’s a look at the second attempt, as you can see, much less sand in view as it’s far more level.
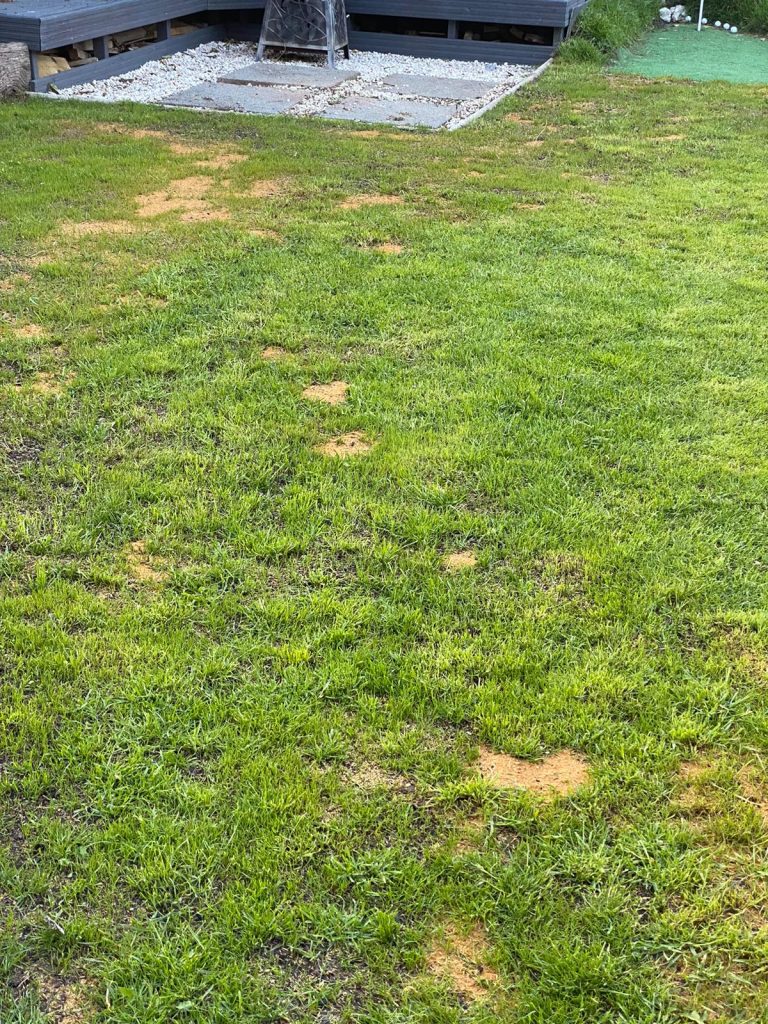
Once I was happy with the levels I turned my attention to making my lawn look as lush and green as I could. Take a look at this close up:
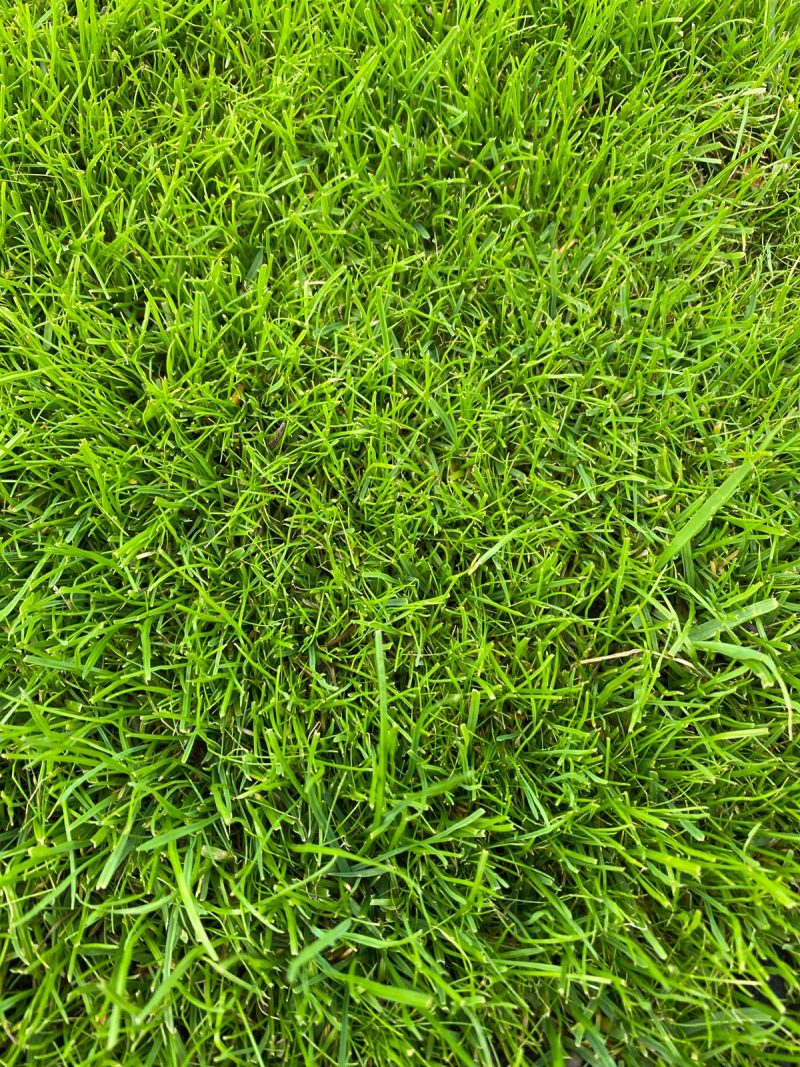
Yes that really is the lawn we are documenting!
How your lawn will turn out if you follow my guide to levelling and starting a lawn from scratch
A few months in and good care will result in a lovely looking lawn that the family can enjoy. I must say I am super pleased with the stripe being just about visible.
Look after the lawn well and you’ll never go through this intense process again, honesty it was so challenging being locked down looking after the lawn. Actually the truth is the hardest part was avoiding staring at my beautiful new lawn 🙂