You only need to take a quick look around the neighbourhood to see that garden bars have become incredibly popular in recent years, and with good reason.You only need basic to moderate DIY skills to actually be able to build a garden bar, and it’s very possible to make a decent one that’ll last for under four hundred pounds, but a lot will depend on the size of the garden bar, materials used, and other accessories.
What’s more, once you’ve built your basic structure for your garden bar, it’s really easy to add extensions, or extra features such as a bench seat to give it that personal touch. A garden bar acts as a wonderful focal point for your garden, as a conversation topic with friends, and is a simple way to turn an ordinary BBQ party into a memorable one.
So, what are you waiting for? Read on as we tell you exactly how to build a garden bar of your very own.
Before you start
Before doing anything, there are some decisions to be made. The main ones are: will you be using an existing shed or building a new one specifically for your garden bar?
For this build, we are using a reverse apex shed, which has the entrance at the side of the shed, rather than the front, and we are building it from scratch along with the rest of the structure. If you decide to use your existing shed, or if you use a shed with the entrance at the front, you’re going to have to use your brain a little and adjust our instructions to suit.
The second thing you need to decide is whether you will go with a permanent base made of concrete, or a wooden base that you can remove later, if you wish to. Permanent bases will offer you more stability, but, well, they’re permanent so you’d better be happy with it. On the other hand, a wooden base can be dismantled and removed in the future, and if built right, can be more than stable and strong enough for the purpose it’s intended for, and that’s why we chose that one for this article.
Let’s say you are going to build the shed along with the rest of the garden bar. You need to get out your best tape measure and take it to the intended spot in your garden where the build will take place. Take plenty of measurements, and write them down, and also make sure you plan to have enough space for the decking area around the garden bar. When you’re happy that the area is big enough, you can start to assemble your materials and tools.
What you will need
Materials:
- Garden decking joists (get beams large enough to be cut down to the complete length of your base, and make sure you have enough for your base and also a few extra that you will cut down to smaller sizes when building other parts of the garden bar).
- 25mm plywood sheets
- Railings and spindles for your decking
- Plenty of decking boards cut to at least 4 metres
- A shed kit
Tools:
- A good combi drill
- Assorted screws ranging from 4.0x40mm to 5.0x100mm
- Nail gun
- Tape measure
- Spirit level
- Mitre saw
- Hinges
- Safety equipment: goggles, gloves, etc.
- Man power: Get one or two people to lend a hand as this isn’t a one man show.
How to build the wooden base for garden bar
Now that you have your measurements for the dimensions of your garden bar, and you’ve gathered the necessary materials and tools, we can get started making the base.

Cut down four of the decking joists exactly to your measurements for the outer frame of your base and lay them on the ground to get a good idea of where everything should go.
Next, cut some more beams to run across the inside of the frame and act as inner joists and place them on the ground inside the outer frame, running lengthwise, and spaced equally apart.
We used just four inner joists for our base, which was perfect for the 2×2.5 metre shed we were going to build, but if you have a larger shed and base in mind, you’ll probably need to use more.
Once you’re happy everything is cut to the right size and will fit together properly, you can screw it all together. Start by drilling holes for the screws in all of the beams, then connect the outer beams before doing the same with the inner joists.
It should go without saying that you should be checking that everything is level at every stage of building your garden bar, so don’t be shy with that spirit level. The last thing you want is a garden bar that looks like it’s had more drinks than you!
Building the shed for your garden bar
Again, we are going to start with building from the ground up. Decide where on the base your shed will go and place the floor down on top of your base beams. It is important to check everything is level again, and also to leave enough room for your decking area, and that the decking boards won’t overlap your shed when they are laid down later. This is important and will prevent a lot of bother so use the tape measure and make sure. Screw the floor down and then it’s time to move onto erecting the sides of the shed.
This part is fairly straightforward. With your trusty assistant’s help, lift the walls and line them up, ensuring that there’s a bit of an overlap at the bottom so that rainwater can run off the roof onto the ground and not onto the base. Drill the appropriate holes and then use 50mm screws to fix the walls to each other and also the floor and base.
To keep the walls from spreading, and to add more structural stability, you now need to fit in a ridge bar. Grab some L-brackets and some 20mm screw and fit the ridge bar so that it connects to the two gables of the shed, sitting flush with the points of both of them.
Up next, is the eave frames which will help to direct water away from the structure once they are screwed into the roof sheets that come with your shed kit. Fix these frames onto each of the roof sheets and then attach the sheets to the top of the shed using 40mm screws. The top part of the sheets will be screwed into the ridge bar that you connected to the gables earlier.
You should now have something resembling a shed structure and it’s time to lay down the roof felt included in the shed pack. Cut the felt sheet into three smaller sheets. One sheet for each side of the angled roof, and a third piece to go over the centre of it. Again, you want to have a little bit of material hanging over the walls for water run-off.
To finish off the shed, you should attach the cover trims from your shed pack to secure the felt in place.
How to build decking for your garden bar
So, your shed is sitting nicely on top of your solid, wooden base and you can’t wait to get cracking with the decking. But first, it’s time to crack out that spirit level again to do some more checking. While building the shed, something might have been misaligned so this is a vital step before laying decking.
Another vital step is to grab your tape measure and recheck the sizes that you need for cutting your decking boards. Doing this will save you time and headaches later. If you’re happy with everything, and the boards have been cut to the right sizes, then go ahead and screw them down to the base. You should use 50mm screws for this.
With the decking in place you’ll want to build some handrails next, and rails need some solid support, so cut two pieces from one of the large beams that each measure a metre long. These are going to be your newel posts, and you’ll be fixing them to the front of your shed base, one at each end, on the outer corners.
Once these are in place, measure from the top of the decking to the top of the newel posts and then cut two more lengths of beam to this size. These will be the half newel posts and will be fixed to the shed wall and of course the decking.
What you will have now are two pairs of newel posts at either end of your decking that you can fix your railings onto. Take your measurements, cut the railings and then fix them in place.
To finish off the railings, all you need to do is to screw the spindles into the railings. The most important thing is to make sure these are spaced evenly apart or it will spoil the look of your beautiful new garden bar.
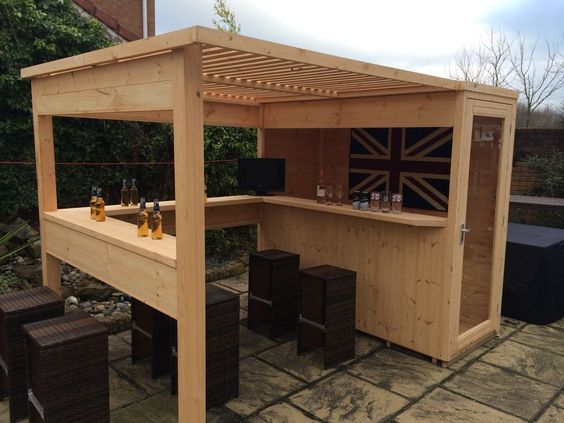
How to build a garden bar
The next step is to build the frame that your bar counter will sit on. For this you’re going to have to cut some more lengths of the large beam we used for the decking and newel posts. It’s measuring time again, so grab your tape and work out how high you want your bar to be and cut a beam to this length before fixing it to the inner shed wall next to the door.
Now you want to work out how long your bar will be, remembering that you’ll need a space to walk behind the bar, so don’t make it all the way to the back wall unless you want to jump over the bar every five minutes.
With this measurement worked out, cut another length of beam and fix it to the first beam, then use yet another beam to connect this horizontal piece to the floor of the shed. All the time checking everything with the spirit level.
Measure the inner space between the two vertical beams and cut another piece of the same material to act as a support for the bar frame, and screw it into the middle of the frame. With that done, a little more use of the tape measure is needed to work out the length of beam you’ll need to cut to fit between the front beam and the back of the shed. Once this is cut, screw in into the floor running against the side wall of the shed.
It’s measuring time again, this time you need to know how long to cut a piece of beam so that it can sit on top of the one you just screwed to the floor and be the same height as the front frame of the bar. Once your timber is cut, screw it into place next to the front of the frame, and then measure, cut, and fix yet another beam that will run along the side but at the top of the frame.
You should now have a suitable frame for your bar area, so the next step is to add the cladding. You can use anything you like for this, planks of wood, leftover decking boards, they all work fine. Cut them too small and then fix them into place on the bar frame using screws or a nail gun.
How to make the counter for your garden bar
Not much left to do now, but don’t slack off just yet, you’ve got to earn that first beer in your very own garden bar. Gab your sheet of plywood, tape measure, and handsaw, and cut two pieces to fit on the bar frame you’ve just finished making. If you want a bar that overlaps the window of the shed, you’ll need to make measurements for this, and while it will look so much better, it is not essential.
Place the counter pieces onto the top of the bar frame, get them lined up nicely, and then screw them down. This is your basic bar finished, but if you feel you need extra support, you could always add more support beams or screw some blocks in place under the weaker parts of the counter, connected to the frame beams.
And there you have it, your very own garden bar! All that’s left to do now is decorate it how you like, maybe add a shelf in there for your glasses and bottles, or brackets for a TV to watch the footy on.
Some stools or a set of garden furniture to fit out on the decking is always a good idea too, just be sure of the dimensions of the furniture before you buy it.
If you’re going to have power running to your garden bar for lighting, Tv, etc. be sure to get a professional electrician to come and do it for you, electricity is not something to be played around with, no matter how skilled you are feeling after building your own garden bar.
We’d like to thank SGS engineering for the basis of this article. They have a slightly more complicated version of this very shed on their website that we simplified for this article.