Planting bulbs is one of the best ways to add a burst of colour to your garden come springtime. The thing is, this reward doesn’t come without a fair bit of elbow grease first. Planting bulbs can be quite a labor-intensive task, especially if you go at it the old fashion way with a simple spade, and it is all too easy to get the planting depths wrong.
To help make planting bulbs less of a chore, and to ensure that you are getting your depths right, you can always use a bulb planter. This is a tool that takes away a lot of the guesswork, and can substantially reduce the amount of time and effort required to get the job done. With a few variations available to you, you might wonder which one would suit you best, so we have decided to highlight them here for you.
What does a bulb planter do?
It is recommended that bulbs are planted 2-3 deeper than times their width for optimal results, and as most bulb planters have some kind of gauge on thee side, using such a tool makes planting bulbs uniformly so much easier, and also allows you to do so more accurately. Bulb planters can also make things a little easier when it comes to the actual digging part too, as you don’t have to dig up the whole bed or make a large trench. These tools make small holes, at just the right depth for you to pop your bulbs in.
Types of bulb planter
There are four main types of bulb planter: short handled, long handled, spring loaded, and drill powered. Below you will find a quick explanation of each one.
Short handled bulb planter
If you’re not planning on planting more than a handful of bulbs, you can easily make do with a short-handled bulb planter. Of course, being short handled means that you’ll either have to bend down to use it, or as I would recommend, get a kneeler or something comfortable like a folded up, old towel to kneel down on. These types of bulb planter can be made from a variety of materials and so the prices might vary, but they are generally inexpensive, and also easy to use.
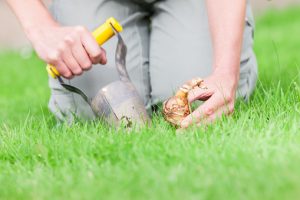
You simply place the tool over the desired spot, push down on the handle until the cylinder sinks into the soil, twist the handle clockwise, and then again, a few times in the opposite (anti-clockwise) direction before pulling the tool out, along with a small chunk of soil.
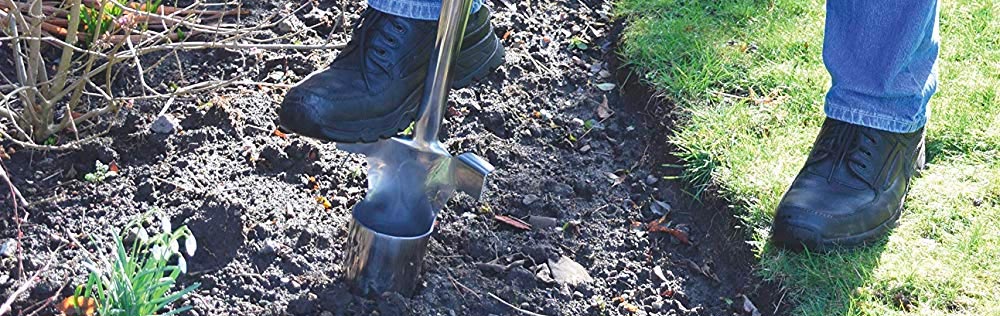
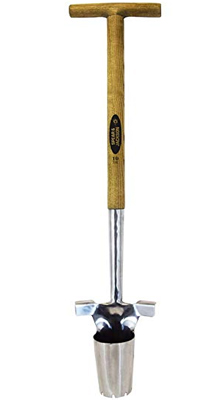
Long handled bulb planter
These can be more expensive than their short-handled counterparts, but if you have back problems, or simply just don’t like kneeling or bending down too much, it’s worth paying the extra for one of these. This type of bulb planter’s handle usually resembles a garden spade in length and design, but the head of the tool is a cone, more often than not made from metal, with a footrest that you can use to step on and sink the tool into the soil.
Apart from the length of the handle and footrest, these bulb planters work in much the same way as a short-handled version, and require you to twist the tool to break up the soil so you can remove some and make your desired hole. If you are going to buy a long handled bulb planter, it is my advice to spend a bit more and get a good quality one, preferably with a strong metal handle, or at least a solid wooden one. Cheap wooden handles, like many of the products coming from China these days, can break easily, leaving the tool useless.
Another helpful feature on some of these products is a release plunger. This can really speed things up as you simply pull the tool out, place a bulb in the hole, and then release the plunger to put the soil back into the hole where it came from.
Spring loaded bulb planter
These are very similar to short-handled bulb planters, but with a small twist. You insert them into the ground in the same way as a short-handled bulb planter, and pull out the soil in the same fashion, however spring loaded bulb planters have a handle that can be squeezed, and this in turn opens up the cone of the tool, dropping the soil back into the hole. This action does require a fair bit of hand strength, and you will still be either on your knees or stooped over, so wouldn’t recommend these only for fitter individuals, or those who don’t have a lot of bulbs to plant. Having said that, they are inexpensive, and work really well.
Drill powered bulb planter
If you have quite a lot of bulbs to plant, and you want to get the job done quickly, with the minimum amount of physical exertion, a drill powered bulb planter might be for you. Please be aware that you will need to own a power drill, or be willing to buy or borrow one, as these are basically bulb planter shaped drill bits that you attach to the power tool.
If you have densely packed clay soil, I wouldn’t use a drill powered bulb planter, but for other types of soil, these planters can really help to speed things up. With drill powered bulb planters, you will have to cover the bulbs and holes you’ve made by hand afterwards as these tools don’t hold the soil ready to be released like spring loaded, or some long-handed models. If you already own a power drill, these attachments can actually be fairly cheap, but if you have to go out and buy a drill, you have to factor that cost into it and decide whether it’s worth it or not.
Using a bulb planter- tips
Whichever of these bulb planters you decide to go with, things will go much more smoothly and quickly if you enlist the help of a family member or friend to pop the bulbs into the holes as you make them. This is a pretty easy to task for someone to do, but it really does make a difference when it comes to how much time is taken on the overall task.
Also, I always try to spend more on my garden tools, as I find that it saves me money in the long run. You don’t have to spend a fortune, but try to avoid the budget tools as costs have to be cut somewhere, even if it isn’t obvious at first. Often, cheaper tools have been made with materials that aren’t that durable, or have been riveted in places where welds would be much better. This inevitably leads to things like handles snapping, or the tool getting warped out of shape and becoming useless.
Shelling out a little more initially will save you headaches, frustration, and ultimately money, as you won’t have to buy replacements within a few months. Always wear appropriate safety gear when using tools. For the hand powered varieties of bulb planter, you should definitely have a good pair of gloves as all that twisting is bound to cause friction and blisters without them. For the drill powered bulb planter, you’ll need safety gloves as that attachment spins at some speed, and also safety glasses so you don’t end up with an eyeball full of soil.
If you only have very small bulbs to plant, using a tool like the ones described above might be a bit of overkill, and you can probably just get away with using a narrow trowel or soil knife. You’ll have to estimate the depth of the hole you’re making though, as most trowels and soil knives don’t have measurements on them like a lot of bulb planters do.