Soil is rarely free of debris. Stones, old twigs, and all sorts of things somehow end up embedded in our beds and this can make growing difficult for the things we plant in there. With this in mind, we ideally should be working with soil that is as debris-free as possible, and one of the best ways to ensure that, is to use a soil sieve.
Now, before you rush out to buy one, you should read this article on how to make a soil sieve, and you just might save yourself a trip to the shop, and also a few pennies in the process. Making your own soil sieve is a fairly simple project, and one can be completed with minimal materials and DIY experience. So, read on to find out exactly how to make a soil sieve, the easy way.
What exactly is a soil sieve?
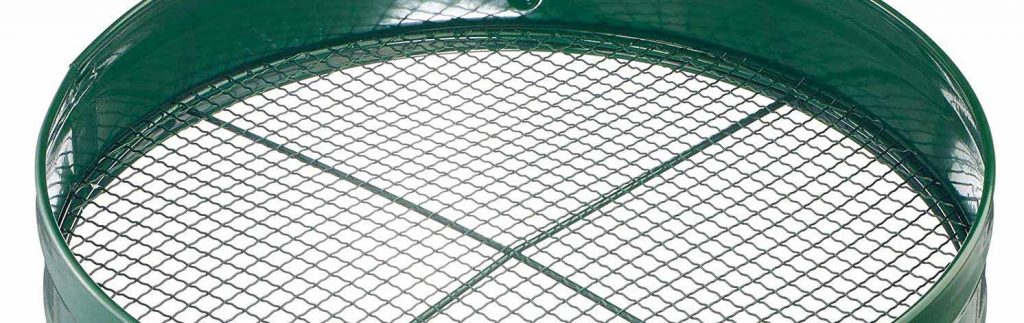
A soil sieve, sometimes known as a soil sifter, is a simple tool that allows you to quickly separate the soil from the unwanted rocks, bits of plastic, etc. For most people’s home use, a simple version made up of a few bits of timber and some wire mesh will do just fine, but if you are thinking of sieving a very large amount of soil, you might be better off buying an electric model.
These tools are not only good for sifting soil, they can also be used for clearing clumps out of your compost, but to do this, the wire mesh that you use will have to be made in a tighter pattern, with smaller holes.
How to make a soil sieve: what you will need
- Timber. It doesn’t really have to be a specific size or thickness, but 25 x 50mm is often used by people making their own soil sieve. Make sure you buy enough to cut up into all the pieces you will need to build the soil sieve. (see the step by step guide for this)
- Wire mesh. This is available with different size holes, but 1cm is just fine for using with soil, and will probably be ok for compost too.
- Tape measure
- Saw
- Screwdriver
- Screws
- Sandpaper
- Wood stain
- Paintbrush
How to make a soil sieve: step by step
Follow these simple steps and you will soon be holding your homemade soil sieve in your hands.
-
Make your measurements
Grab your tape measure and go over to your wheelbarrow. Measure the length and width of the barrow, and then add a few cm to these measurements so that when your finished soil sieve is placed over it, it will overhang a little.
-
Cut your timber
Now you have your measurements, you can cut the timber and mesh to size. You are going to be sandwiching your mesh between two rectangular frames, so you’ll need to cut the eight pieces of timber to make those frames.
-
Sand the wood smooth
You’re going to be spending a fair old bit of time holding this soil sieve in your hands, so it’s best to spend a lot of time with some sandpaper making everything smooth.
-
Treat the wood
To make sure your DIY soil sieve lasts, you should treat the wood. Take your paintbrush and wood stain and coat all of the timber and leave it to dry. You can also paint the wood if you choose to, but I prefer using wood stain.
-
Build the frames
Using your screwdriver and screws, fix the eight pieces of timber together so that you have 2 rectangles of the same dimensions.
You can use a hand driver for this or a power tool to speed things up, and I always drill pilot holes before I screw any timber together to avoid any splitting and keep things neat and tidy. -
Final steps
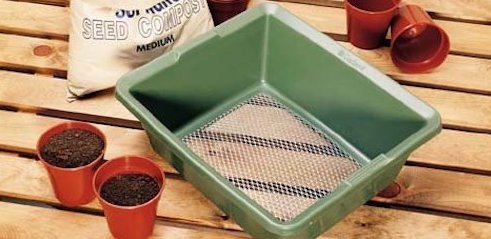
Lay one of the rectangular frames on the floor or any other flat surface. Next, place the mesh over the frame and line it up properly. You can choose to move onto the next step, or you can use a good staple gun to fix the mesh in place. Finally, place the second frame over the mesh.
wood sieve
All you need to do now is screw these frames together, trapping the mesh between them, and you have your basic soil sieve.
How to make a soil sieve: Extra Ideas
If you are a little more skilled at DIY, you can make a more advanced soil sieve than the one we described above. One particular idea is to build 2 rectangular frames the same width, but make one shorter in length than the other. You then cut two groves in the longer pieces of timber to act as runners, and fix caster wheels onto the smaller frame.
The smaller frame will have the mesh attached to it, and then slide back and forth on its wheels along the groves of the larger frame, which will sit below it, on top of the wheelbarrow. Although this design is quite a bit more complicated than the simple one we showed above, it will save you a lot of manual labor in the long run, so if you’ve got the DIY skills, why not give it a try?
That brings this article to an end. Soil sieves are a really simple, yet extremely handy tool, and clearing your soil of debris, or compost of clumps, can really make a difference in how well your plants grow. All you have to do is spend an hour or so following our instructions as you go, and you can make your own soil sieve.
If you enjoyed this article and found it useful, then why not spend a bit of time browsing this website? We have packed it full of gardening tips and knowhow, DIY projects to improve your garden, and also reviewed the tools and other equipment needed to do that. Here at garden toolbox, we take pride in bringing you the best, and most comprehensive gardening site possible.