
If you’ve thought about adding a garden bench to your outdoor room, you’ve probably taken a trip down to the garden centre and then being more than a little shocked at how much they are asking for one.
Now, if assembly is taken care of as well as delivery by the seller, it might be worth considering, but if you’ve got a few basic tools, an ounce of common sense, and know how to read some simple instructions, you could save yourself a lot of money by building your own.
While the high prices attached to some of the garden benches in shops might give you the illusion that they are complicated and hard to build, the truth is that you can put one together within half a day and it will look just as good, and last just as long, for a fraction of the cost.
There are hundreds if not thousands of designs and pans for garden benches online, but after looking through a load, most seemed a little bit too complicated for the beginner, so we thought we’d do our own step-by-step guide on how to make a garden bench.
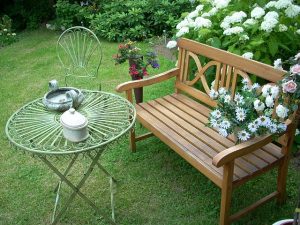
The type of garden bench you will be making will certainly be familiar to you if you’re from the UK, as they are seen in the vast majority of pub beer gardens across the land. So, not only will you get a double bench, you’ll also have a tabletop to rest your food and drinks on too.
Let’s get started, shall we?
Making a garden bench- What you’ll need
Tools:
- Tape measure
- Pencil (square one is better for woodwork)
- Handsaw or circular saw
- Mitre saw (optional)
- Screwdriver
- Sand paper
- 45mm exterior screws x 120
- 60mm exterior screws x 30
Materials
- Screws (make sure they match the screwdriver head)
- 2m of 45mm timber (pressure treated) x 2 lengths
- 2m of decking x 14 lengths
*You will also need a workbench or some other flat surface to work on.
How to make a garden bench – the table top
Once you’ve gathered the necessary materials and got your tools ready, we can begin by cutting some of the decking lengths to size to build our table top later.
You’ll need to cut four of the 2m decking lengths down to 1.5 metres, making sure the cut is a perfect 90 degrees.
The easiest way to ensure this, is to line up the handle of your handsaw with the longer side of the decking length and then draw a pencil line perpendicular to it using the back of the saw blade as a guide.
Cut the decking to size then grab your sandpaper and smooth off the sawed edges. When this is done, write a ‘T.T’ or something similar on the underside of them in pencil so you’ll know what they’re for later, and then set them aside.
When cutting all of these lengths and the following ones, make sure you save all the off cuts as we’ll be making use of them later.
How to Make a Garden Gate
How to Build a Simple Playhouse
How to restore garden furniture (wooden) and wrought iron
How to make a garden bench – bench seats and legs
Following the same instructions as above, mark off four more lengths of decking, but this time a bit shorter at 1.2 metres.
As before, sand them nice and smooth, mark them as bench seats, and put them out of the way for now.
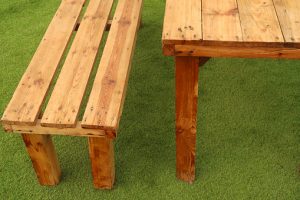
Next, it’s time to move on to cutting the bench legs, and for this you’re going to use some more of the decking but cut to 90cm lengths. You’ll need four pieces at this size.
Once you have your four pieces, we need to cut 45-degree angles into the ends. If you look at the handle of your hand saw again, you’ll notice that there is actually a 45 degree angle guide right there for you, and you just need to line up the handle so that the back of the blade lines up, and draw a line, just like you did with the 90 degree angle earlier.
You have to cut this same angle at both ends of all four 90cm pieces, and it is vital that the angle, and direction of the angle is the same at both ends, and not angled out opposite to each other. If done right they’ll resemble parallelograms in shape.
Finish off these pieces with the sandpaper and mark and store them.
How to make a garden bench – bench supports
The bench supports will also be cut from the decking (how convenient eh?), only this time you’ll end up with two 140cm long pieces.
These pieces also need 45-degree angles cutting in the ends of them, but this time the two ends will be cut in opposite directions. If done correctly, the shape of the lengths will resemble an upside down, elongated, trapezoid.
As with all the other pieces, sand the rough parts off and set aside.
Best wood knotting
Best wood preserver to keep your joinery rot free
Best wood stain
Best shed and fence stain for woodwork
Best furniture and decking stain for woodwork
How to make a garden bench – putting it all together
With the majority of the pieces now cut, it’s time to construct your garden bench.

Let’s start by taking the bench supports and laying them down so that the longer side (the one that measures 1.4m) is at the top, pointing skywards.
Then take one of the bench seats you cut earlier and place it across the two supports so that it overlaps them by 60mm at both ends. Once you’ve measured this, and are satisfied it’s correct, screw the bench seat piece in place using a couple of the screws on each end.
Now grab another 1.2m length and follow the same process at the other end of the bench supports. What you should now have is a 120cmx140cm almost shape made up of the supports and bench seats.
The last part of constructing the bench seats, is to screw in the remaining 1.2m lengths next to the others, using a screw as a spacer, so that you end up with two 1.2m pieces at either end of the supports.
Basically, if you put legs on this structure, you would have two separate long benches to sit on, connected by the supports, so let’s get those legs on.
Place two the legs so that they are angles in towards each other creating an A shape. Now do this for the other two legs.
The bench seats you just constructed will be screwed into the legs 27cm from the base of them. Use at least two screws on each leg to do this, and make sure that the bench is level across the A frame of the legs on both sides.
What you will now have is a structure consisting of two benches, and two A-frames that you can now sit your tabletop upon.
But before you go ahead and screw the top on, you’d better take some of those off-cuts from earlier and make some supports for the table.
Cut a piece that will be screwed into the tops of the A-frames (tops of the legs) to create more support, and do the same for the other side too. If you want more support, you can measure from the bottom centre of the table top out to the bench supports and cut a couple of pieces to be screwed in there.
Now, you just have to screw your table top pieces in place, and your garden bench is done. Time to grab a cold one and get comfortable on your little masterpiece.
We would like to thank you for taking the time to read this little how to article and also to thank xs-stock.co.uk for the inspiration to build our own garden bench.
We really hope that this article was of some use to you, and that you are now enjoying the fruits of your labour, just like we are. If you are interested in building other things like garden mirrors, garden sheds, and many other things, please spend a moment and browse the rest of this site.