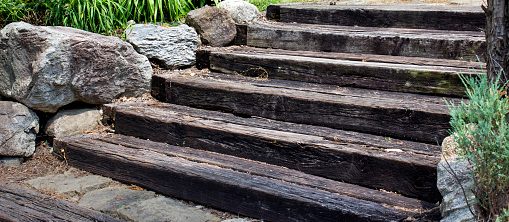
Timber sleepers, also known as railway sleepers, can be used to create simple, yet strong, garden steps that have a contemporary aesthetic and will look good as a part of any type of garden. It doesn’t matter whether you just want to have a couple of steps that separate different ‘zones’ in your garden, or if you have a large hill that you’d like to make more interesting to look at, and much easier to walk up; building garden steps with sleepers is a DIY project that is in the reach of anyone able bodied enough to wield a spade. Having said that, we suggest that you get at least one more person to help you with this project, as the sleepers can be quite heavy, even the smaller ones.
This article has been kept simple on purpose, but if you feel that you can modify the plan in your own way, then please be our guest. With a little imagination, you can create some incredible things with timber sleepers, and not just steps either. The internet is full of photos of other people’s DIY projects with railway sleepers, and they can act as good inspiration for your own ideas.
How to build garden steps with sleepers: Planning and preparation.
First things first, you have to decide on what your garden steps are going to look like, and one of the main parts of this is knowing how many steps you’ll need. Let’s say you are going to build sleeper steps all the way up your garden slope. Well, before anything else you need to know what are the basic dimensions of the hill: the rise and the run.
The rise is just how tall the top of the hill is when measured from the bottom, and the run is how far it is horizontally from the bottom. You can work this out quite quickly by using a couple of long sticks, a length of string, a spirit level, and a tape measure. One of the sticks gets dug into the ground at the top, the other at the bottom. The length of string is then tied to both of these and then adjusted and checked with the spirit level until it is properly horizontal. After this, you just measure from the ground level up to the string on the bottom stick for the rise, and across to the other stick for the run. With these measurements you can easily work out how many steps you are likely to need, which will reduce waste later on.
Please bear in mind how wide your steps will be, how high each step, and also how long the horizontal parts are to be. The absolute tallest you want the vertical parts is 15cm, but the horizontal tread parts don’t have to be any specific measurement. However, the step will look better if they are fairly uniform.
Decide on what you will be filling the horizontal treads with. Are you going for soil and grass? Looks nice, but can make negotiating the steps a bit messy in wet parts of the year. Going with gravel, stones, or even paving stones can look fantastic, as can using wood chippings, but weeds can grow through these materials so it’s best to lay down some landscaping fabric underneath.
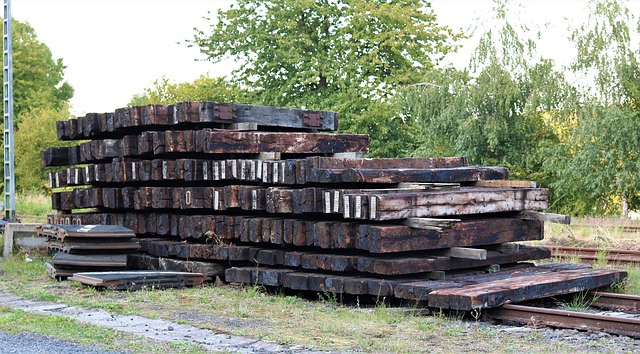
Next is deciding on a material for your sleeper garden steps. Pine is commonly used because it is the cheaper alternative, but if you can afford it, go with oak. Oak won’t rot due to contact with the ground as quickly as pine will, and in my opinion, it looks better too.
You should buy treated wood if possible, and if not, grab a paint brush and treat it yourself. This will slow down the rotting process which will naturally happen over time due to exposure to the elements.
Before digging anywhere, call the utilities companies, council, or whoever, to find out if there are any important pipes, cables, etc. buried under the area you intend to excavate. The chances of you hitting something might not be that high, so you might be tempted to skip this part, but if you are one of the unlucky ones, this can become very expensive, inconvenient, and time consuming. To sort out, and building garden steps with sleepers will be the last thing on your mind then.
How to build garden steps with sleepers
It’s time to start digging. While constantly checking your measurements with your original plan, plus a tape measure, dig out the basic shape into your garden slope. By digging you will soon get an idea of how the soil is, and this will determine your next move. If you find that the soil comes away very easily, and feels a bit too soft, you are probably going to have to mix some cement and use it to hold the sleepers in place. On the other hand, if the soil feels quite solid, you can take the easier route and just use wooden stakes to hold the sleepers.
If you choose to go with the more reliable cement idea, your trench for each sleeper needs to be larger than the sleeper itself, with a particularly larger space behind the sleeper. This is to help you move around and work. It also needs to be dug in a way that allows for some of the cement to get under the back of the sleeper. The cement should be about 8cm deep. Pour the concrete into the trench, lay it into a bed, and then add the sleeper in. next pour more cement in behind the sleeper, checking that everything is level as you go.
If you’re confident that a wooden stake stuck in the ground is enough to support the steps, all you need to do is dig your trenches with enough extra space for your wooden stakes to sit behind the sleepers, and for you to get in there to attach them. Use a thick piece of wood for the stake, and make sure it’s a minimum of a foot and a half long, as you’ll want to stick it firmly and deeply into the ground and still have a good amount to fix onto the sleeper.
You don’t, however, want the stake to be higher than the sleeper, so work out the measurements that keep the stake a few inches lower than the sleeper once it’ll be planted in the ground behind it. The reason for this is that it gives you a few inches of whatever material you use to fill the horizontal treads on top of the stakes, so they don’t protrude and affect how level you can make the tread.
Whichever of the above methods you use, once your sleepers are in place, there are just a couple of steps to go. The first is filling the treads with whatever medium you decided upon: soil and turf, shingle, chippings, etc. Make sure everything is compacted down nicely and that all is levelled off.
The final step, which many forget, is to use coarse grit and some adhesive to give the edges of the sleepers more grip when they get wet. You might be surprised how slippery they can be in the rain, so this is a small, but very important detail.
That’s all from us for today. Enjoy showing off your new garden steps made from sleepers with your very own hands. If this has sparked something in you, and you’d like to try your hand at some other DIY gardening projects, then check out the rest of this site where you will find tons of ‘how to’ articles, as well as gardening and growing tips, and honest product reviews of the latest tools and accessories for your garden.